Você está no 3DFinder
Buscamos em Thingiverse, MakerWorld e Printables ao mesmo tempo para te dar o melhor de cada uma.
Descrição
Tired of that massive Member's Mark Food Service Film box taking over your kitchen counter? I designed this sleek, low-profile wall mount to get the box off the counter and free up valuable workspace. This mount is custom-designed to hold the 18in x 3000ft roll (spool length 470mm) sold at Sam's Club, but it could be adapted for other large rolls.
It features an integrated 3-piece cutter for easy dispensing and a simple slide-in, slide-out system for replacing empty rolls. My kitchen feels so much cleaner and more organized now, and I hope yours will too!
Key Features:
- Reclaim Your Counter: Gets the huge, bulky box out of your kitchen workspace.
- Custom Designed: Perfectly fits the Member's Mark 18in x 3000ft Food Service Film roll.
- Integrated Cutter: Three slide-in blades provide a clean, easy way to cut the plastic wrap.
- Easy Roll Changes: The two-piece spool holders allow you to simply lift the empty roll out and slide a new one in without any disassembly.
- Sturdy Wall Mount: Attaches securely to the wall with screws.
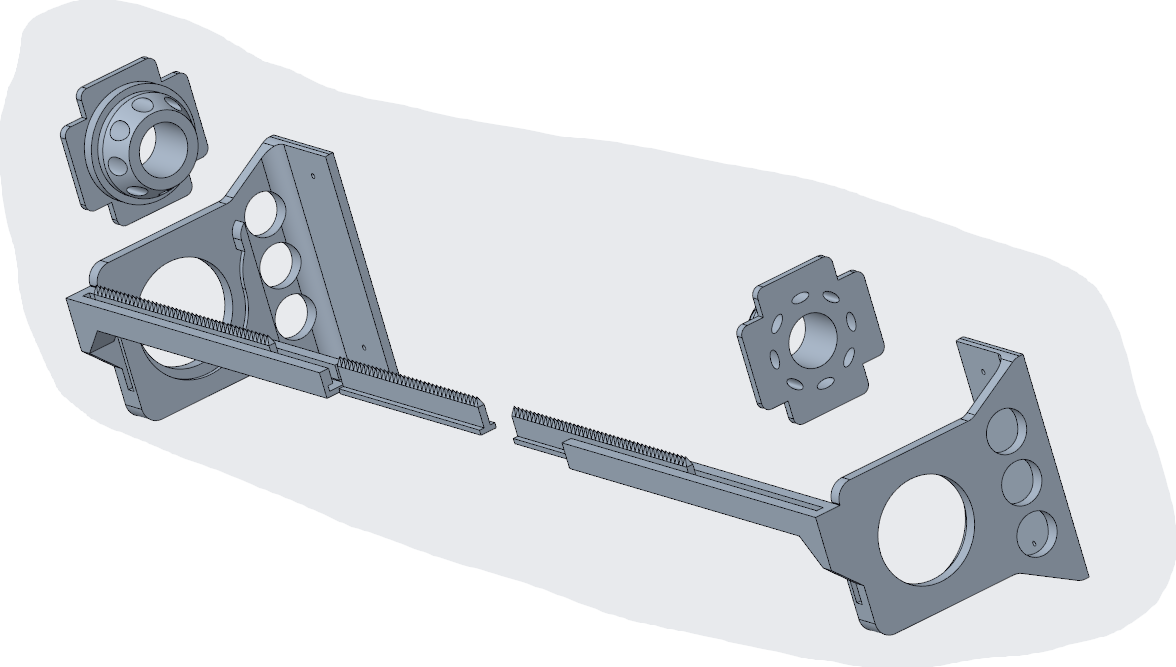
Parts List:
You will need to print the following files. The filenames indicate which part it is, and the quantities below tell you how many of each to print.
- `saran_wall_mount_left` (Print one)
- `saran_wall_mount_right` (Print one)
- `saran_spool_holder_x2` (Print two)
- `saran_cutter_x2` (Print two - these are the outer blades)
- `saran_cutter_middle` (Print one - this is the shorter, middle blade)
Hardware Required:
- You will need screws appropriate for your wall type (e.g., wood screws for studs, drywall anchors with screws for drywall).
Printing Instructions:
I printed all parts successfully using standard PLA with the default settings from my slicer.
- Material: Standard PLA
- Layer Height: 0.2mm
- Infill: 15%
- Supports: Supports are needed for the `saran_wall_mount_left` and `saran_wall_mount_right` files. The other parts should print support-free depending on their orientation.
Note on Durability (Optional): If you are concerned about the weight of the heavy roll over a long period, you could consider using a stronger material like PETG or increasing the infill on the wall mounts to 25% or more for extra peace of mind.
Assembly & Installation Guide:
- Print all parts according to the parts list and settings above.
- Clean up the prints and remove all support material from the wall mounts.
- Insert the Cutter Blades: Carefully slide the two parts printed from `saran_cutter_x2` into the leftmost and rightmost slots on the front of the mount. Then, slide the part from `saran_cutter_middle` into the center slot. They should be a snug fit.
- Mark Your Wall: Insert the two parts printed from `saran_spool_holder_x2` into the ends of your plastic wrap roll. Hold the entire assembly against the wall where you want to mount it and use a pencil to mark the screw hole locations for both the left and right mounts. Using the actual roll as a guide ensures perfect spacing!
- Mount to the Wall: Remove the roll. Securely attach the wall mounts to the wall using your chosen screws. Use a level to ensure they are straight.
- Install the Roll: Simply slide the plastic wrap roll (with the spool holders still in it) down into the vertical slots on the wall mounts.
To change the roll, just lift the empty one out and drop the new one in. Enjoy your newly organized kitchen!
About the Photos:
I have included several photos, including a 3D exploded view and step-by-step assembly pictures, to make putting this together as easy as possible.