Você está no 3DFinder
Buscamos em Thingiverse, MakerWorld e Printables ao mesmo tempo para te dar o melhor de cada uma.
Descrição
I liked this design very much and made some modifications according to my stuff. .step file is added in case you want to see how to build it and also you can modify it according to your needs.
Here are some videos:
https://youtu.be/Xr0DVECpsTc https://www.youtube.com/watch?v=vAGLoPGNZiI https://www.youtube.com/watch?v=NR8S0mub1dY https://youtu.be/K5DLwbwcBws https://www.youtube.com/watch?v=SNEAFIusrJM
- Controller Card: https://www.aliexpress.com/item/32913353887.html?spm=a2g0s.9042311.0.0.27424c4d04J94D
There are some modifications you should do when you get the nano board if you want to drive your steppers in 1/16 step mode and want to use it properly. Here is a good guide:
https://www.davidpilling.com/wiki/index.php/CNCShield
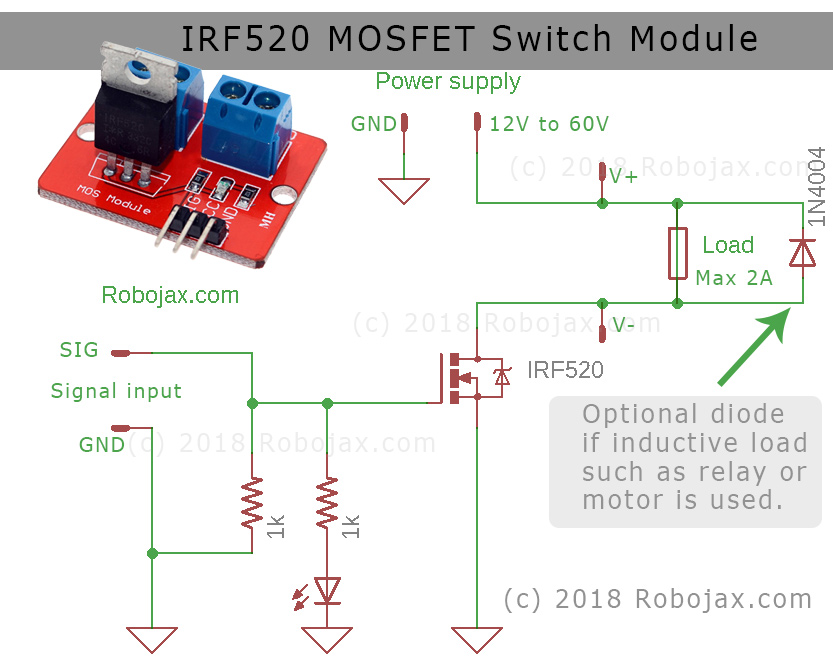
- IRF520 drive module: https://www.aliexpress.com/item/32850371349.html?spm=a2g0s.9042311.0.0.2fc54c4d0mbncR
*** Important: Do not forget to add flywheel diode (1N4004-1N4007) if you use the mosfet module to drive the solenoid (Look at pictures). IRF520 Schematic: http://robojax.com/learn/arduino/robojax-IRF520-MOSFET_schematic.jpg
-
Arduino Nano and 2x A4988 drivers
-
Solenoid: https://www.aliexpress.com/item/32974509060.html?spm=a2g0s.9042311.0.0.27424c4dV2xmWS
-
Min 12Pcs MR126ZZ (for auxiliary roller)
-
If you want to use an aluminum shaft coupler for X axis, here it is (5x6mm): https://s.click.aliexpress.com/e/1bgyoQG
-
2 Pcs LM4UU
-
2 Pcs LM6UU
-
2 Pcs 310x8mm (LxDia) screw
-
2 Pcs 282x6mm (LxDia) steel rod
-
1 Pcs 268x6mm (LxDia) steel rod (for auxiliary roller)
-
1 Pcs 277x6mm (LxDia) steel rod (for main roller)
-
1 Pcs 696ZZ (for main roller)
-
2 Pcs 42x4mm (LxDia) steel rod (for pen driver)
-
8 Pcs M8 Nuts
** For pusher_arms you need to make a hook from a wire (~1.5mm dia) and insert it to the hole in the arm and apply a little CA to hold it there (sample picture is added).
SOME NOTES: *** I have built this from salvaged parts from my old laser printer. Pictures are from these parts. But I have designed the alternative parts to publish here for these items (like main and auxiliary rollers). MR126ZZ was one of them and you can sandpaper the places on the 6mm rod and then apply CA to hold the bearings on place or just imagine :) Springs are also salvaged too. You can find appropriate springs from Aliexpress or some other things around you.
*** I have used my old xerox 6000 roller as main roller. But after plotting some graphics, I have realized that y axis was missing some steps and the lines were overlapping in y axis. I have controlled everything and at last I have changed the main roller with printed one and applied some grinding paper on roller plastic parts. Now no missing steps and no overlapping. I strictly advice you to not to use "soft" surfaced main rollers.
*** There are 4 of Pen_Mount piece. I have added these because 4mm shaft is needed to be more precise and everyone has different printing quality and options. So if you want the pen_mount piece to move freeley, you should print the appropriate one (trial and error). For example in Pen_Mount0.1mm, the axes are 0.1+0.1=0.2mm narrower, I have used this one BTW.

Gostou deste modelo? Crie uma conta grátis para salvar seus favoritos e voltar a eles depois.
Criar conta