Você está no 3DFinder
Buscamos em Thingiverse, MakerWorld e Printables ao mesmo tempo para te dar o melhor de cada uma.
Descrição
Hey,
Gridfinity is great, but for big projects they take a long time to print and use quite a bit of filament.
I designed these bins, that use empty toilet paper rolls to reduce both.
Other cardboard like cereal and frozen pizza boxes work as well.
The cardboard is simply press fitted into the 3D printed parts so no glue is required.
Print time and filament used is reduced by a lot compared to the standard Gridfinity bins.
This Project was first meant as a joke but got a lot of attenion on reddit.
You can find the discussion here:
OG-Post: [https://www.reddit.com/r/3Dprinting/comments/1crwgp8/shitfinity](https://www.reddit.com/r/3Dprinting/comments/1crwgp8/shitfinity)
Release-Post: [https://www.reddit.com/r/3Dprinting/comments/1cte0dv/shitfinity_released](https://www.reddit.com/r/3Dprinting/comments/1cte0dv/shitfinity_released)
Updates:
If there are any problems with the new files, feel free to contact me.
This will probably be the final revision of this project.
v4 → v4.1:
- Updated some wrong dimensions on the gridfinity lids.
v3 → v4 :
Now version 4 is online. This will have a few improvements compared to v3.:
- Gridfinity bins stack better.
- Gridfinty bins mesh better with the base plate
- Gridfinity bin base is easier to print
- Roughly same print times and filament used.
- The Basic bins and the template stayed the same.
- v3 can still be downloaded as zip in the “other files” section
Printing:
I printed these with a 0.4mm nozzle and 0.2mm Layer height.
No support needed.
The gridfinity base plates can be a bit tricky to print. If you have troubles with them, there exists an easy print version.
Models:
For a complete bin you need to print a pair of lid and base that have the same dimensions.
You also need the template to cut the cardboard into the right size.
Basic Bin
They have a lower print time and use less filament.
But they are not compatible with the Gridfinity base plates and are not stackable.
Gridfinity Bin:
These are compatible with Gridfinity but use more filament.
There are two variants of the base plate. The normal version prints faster but is a little bit more tricky to print. Your printer needs good bed adhesion and be able to bridge.
The “*_easy_print” files have larger contact area with the bed, but take longer to print and use up more filament. I'd recommend trying the normal base plate first and only use the “*_easy_print” files if your printer can't handle them.
Template:
This is used to mark where the cardboard needs to be cut. The different bin sized need differently spaced cutouts. The template contains marking holes for each bin size.
It allows different heights. These are also in Gridfinity units (7mm increments).
If you want to use a ruler instead. Here is the spacing of the holes:
| Template Hole | Spacing |
| 1x1 | 80 mm (3.14 inch) |
| 2x2 | 110mm (4.33 inch) |
| 1x2 | 120mm (4.7 inch) |
Template Small:
Small version of the template. Can only be used to mark the length of the cutouts.
You need to draw two parallel lines in the desired height yourself.
Other Variants:
I've got requests for different variants of the bins. I'll add the into this folder. Currently other variant contain:
- Gridfinity Magnetic Base: Gridfinity base variant with mounting holes for magnets.
Assembly:
Here is a small guide how to assemble the bins. It's a little bit tricky but when you get the hang of it, they assemble quite fast.
I would recommend starting with a 1x1 bin, because the smaller ones are easier to assemble than the bigger ones.
What you need for this example:
- 1x1 base (it doesn't matter if you use basic or gridfinity)
- 1x1 lid (it doesn't matter if you use basic or gridfinity)
- the template (if you use a ruler, use the dimensions from the model section)
- scissors or other means to cut the cardboard.
Step 1: Prepare the tube
If you use an empty toilet paper role, cut the tube in half and lay it down flat.
Step 2: Mark the size
Use the template to mark where the cardboard should be cut.
Depending on the container size you need a different holes on the template and a different amount of cardboard strips.
The template holes should be ladeled on the print.
| Size | Number Strips | Template Holes |
| 1x1 | 2 | 1x1 |
| 1x2 | 2 | 1x2 |
| 1x3 | 3 | 2x2 |
| 1x4 | 4 | 2x2 |
| 2x2 | 3 | 2x2 |
| 2x3 | 4 | 2x2 |
| 2x4 | 5 | 2x2 |
| 3x3 | 4 | 1x2 |
| 3x4 | 5 | 1x2 |
| 4x4 | 6 | 1x2 |
In this example a 1x1 container with 21 mm height is built, therefore 2 cardboard strips are needed.
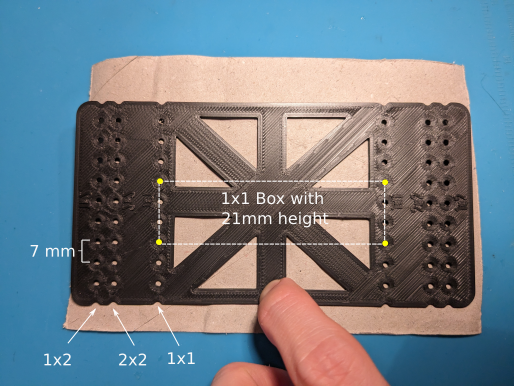
The yellow holes are marked using the template as shown in the picture to get the strips of the desired size.
Step 3: Cut
You can use the template as a ruler to connect the dots and start cutting out the shape.
Pro tip, the template is designed in a way that allows checking for squareness and 90° angles.
I'd recommend using a box cutter (for adults) or scissors (for kids) to cut the cardboard.
It's important to be precise here otherwise the assembly might not be as easy.
Step 4: Assembly Base
Start by assembling the cardboard strips into the base plate.
There are wider pockets in the walls where two strips will overlap.

Tuck on end of the cardboard strip into the pocket. Hold it down with your thumb like shown in the picture. This way it can't pop out again.
Keep holding it like this until the entry strip is press fitted.
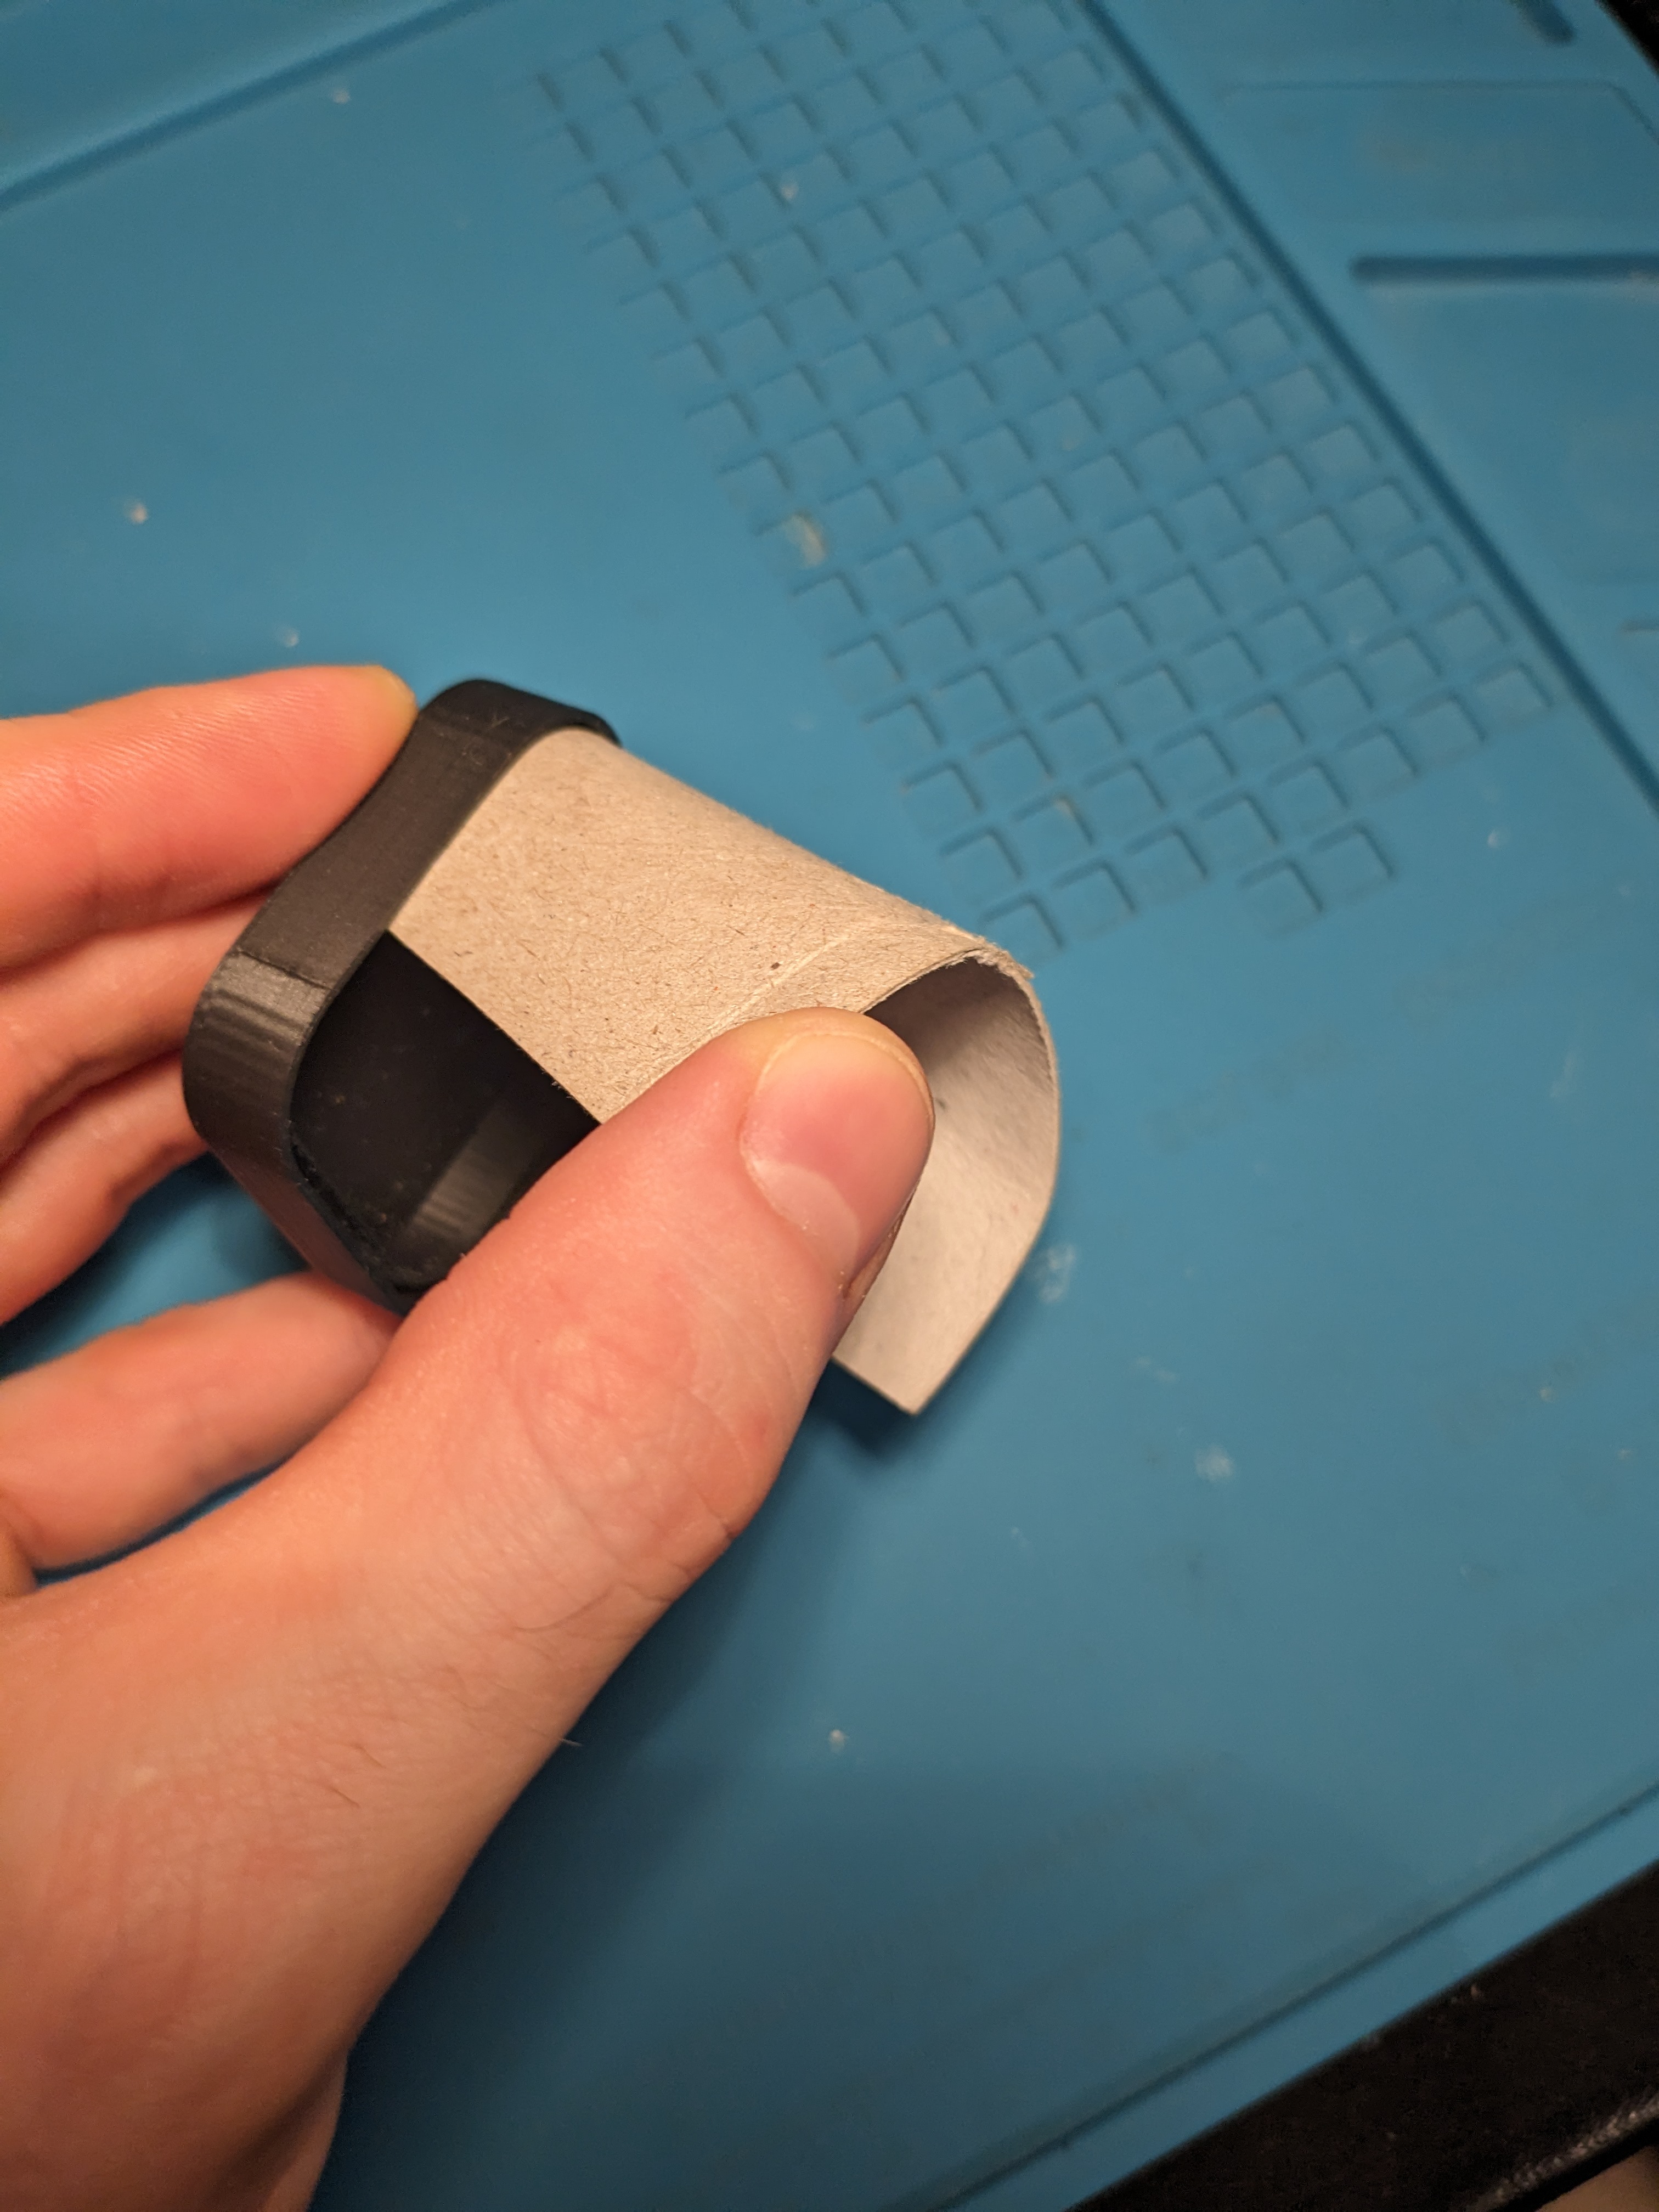
Use your remaining hand to slowly tuck in the rest of the cardboard. If you have problems doing that look at the tips.
Once all of the strip is submerged gently press it deeper in. Don't use a lot of force for that, the final press fit will be done once everything is assembled, but it should be firmly enough so it won't pop out again.
Repeat the same for the second/third strip.
Tips:
- Always have all of the cardboard inside the bin (not hanging outside). Inside is a chamfer that guides the cardboard into the groove when you press it down.
- The outside wall is higher, so you should first press the cardboard from the inside towards the outside wall. After that gently press it down to secure it in the groove
- It is important that the edges are clean. Especially the toilet paper rolls can fray and get soft, making them progressively harder to assemble. If that's the case you need to cut them again or use new strips.
- Don't give up, it gets a lot easier after a few bins.
Step 5: Prepare for lid
Prepare the assembly of the lid. Try to make the shape of the cardboard as similar to the lid as possible. Than means straighten the straight parts and bending the corners.
You should also make sure the face where the lid will be is is as level as possible.
The ends of the strips should also be vertical not at an angle.
To prevent the strips from popping out, use one hand to press it down and the other to do the cleanup.
This is how it should not look:
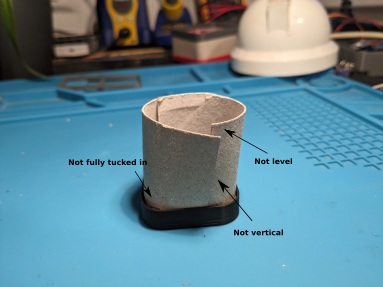
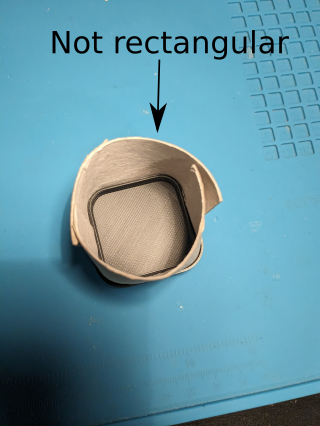
This is how it should look:


Step 6: Assemble lid
Put the top lid on.
Make sure the pockets for the overlapping cardboard matches the overlapping cardboard (See Step 4).
First try to get all cardboard inside of the lid. Work your way around the circumference. Always press the cardboard on the outside wall then press it down.
Make sure that every piece of cardboard is inside the groove.
Step 7: Finish
Press fit everything together. You can use quite the amount of force, It's surprising how rigid these boxes are.
If they somehow don't hold together you can add some CA glue on the chamfer to fix that.
But this was never a problem for me.
Congratulations on assembling your first bin.
If you like the project an want to support me feel free to like, comment and/or add a make of your bins :)
Customize Bins:
I exported everything as Step files. for you to modify. I used FreeCad as my CAD tool. This project was very rushed so the design is not the cleanest.
If you want to model your own containers here is a simple getting started guide.
Step 1:
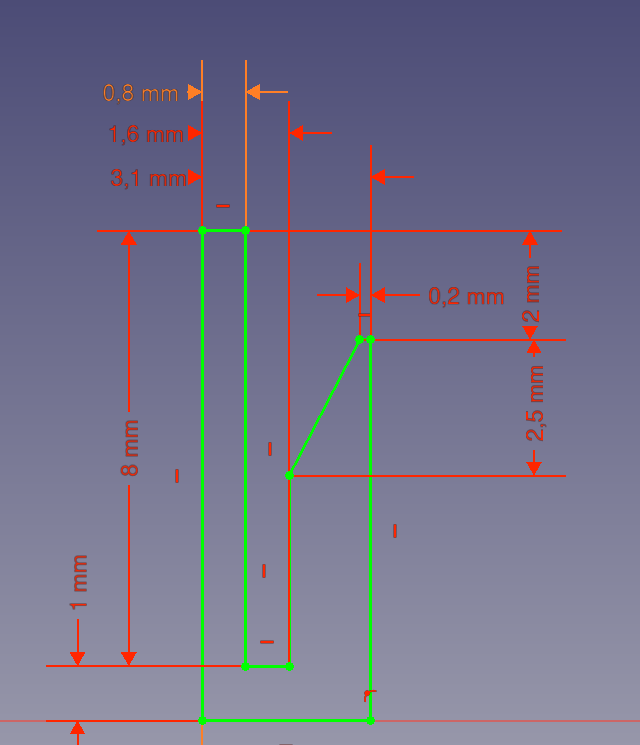
The container mainly consists of a sketch that is swept along a path.
For basic bins the following this sketch is used for both lid and base
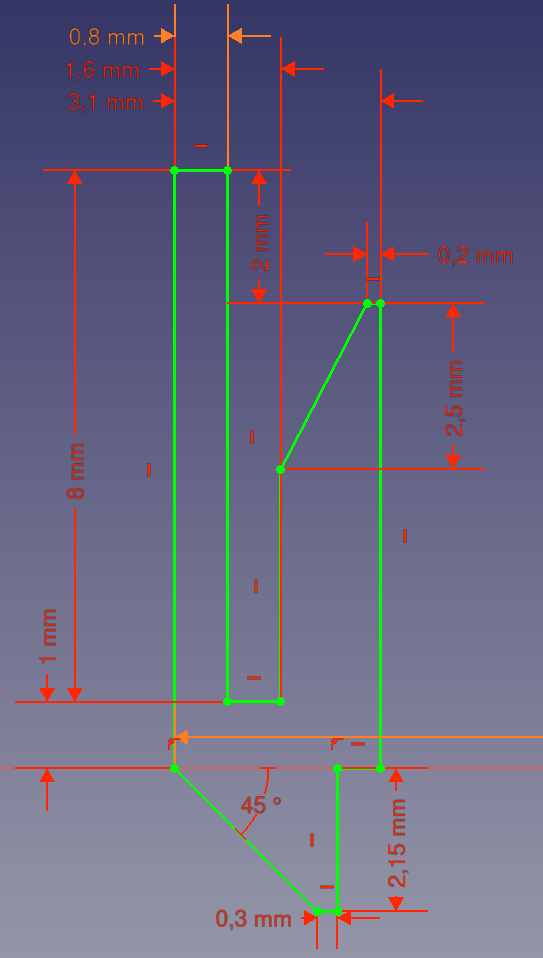
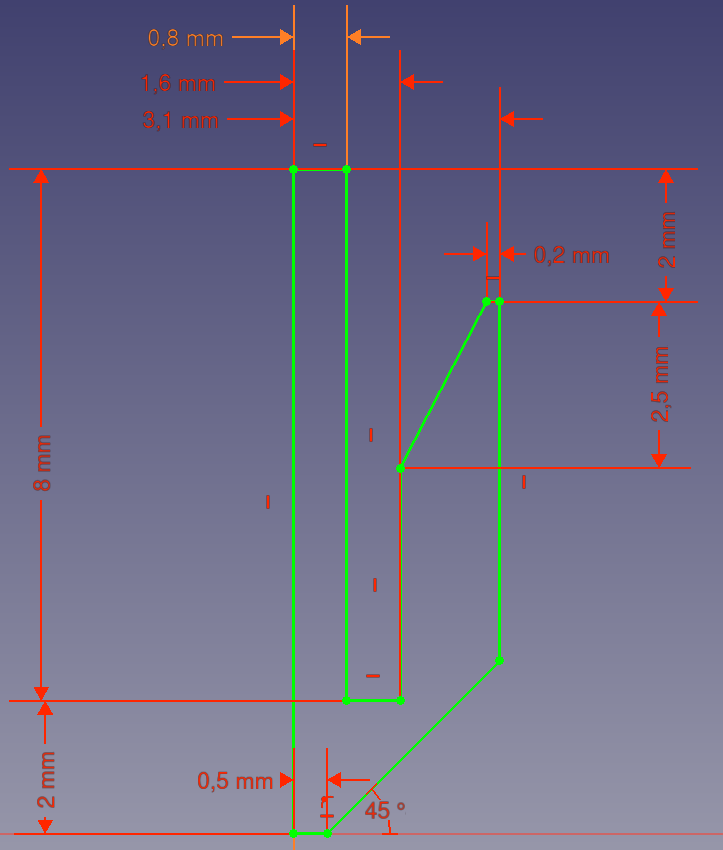
For the Gridfinity the lid and base use different sketches (left base, right lid)
I exported these sketches as faces. You can use these Step files directly if you only need containers with custom dimensions and don't need to adjust for example the thickness of the cardboard. The files start with the name "sketch_".
Step 2:
Create your container shape. The sketch for a 1x1 container shape looks like this.
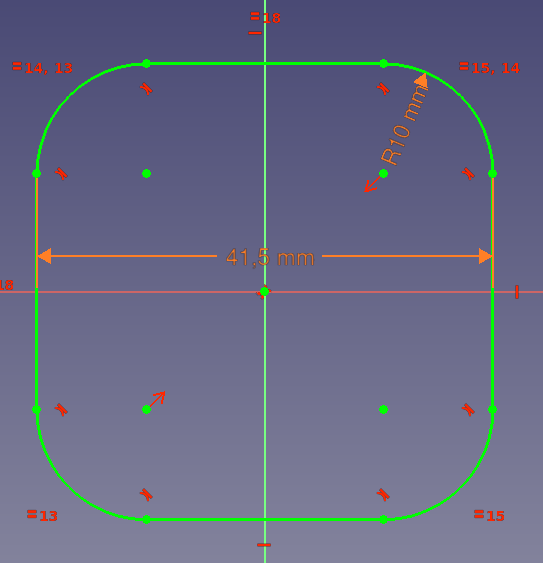
Now you can sweep the first sketch along this path. This will create the base shape of the container.
Next Steps:
- Extrude the floor for the base plate.
- Create a pocket where two parts of the cardboard will overlap. I use a 0.5mm wide pocket for this.
- Calculate the circumference of the container. This value is corresponds to the length of the cardboard strip that is needed.
- Decide how many cardboard strips and which length you need and create a template
- If you want to make your custom container compatible with Gridfinity, you need to add some custom features for the base to make it work with the Gridfinity base plate.
You can use my models as a reference. - For my Gridfinity bins I added some custom support for the base to reduce the amount of filament used and make the bridging easier

Gostou deste modelo? Crie uma conta grátis para salvar seus favoritos e voltar a eles depois.
Criar conta