Você está no 3DFinder
Buscamos em Thingiverse, MakerWorld e Printables ao mesmo tempo para te dar o melhor de cada uma.
Descrição
Recent updates
- 2021-06-29 Here's an Autohotkey example to send the name of the active window to the Arduino
- 2021-06-12 added the very basic Arduino Sketch
- 2021-06-08 first upload. Files: V0
6-Key super slim Macro KeyPad
Proudly designed with FreeCAD ❤. Join the first FreeCAD-Group here on PrusaPrinters.org!
This small Macro Keyboard is my first dive into the DIY keyboards hobby. I wanted to have some extra keys next to my 3Dconnexion SpaceMouse to have some ofte-used CAD shortcuts at hand.
The main body is only 9mm thick. The switches sit in a recess to get the key caps even closer to the table.
There's an Arduino Micro (Atmega 32U4) in it which reads the button matrix (2 columns, 3 rows).
The 6 keys just send CTRL+SHIFT+ALT+F1 to F6 to the PC. A small AutoHotkey script converts it to the hotkeys I need at the time. So those can be different for SolidWorks, FreeCAD, Firefox, Windows, …
No flashing of QMK software needed. The Arduino sketch and AutoHotkey script will be uploaded only if there's enough interest.
These are the key caps and here's the switches. I use white (clicky) ones at home and brown (tactile) at the office.
Is this thing useful to you?
Don't hesitate to hit the ❤ and show some love. I'm always happy to hear from you in the 🗩 comment section. If you have problems printing my files: tell me in the comment section too!
Provided files
I do like to have real CAD-files, when downloading things from others. Most users don't provide files other than .STL-files. These are useless for further manipulation or quick changes. So I'll provide the following files to you:
| Format | Included? | Description |
| STL | ✓ | - |
| STEP | ✓ | Version 214 |
| FreeCAD | ✓ | Version 0.19 Link Branch |
Is it easy to build/assemble?
Yes, but you need to know how to solder! For further assembly instructions see the Assembly section down below!
What do I need other than the printed parts?
- 6x Kailh Choc V1 switches
- 6x keycaps for the switches
- 6x diodes (1N4148, 1N4148, 1N4001 or whatever you have at hand)
- 1x Arduino Pro Micro (clone)
- 1x USB micro breakout board
- A bit of (insulated) wire
- Glue. I use 5 minute Epoxy
- Soldering Iron
Is this thing finished?
YES, V2 is in the makes.
Print Settings
Here are some general guidelines on how to print this thing.
Rafts: Not necessary
Supports: Not necessary
Resolution: 0.2
Infill: 100%
Filament: PLA, PETG, ABS, ASA, …
Notes: 100% infill for maximum weight.
Post-Printing
none
Assembly
Assembly instructions will follow if there's interest in this thing!
Step 1 – printing parts
Print the parts 100% infill at 0.2mm. Let them cool on the plate, don't rip them off when the plate is still hot. You want a straight bottom on the case.
Please check if the parts fit together nicely before glueing anything.
Step 2 – adding the switches and wiring
Snap the switches into their recesses, the tolerances are quite tight so it might be a bit fiddly. Use the same orientation for all switches, it makes wiring much easier!
For reference, here's my wiring.
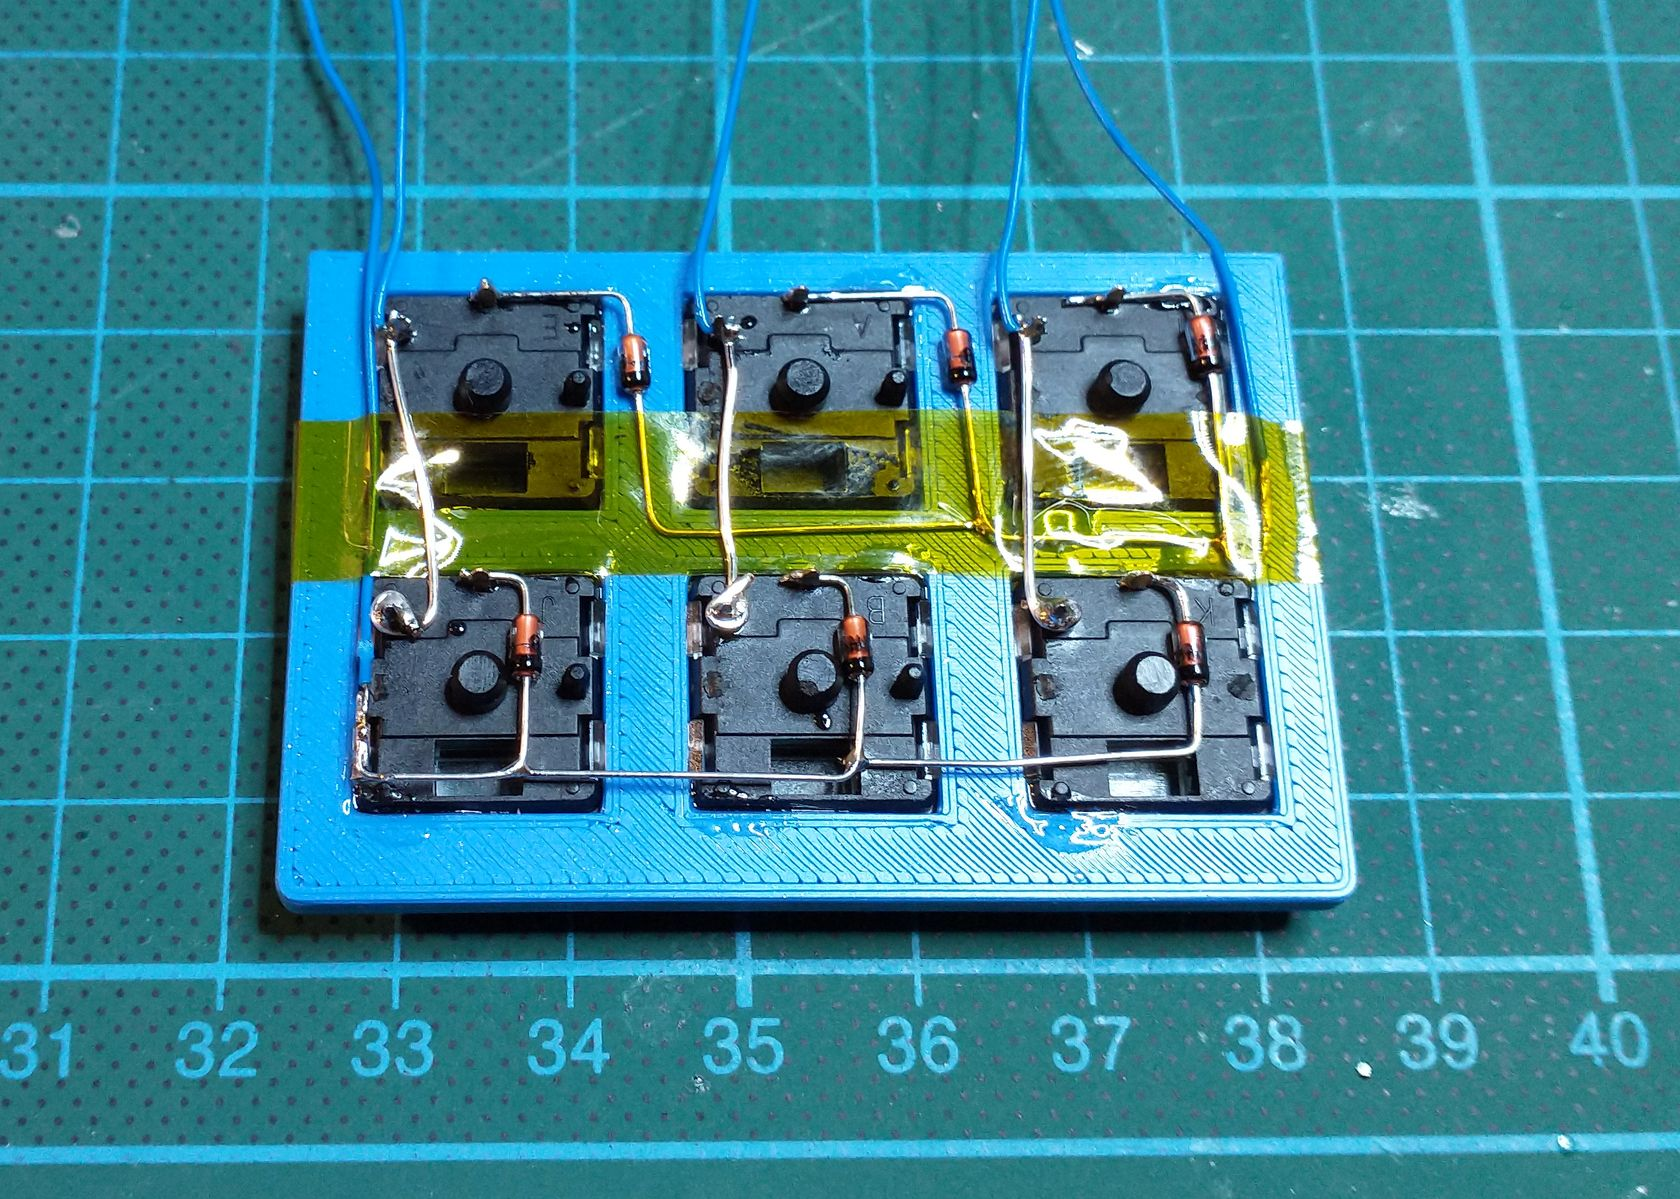
Before soldering, add two drops of glue (Epoxy) to each switch. It helps to keep them in place when you need to pop the caps off for cleaning later! Let it set before continuing with the process.
The keys are multiplexed. A good explanation can be found here! Applying the “usual syntax” to the pic above I have two rows and three columns.
To avoid shorts between the rows and columns you need to apply a layer of tape or use insulated wire.
Step 3 – connecting to the Arduino
tbc
Programming
The whole thing works like this:
- Arduino emulates a HID device (a keyboard in this case)
- the 6 keys are read (polled) by the microprocessor
- if one key is read as pushed (== 1), the program sends one/multiple keys to the connected computer
You can go one of two routes here:
- Send pre-defined (fixed) keystrokes which are fixed for all the keys on the macropad and let the program on the computer decide what to do.
Example: Pressing [KEY 1] always sends CTRL+SHIFT+ALT+F1, [KEY 2] sends ESC,
- Program the Arduino to send the exact keystrokes/combinations directly to the computer
Route 1 - hard-coding
tbc

Gostou deste modelo? Crie uma conta grátis para salvar seus favoritos e voltar a eles depois.
Criar conta