Você está no 3DFinder
Buscamos em Thingiverse, MakerWorld e Printables ao mesmo tempo para te dar o melhor de cada uma.
Descrição
Introduction
This is a very quick print that will support the heavy, loose end of your PC graphics card. I have made two versions, a shorter, 50mm stand and a taller 60mm stand.
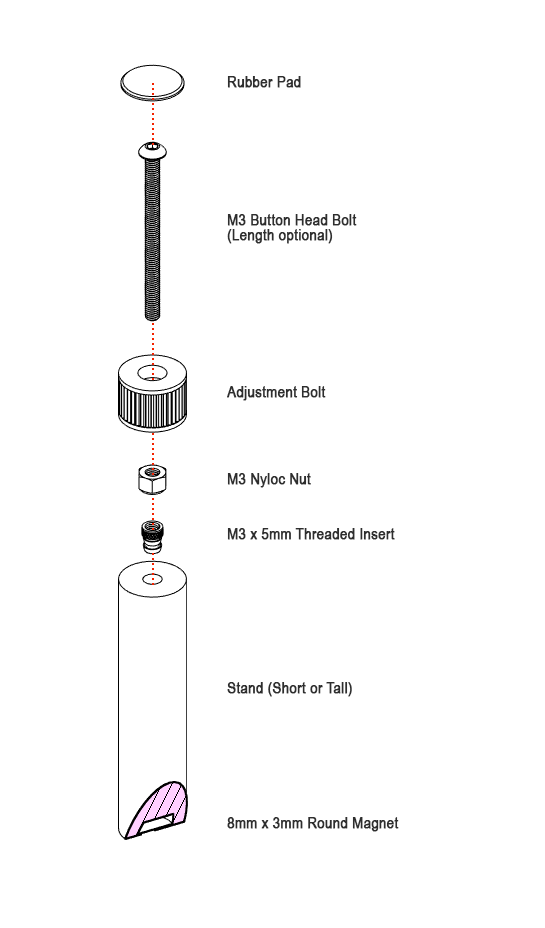
The stand uses an M3 bolt to allow adjustment. In my case, it is a 30mm bolt to allow for plenty of height adjustment. A Magnet is also inserted into the print to help hold the stand in place.
You will Need
You will need an M3 bolt, at least 10mm but can be as long as you need it to be. It would be wise to measure the height of the space between the GPU and the bottom of your case first. Then decide if you need the 50mm or 60mm stand. Remember the adjustment bolt will add 11mm(ish) on top. Choose a bolt length longer than you need, most of it will be inside the print.
You will need an M3 x 5mm threaded insert. This will be heat-set into the top of the stand so that the bolt has something to thread into.
You will also need an M3 nut, I recommend a Nyloc nut but any standard M3 nut will work.
Finally, you will need an 8mm x 3mm magnet for the main stand. The magnet is optional but will help hold the stand firmly in place on top of your PSU shroud or the base of your case.
Printing
When printing the stand, orient the base so that the magnet is closest to the bottom. You will need to pause the print at layer 19 so that you can insert the magnet mid print. The main stand and the adjustment bolt are both printed at .2mm layer height with PLA, no supports are needed.
The adjustment bolt should be printed upside down as there is a sacrificial layer in the hole where the bolt goes. This should be easy enough to push through once printed and means you won't need supports for this part either.
The pad on top of the adjustment bolt is printed in TPU to prevent scratching your GPU.
Construction
After printing all of the parts. Take your stand and the threaded insert. This will need to be heat set into the print with a soldering iron. I like to get the insert set most of the way into the print and then press the part onto a hard flat surface to fully seat the insert. this will get it nice and flush and straight.
Next take the nut and insert it into the hexagonal hole on the bottom of the adjustment nut. You can use a little threadlocker if you like but it will be fine without. Take the M3 bolt and thread it through the nut from the other side of the adjustment bolt. When fully seated, press the rubber pad into the hole on the top of the adjustment bolt.
Finally thread the adjustment bolt into the stand and adjust it to the height you need. If you are building a new PC and have the case on it's side, the magnet should be plenty strong enough to hold the stand in place while you work.
Adjustable GPU Anti Sag Support

Publicado em 8 de abr de 2023
Gostou deste modelo? Crie uma conta grátis para salvar seus favoritos e voltar a eles depois.
Criar conta