Você está no 3DFinder
Buscamos em Thingiverse, MakerWorld e Printables ao mesmo tempo para te dar o melhor de cada uma.
Descrição
Introduction:
Happy Pride Month, everybody! Remember: Despair is something to fight! Even when we're all exhausted. This keychain is a small way we can make the world a better place. Signify who you are and who you support while filtering out the folks who wish harm on you and the people you love. Some people say that they don't care who you bork but they don't understand why you've gotta be rubbing it in their faces all the time. Rub it in their face even more! Reject homophobia! Embrace homo-utopia!
Also, this keychain makes it easier to flirt with you.
Unfortunately, it is an absolute nightmare to print. Fortunately, my day job is writing documentation, so I'm going to do my best to make it as easy as it can possibly be.
Model Specifications:
Size: 50mm x 30mm x 4mm
Parts: 6
Filament used: 10g (or a LOT more, depending on stuff I'll talk about later)
Print time: Varies wildly based on print method
Usefulness of these specifications: Pretty low
Supports: No, but you may need to print it with a brim or use glue.
Creation Instructions:
Method 1: Print Pauses and Filament Changes
This method is how you could make this flag if you DON'T have a tool changer or Automatic Material System (AMS). I haven't done it this way yet, but the theory is sound. These instructions are for PrusaSlicer, but you should probably be able to adapt them for other slicers as well.
Download the .3mf and ensure that your printer configuration is correct.
Do not reorient the model (most of us have experience attempting reorientation, and we know how much it can mess things up). You can rotate it and move it around, but make sure it's gay up and down. It must be printed vertically for the color changes to work, and I am going to give you the layers where you'll need to swap filaments if you keep it the same size and print it at 0.20 mm layer height or a formula to use if you resize it or mess with the layer heights. That way madness lies. Or tediousness. Tediocrity? Something like that.
Note: It ISN'T possible to print it horizontally (or any other orientation) without some color changing system, and since this thing has 6 colors, it would have to be a really uncommon color changing system as most of them only go up to 4.Slice the model. Whachaaaa! (That's the sound of slicing.)
Now we're going to do some math! If you want to. If you don't want to, keep the flag at its exact current size and the layer height at 0.2 mm. If you want to resize it or print it with a different layer height, take a deep breath and follow me.
First, find the total number of layers in the model. In my case, it's 147. The easiest way to do this is to slice it and look in the top right of the Preview screen.
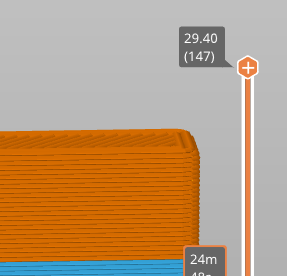
Divide that number by 6. Cross your fingies that you get a whole number. When you don't (and you won't. You have approximately 17% chance of getting a whole number, which means it will happen exactly 0% of the time), curse once, not very loudly.
The number you get will be the number of layers up the print you put a pause in, rounded to the closest whole number. In the case of the base model, 147 / 6 = 24.5, so in the Preview screen, I'm going to grab the little + sign in the top right and pull it aallll the way down to layer 25.

Right click and add a pause.
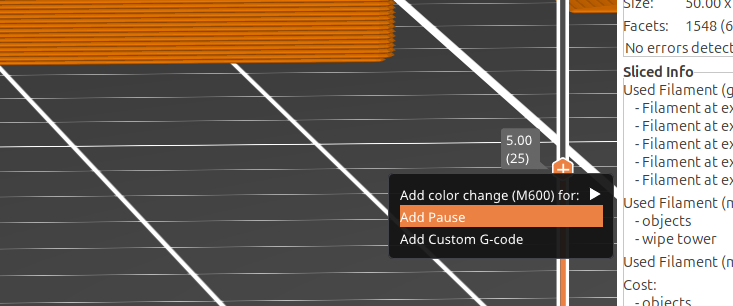
If you're sort of swimming in the math here, don't worry. I am too. I'm pretty sure I used incorrect wording up in step 7. But you get what I'm trying to do, right? We're trying to add pauses at 1/6 of the print, 2/6 of the print, 3/6 of the print, and so on. In the base model, this is where those pauses fall:
49
74
98
123Put the calculator away when you're done. Slice the model again. Feel free to make the "whachaaaa" sound yourself this time.
Double check everything. Just in case.
Save it and get the file to your printer, however you usually do that. DON'T START THE PRINT YET.
Load the first filament (either blue or red, depending on whether you are printing the flag rightside up or upside down) and then make certain that you have the next five colors easily accessible. The longer the print remains paused, the more visible the pause is and the more fragile the print becomes. You don't want to leave it paused for 4 hours while you run down to the filament store in the next town over to get some yellow. Make sure you've got the yellow on hand.
Start the print. Wait nearby for the telltale sound of silence. Or the beep.
When the printer pauses, change to the next filament and start it up again.
If the print breaks off the plate, sigh deeply, rub the back of your neck and then rub a glue stick on your print bed, and restart the print. If it breaks off AGAIN, make a different frustrated sound, go back to the model, add a 4 mm brim, and reslice.
If the print makes it past green successfully, you can use that pause to drop a split ring into the unfinished hole to save your fingernails a little bit of wear and tear.
Good luck!
Method 2: Toolchanger or AMS
First, count how many colors are in the Pride flag. I usually come up with 6, which is extraordinarily inconvenient, since most toolhead printers or AMSs only have 4 colors. This means we have to get creative.
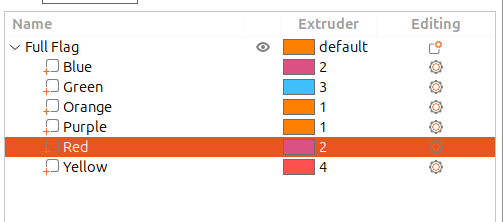
In the slicer, designate the bottom 4 colors (purple, blue, green, and yellow) as extruders/colors 1, 2, 3, and 4 respectively.
Designate the top 2 colors (orange and red) as extruders/colors 1 and 2. It should look something like this:
Slice the model.
In the Preview window, add a print pause just before Orange begins.
Save and export or send to your printer or whatever.
Load your printer with purple, blue, green, and yellow.
Put your orange and red filaments nearby.
Start the print and hang out, waiting for the telltale pause or beep. It should happen in like 20 minutes. If you want, you can put two frozen chicken pot pies in the microwave and cook them while your pride flag prints. Make sure you put a one inch slit in the top of each so you get a softer crust and so the broth doesn't leak out the sides.
When the pause happens (or when your pot pies are done), unload purple and blue and load orange and red into their respective spots.
Restart the print.
Add a split ring or a small carabiner (although I think the carabiner goes better with a different model I will be uploading later) and attach it to your key ring or a zipper pull or your phone case or a piercing or wherever you want. Probably not the piercing, actually. Seems like it would get caught on stuff. But hey, I'm not your dad.
Method 3: Toolchanger or AMS with Full Spectrum or ColorMix
This method isn't going to include a set of steps for a very good reason. Neither Full Spectrum nor ColorMix are fully implemented yet, and they are both likely to change pretty substantially in the near future. When they get full releases and I feel particularly masochistic, I'll update this with a step by step for them. Until then, there are two very likely scenarios:
You ARE familiar with their jank, so you don't need step-by-step instructions. Add your colors in the usual way and send it, you madman, madwoman, madperson, or monster.
You have never used either of them before. In this case, I'm begging you to use one of the previous methods. On hands and knees. You don't want to do this to yourself. You will fill your house with filaments of slightly different shades, trying to get the purple perfect or the orange to pop. Please. The forest is dark. Go back to the nice, safe, warm town.
HOWEVER, it would be hypocritical of me not to mention that the pictured model was created using OrcaSlicer's Full Spectrum alpha fork. I would tell you how many times it crashed while making it, but I lost count. Prusaslicer's ColorMix plugin has been released into beta at the time of this writing, but I haven't been able to install it yet because I'm on Linux and have intentionally forgotten how to read by drinking paint thinner. It IS possible to print this without pauses using only 3 filaments, because that's what I did, but I really, really don't want to write down how it was done, both because the method will change tomorrow (and the next day and the next day) and because doing it was miserable. Yes I wound up with a cool flag. No it wasn't worth it.
If you leave me a comment asking me to do a full write up of this method, I will send you a link to a bank account that only accepts hot dogs with holes in them as currency. I will not do this thing for fewer than twelve of them. That's right. Twelve swiss franks.
Notes:
tbd
Pride Flag Keychain (no AMS required)

Publicado em 22 de jun de 2026
Gostou deste modelo? Crie uma conta grátis para salvar seus favoritos e voltar a eles depois.
Criar conta