Você está no 3DFinder
Buscamos em Thingiverse, MakerWorld e Printables ao mesmo tempo para te dar o melhor de cada uma.
Descrição
The Blender file for this model can be downloaded for free from CGTrader
This is a fully parametric planter saucer designed in Blender using Geometry Nodes. Instead of being a fixed shape, it's driven by eleven adjustable inputs — size, wall taper, corner roundness, rib count, material thickness, and more — that let you customize the saucer to fit whatever pot you have. The same base model can produce a small sharp-cornered square saucer, a large round flared one, or anything in between.
A few STL files are included for the saucer shown in the images for anyone who just wants to print and go. But if you have Blender installed (it's free), you can open the source file and dial in the exact dimensions you need. The instructions below walk through how to do that, even if you’re new to Blender.
The saucer prints flat-side-down with no supports. The ribs on the underside lift it slightly off the surface so the excess water can drawing from the pot.
ABOUT AI
Claude Code was used to create the geometry nodes. You don't need Claude or any other AI service to use the Blender file. Scroll to the bottom to learn how you can use Claude Code to modify the geometry nodes...without knowing anything about geometry nodes.
Customizing the Planter Saucer in Blender
This model is built with Geometry Nodes, so you can adjust its shape using parameter values— no mesh editing required. Of course, if you are a Blender star, you can always convert it to a mesh and modify it as you want. Below are instructions for tweaking the design and exporting your custom version as an STL ready to slice.

Part 1: Changing the Shape with Geometry Nodes
Open the .blend file in Blender (4.0 or newer recommended).
Click the saucer in the viewport to select it.
On the right side of the screen, find the Properties panel and click the wrench icon (Modifier Properties).
You'll see a modifier called PlanterSaucer. Expand it if it isn't already.
You'll see a list of inputs you can change. Click any value and type a new number, or click and drag to scrub. All measurements are in meters (Blender's default), so 0.1 = 100mm.
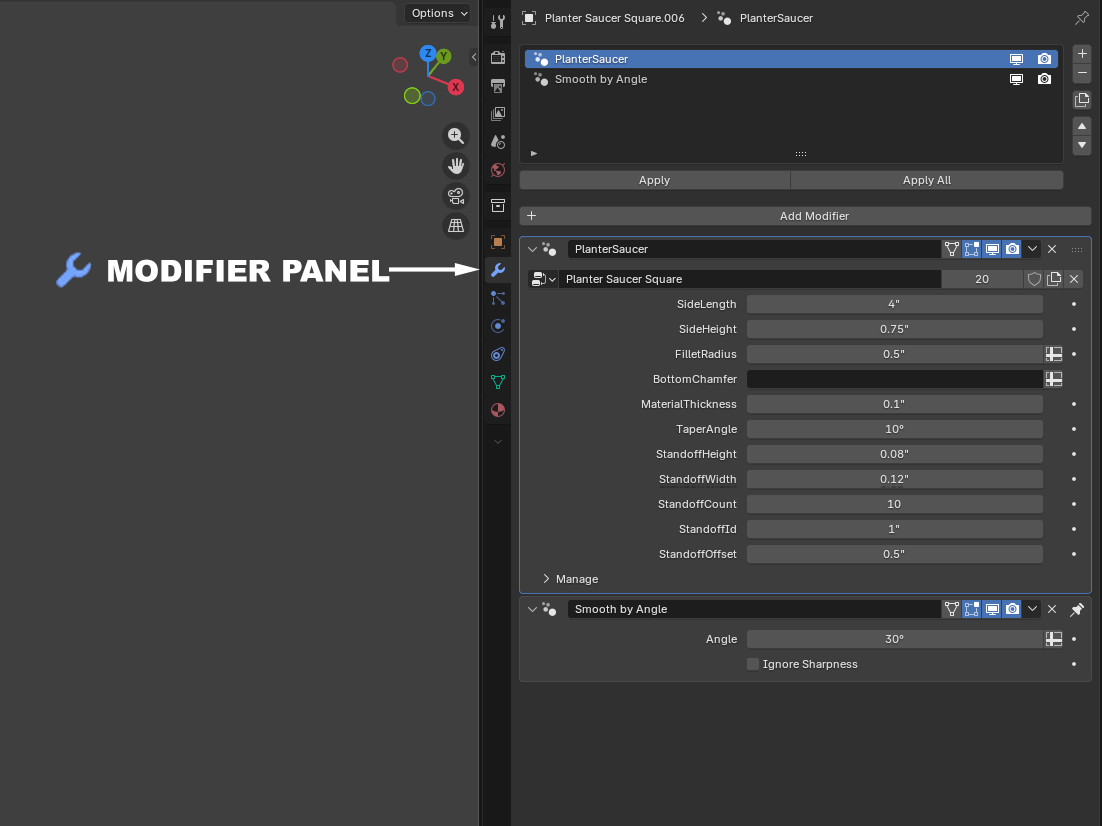
What each input does
SideLength — Overall width of the saucer (square footprint).
SideHeight — Total height of the saucer wall.
FilletRadius — Corner rounding. Set low for a sharp square; raise it until the saucer becomes fully round.
BottomChamfer — Small bevel along the bottom outside edge. For nearly vertical walls, this setting will eliminate elephant footing and make it easier to remove from the print bed.
MaterialThickness — Wall and floor thickness. Match this to your nozzle/wall count for clean printing.
TaperAngle — Outward flare of the walls, in radians. 0 = straight walls; ~0.5 ≈ 30° flare.
StandoffHeight — Height of the ribs on the underside that lift the saucer off the surface.
StandoffWidth — Thickness of those ribs.
StandoffCount — Number of ribs.
StandoffId — Inner radius where the ribs start (the empty center).
StandoffOffset — How far the ribs sit inset from the outer edge.
The saucer updates live as you change values. If something looks broken, your fillet radius is probably larger than half the side length — reduce it.
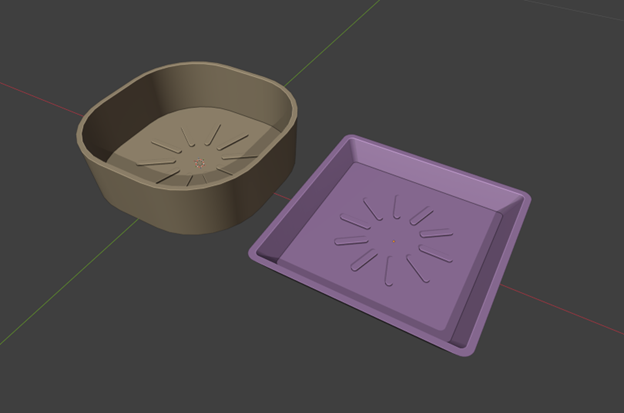
Part 2: Making Multiple Variants in One File
If you want to design several different saucers side-by-side before exporting, you can duplicate the parametric model. Each copy keeps its own independent set of Geometry Node parameters, so you can tweak them separately.
Click the saucer to select it (make sure you do this before applying the modifier — while it's still parametric).
Press Ctrl+D to duplicate it.
Move the mouse in the X or Y direction to slide the copy away from the original, then left-click to drop it in place. (Press X or Y before moving if you want to lock the movement to a single axis.)
With the new copy still selected, open the Modifier Properties panel (wrench icon) and adjust the PlanterSaucer inputs to your liking. Only this copy changes — the original stays as it was.
Repeat as many times as you want. Each duplicate is fully independent.
When you're ready to export, select one saucer at a time, then follow Part 3 (apply the modifier) and Part 4 (export STL). Save a copy of the file before applying so your parametric originals stay intact.
Part 3: Saving Your File and Applying the Modifier
Before exporting, you need to convert the live geometry-node output into a real mesh. To keep your original parametric file intact, save a copy first.
Go to File → Save As...
Give it a new name like MySaucer_Export.blend and save.
Now you're working in the copy — the original is safe.
Make sure the saucer is still selected (it should have an orange outline).
In the Modifier Properties panel, find the PlanterSaucer modifier.
Click the dropdown arrow at the top-right of the modifier (next to the camera/screen icons) and choose Apply.
Alternative: Instead of apply the modifier as described above, right-click on the model and select convert to - mesh from the pop-up menu.

Part 4: Exporting the STL
Blender uses meters internally, but slicers expect millimeters. We fix that with a scale factor of 1000 during export.
Make sure your saucer is selected (orange outline).
Go to File → Export → STL (.stl).
In the export dialog, on the right-hand panel:
Check Selection Only (this exports just the saucer, nothing else in the scene).
Set Scale to 1000.
Verify the forward direction is Y and the Up direction is Z
Leave other settings at default.
Choose where to save the file and click Export STL.
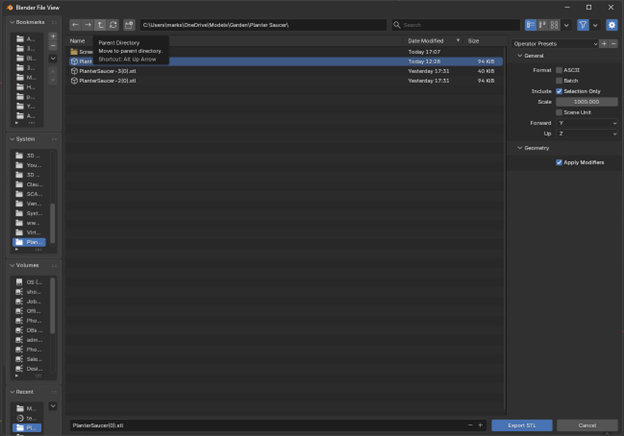
Open the resulting .stl in your slicer — it should appear at the correct millimeter size, ready to print.

Tip: If you want to make several variants, you can either use the duplicate method in Part 2, or repeat Part 1 with different values and use File → Save As with a new name each time before applying and exporting. That way each variant stays editable in its own file.
HOW TO MODIFY
In the Blender file is a readme text panel. Here you will will find the Claude mark down file. You can copy this text to a folder and use Claude Code. This will give Claude a starting point. You can then describe the modifications you want in the prompt. Claude makes a python script for a new Blender file that creates the geometry nodes.
After the geometry nodes are created, delete the python code. You only need to run it once. Now save the Blender file with the geometry nodes.
Your updated model is no 100% decoupled from Claude.
Of course, if you are a geometry node wizard...you can do it yourself.
Gostou deste modelo? Crie uma conta grátis para salvar seus favoritos e voltar a eles depois.
Criar conta