Você está no 3DFinder
Buscamos em Thingiverse, MakerWorld e Printables ao mesmo tempo para te dar o melhor de cada uma.
Descrição
XWii Controller
Link to official source:GitHub - dmcke5/XWii-Controller
An Xbox One style controller with a Wii U layout and Hall effect Triggers and Joysticks!
The Wii U gamepad layout is a fan-favourite for many gamers yet it is rarely used in the current generation of controllers. This open source project brings the Wii-U layout back but in a shape more akin to an Xbox controller and provides you with a cool piece of tech that you can be proud to say you built yourself!
Features:
- Wii-U controller layout
- Hall Effect Joysticks
- Hall Effect Triggers
- Rumble
- Xinput Compatible
- RGB Status indicator home button
For now, this controller is wired only but I plan to add a wireless version of the design at some point in the future!
Print Orientation
If you're printing the housing at home on an FDM printer here's some tips to get the best finish possible!
Front Housing
Stand the front housing on its top edge and lean it forward 45 degrees. Enable supports for surfaces over 55 degrees and use a raft to ensure good adhesion to the bed. Ensure Z seam is on the inside! Only minimal supports should be generated, just to support the bottom of the button holes. If you're using a bed-slinger, orient your part so that it runs with the direction your bed moves to reduce wobble.
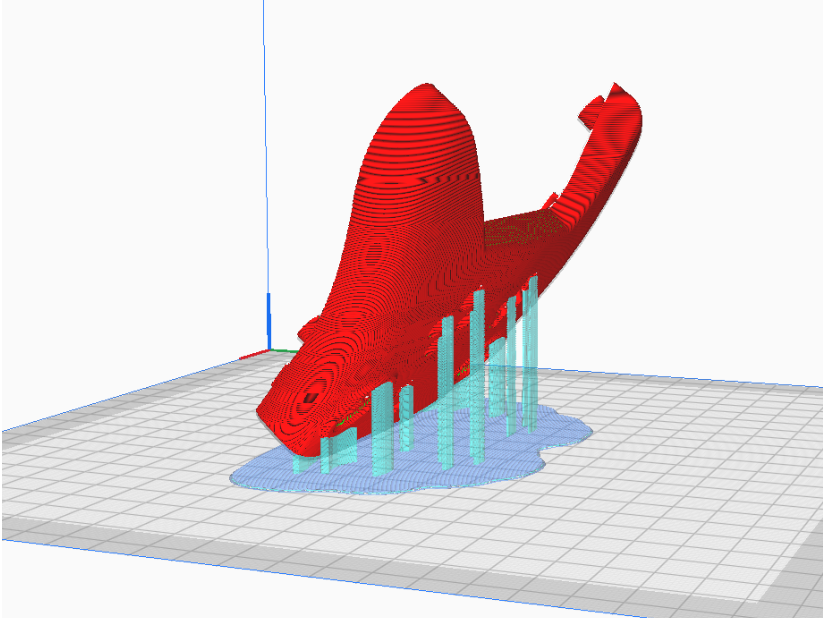
Rear Housing
Stand the rear housing on its top edge and lean it back 30 degrees. Enable supports for surfaces over 55 degrees and use a raft to ensure good adhesion to the bed. Ensure Z seam is on the inside! Some supports will be generated on the inside but none are in contact with critical surfaces making cleanup relatively easy. Same as the front, ensure orientation matches your bed movements for bed slinger printers!

Shoulder Buttons
Shoulder buttons should be printed flat on the bed, to ensure the spring is working with the layers rather than against them. Enable supports so the top edge of the buttons aren't left hanging.
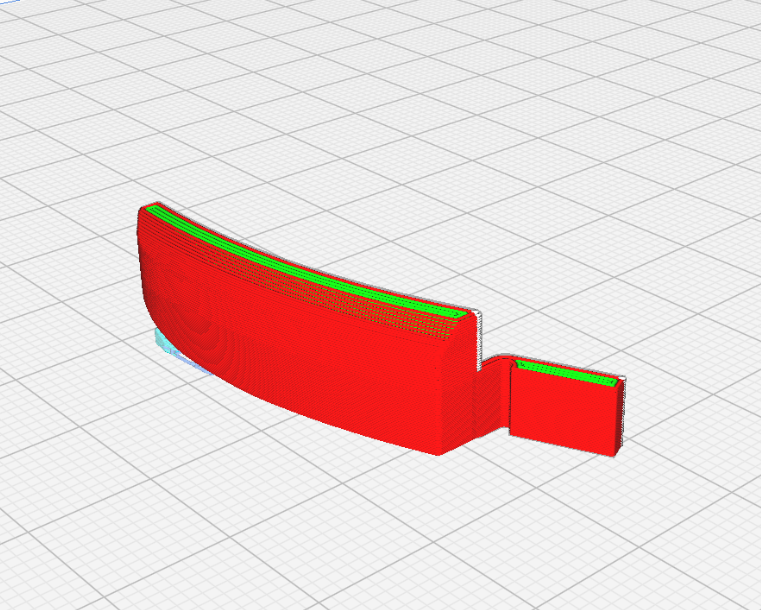
Trigger Buttons
Stand trigger buttons on their end and rotate forward 30 degrees. Enable supports for surfaces over 55 degrees and enable raft. Supports should be generated in the holes and for the magnet mount only leaving very little cleanup required.

Bill of materials
PCB's
1x Front PCB (Must use ENIG finish!)
1x Rear PCB
3D Printing
1x Controller Housing Top
1x Controller Housing Bottom
1x LHS Shoulder Button
1x LHS Trigger
1x RHS Shoulder Button
1x RHS Trigger
Purchase
1x Switch lite button set - [https://www.aliexpress.com/item/1005007266706005.html](https://www.aliexpress.com/item/1005007266706005.html)
1x Switch lite membrane set - [https://www.aliexpress.com/item/1005004544710872.html](https://www.aliexpress.com/item/1005004544710872.html)
2x PS5 Hall sensor joysticks - [https://www.aliexpress.com/item/1005007688806322.html](https://www.aliexpress.com/item/1005007688806322.html)
1x Xbox rumble motor (pair) - [https://www.aliexpress.com/item/1005002877455453.html](https://www.aliexpress.com/item/1005002877455453.html)
2x PS4/5 Trigger Springs - [https://www.aliexpress.com/item/1005005844578554.html](https://www.aliexpress.com/item/1005005844578554.html)
2x 3x1mm Neodymium Magnets - [https://www.aliexpress.com/item/1005006619263188.html](https://www.aliexpress.com/item/1005006619263188.html)
1x 6028 RGB LED - [https://www.aliexpress.com/item/1005003719602946.html](https://www.aliexpress.com/item/1005003719602946.html)
1x WS2811 IC - [https://www.aliexpress.com/item/32844615804.html](https://www.aliexpress.com/item/32844615804.html)
1x USB Data Cable (End will be removed so only need to ensure it has the correct end for your device on one end of the cable)
Hardware
5x M3x5x5 Threaded Inserts
2x M2x3.2x3 Threaded Inserts
3x M2x3.2x4 Threaded Inserts
5x M3x8 SHCS Screws
6x M2x4 SHCS Screws
PCB Assembly
Front PCB:
Follow the diagram below for locations of components. Pay close attention to orientation of parts U1, Y1, U7 and D1 as they can be fitted in the wrong direction and cause damage. Align marks on all these components with the alignment marks on the PCB.
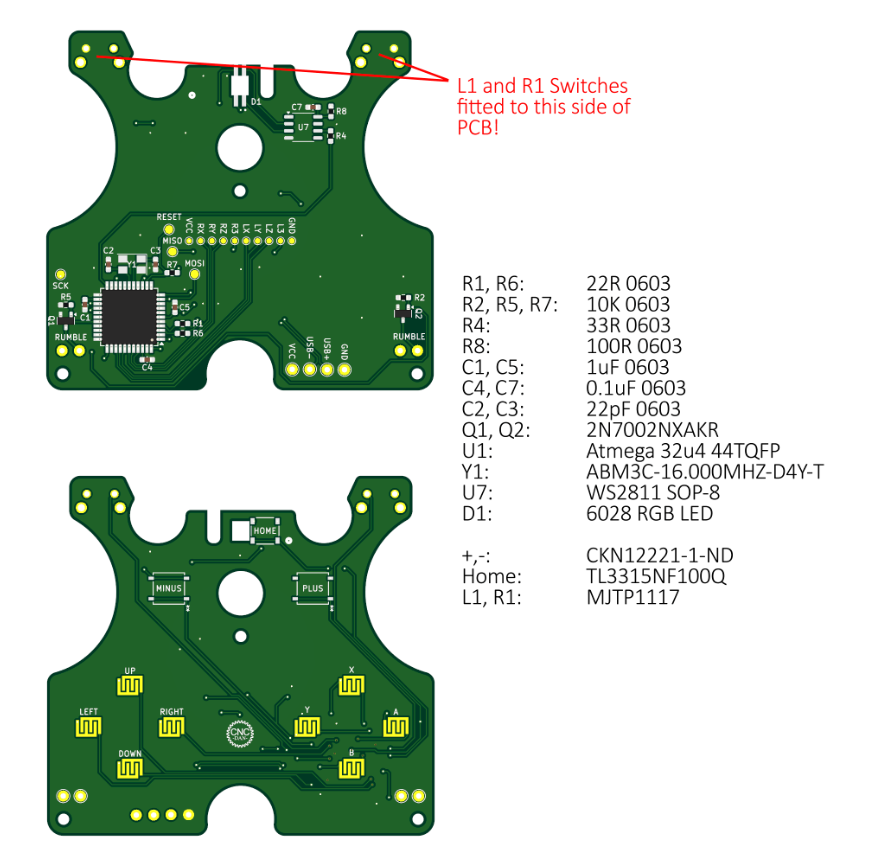
Rear PCB:
Follow the diagram below for locations of components. Fit joysticks to opposite side of PCB.
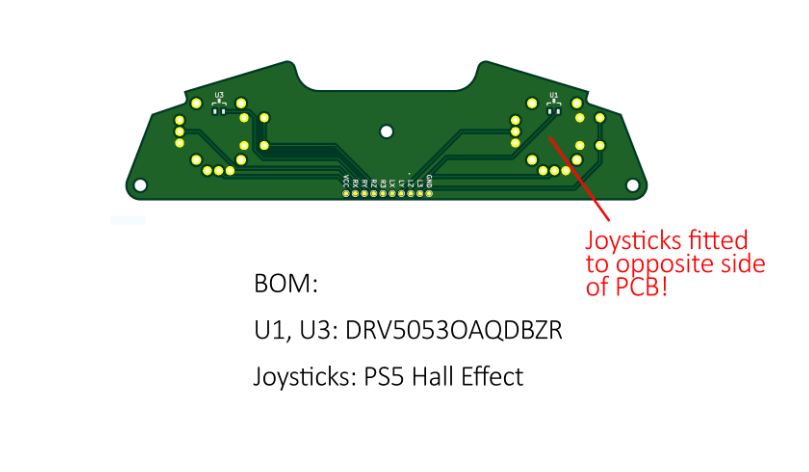
Software
You will need to install these libraries to be able to compile the code:
XInput: [https://github.com/dmadison/ArduinoXInput](https://github.com/dmadison/ArduinoXInput)
FastLED: [https://github.com/FastLED/FastLED](https://github.com/FastLED/FastLED)
Then simply compile and upload to your controller using the Leonardo w/xinput board option. Please note, once the code is uploaded you will need to re-flash the bootloader to be able to upload code again due to a limitation in the way the xinput library works.
Link to official Upload: GitHub - dmcke5/XWii-Controller
Diy Xbox Style Game Controller

Publicado em 1 de jul de 2025
Gostou deste modelo? Crie uma conta grátis para salvar seus favoritos e voltar a eles depois.
Criar conta