Você está no 3DFinder
Buscamos em Thingiverse, MakerWorld e Printables ao mesmo tempo para te dar o melhor de cada uma.
Descrição
Raspberry Pi 5 case for use as desktop computer. Better cooling solution included (hard to get over 60°C with ~23°C ambient).
Design
Specifically designed as 2 part case with 3D printer in mind. Whole solution counts on modifying Pi 5 holes to fit M3 screws. But if you can manage to get long enough M2.5, use them.
Originally I was tempted to embed Raspberry logo on top but I think it would violate their trademark. Feel free to modify the top to fit your personal logo as you wish.
Power button
Power button is hidden behind exhaust grill.
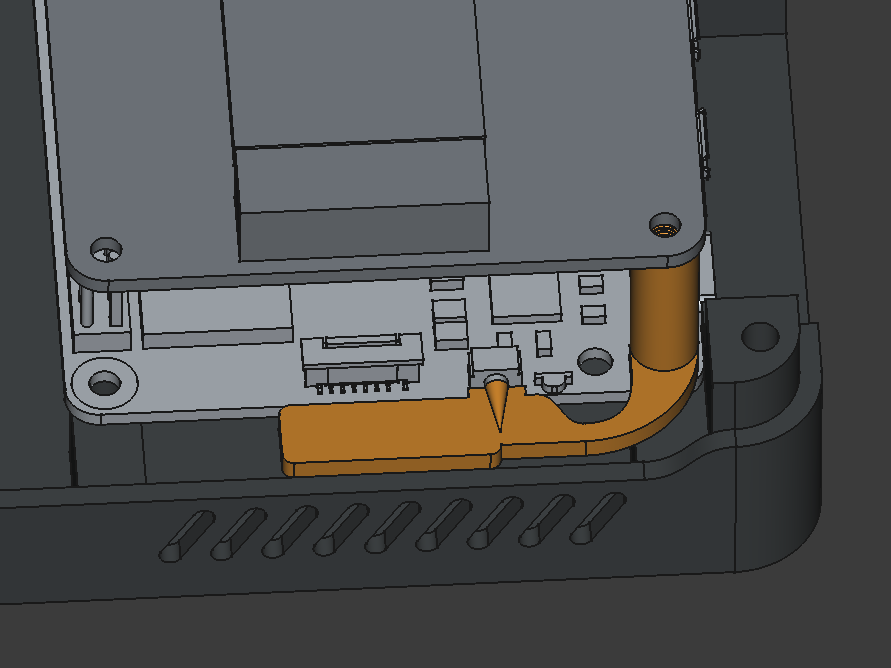
Be sure the arm is not pressing power button all the time but is in touch. Once case is closed, you turn on Raspbbery by pressing roughly in the bottom center of the exhaust grill. Don't worry, PET-G is fairly flexible material and should handle this long term.
The click response is gone but once Pi is about to boot, red LED will turn off and after a while, green LED should light up.
Missing features
MicroSD card slot not accessible at the moment. I have no intentions to make MicroSD accessible in the future.
Warning
In case you will use SSD, use anything except 2280 - HATs are too long and probably won't fit.
Cooling
In case you use default cooler, be prepared for its noise to be amplified a bit by hollow case. I Highly recommend using Noctua fan or similar silent 40mm one.
Also default cooler will mean worse cooling. During 5min stress test I was able to get Pi up to 69°C. With Noctua fan the temperature reached 61°C for brief moments.
40mm fan will also provide cooling to the bottom of PCB.
BOM
- 1x Noctua NF-A4x20 5V PWM (optional, recommended)
- 4x Screws for mounting Pi 5
- M3x15mm in case you are willing to drill into your SBC
- M2x15mm in case you are able to source them
- 4x 17mm standoffs (M3 or M2.5 depending on screws you'll use)
- 4x M3x25mm (for fixing top part to bottom)
- 4x M3x5x4.2mm heat inserts
- Tools for drilling and soldering
Printing
I printed from PET-G due to its higher glass transition temperature (Pi 5 has potential to reach ~85°C in extreme situations, although probably not in this case).
Printed with 0,4mm nozzle, 0,2mm layer height. Print flat on bed, you will need almost no supports (except screw holes on bottom and fan hole on the side, maybe ventilation grill just to be sure).
Assembly
- (optional) expand holes in your Pi 5 and SSD HAT
- (optional) unscrew original fan and clip off its connector (you will need that)
- (optional) solder wires from connector to standard fan connector (beware of different polarity!)
- mount Pi 5 using screws and standoffs (don't mount standoff near USB-C yet)
- mount power button arm in the place of standoff near USB-C and make sure it touches power button slightly but the button is not pressed
- mount and connect SSD HAT
- mout and connect 40mm fan
- put in heated inserts into holes of top part (take care of thin walls, I held them with pliers to prevent bulging)
- close the lid and secure with long screws
Recent changes
1.2.2025 - added M3 and M2.5 power button variants
Final words
If you'll use this design, please share your print and observations to potentially improve this design. I appreciate any feedback.

Gostou deste modelo? Crie uma conta grátis para salvar seus favoritos e voltar a eles depois.
Criar conta