Você está no 3DFinder
Buscamos em Thingiverse, MakerWorld e Printables ao mesmo tempo para te dar o melhor de cada uma.
Descrição
An anatomically correct scaled-up version of a DNA model.
All dimensions are correctly scaled to keep the correct ratios.
The model is the B-DNA double helix that is most commonly pictured.
Easy to print and assemble. Stack as many of them together as you want.
For assembly, you will need some superglue or 2-part epoxy. I recommend epoxy at least for the first parts so you have more time to align everything.
Dimensions
The DNA has the following scaled dimensions:
- helix pitch - 100 mm
- helix diameter - 58.8 mm
- backbone (helix) diameter - 5.88 mm
- base pair diameter - scaled to 2,94 mm
- number of base pairs - 10.5
The actual model height is around 95 mm to round the number of base pairs to 10. This makes it easier to stack as you can have the same shape for each next level.
For the same reason, I did not implement backbone tilt which should be -6°.
Assembly
Step 1
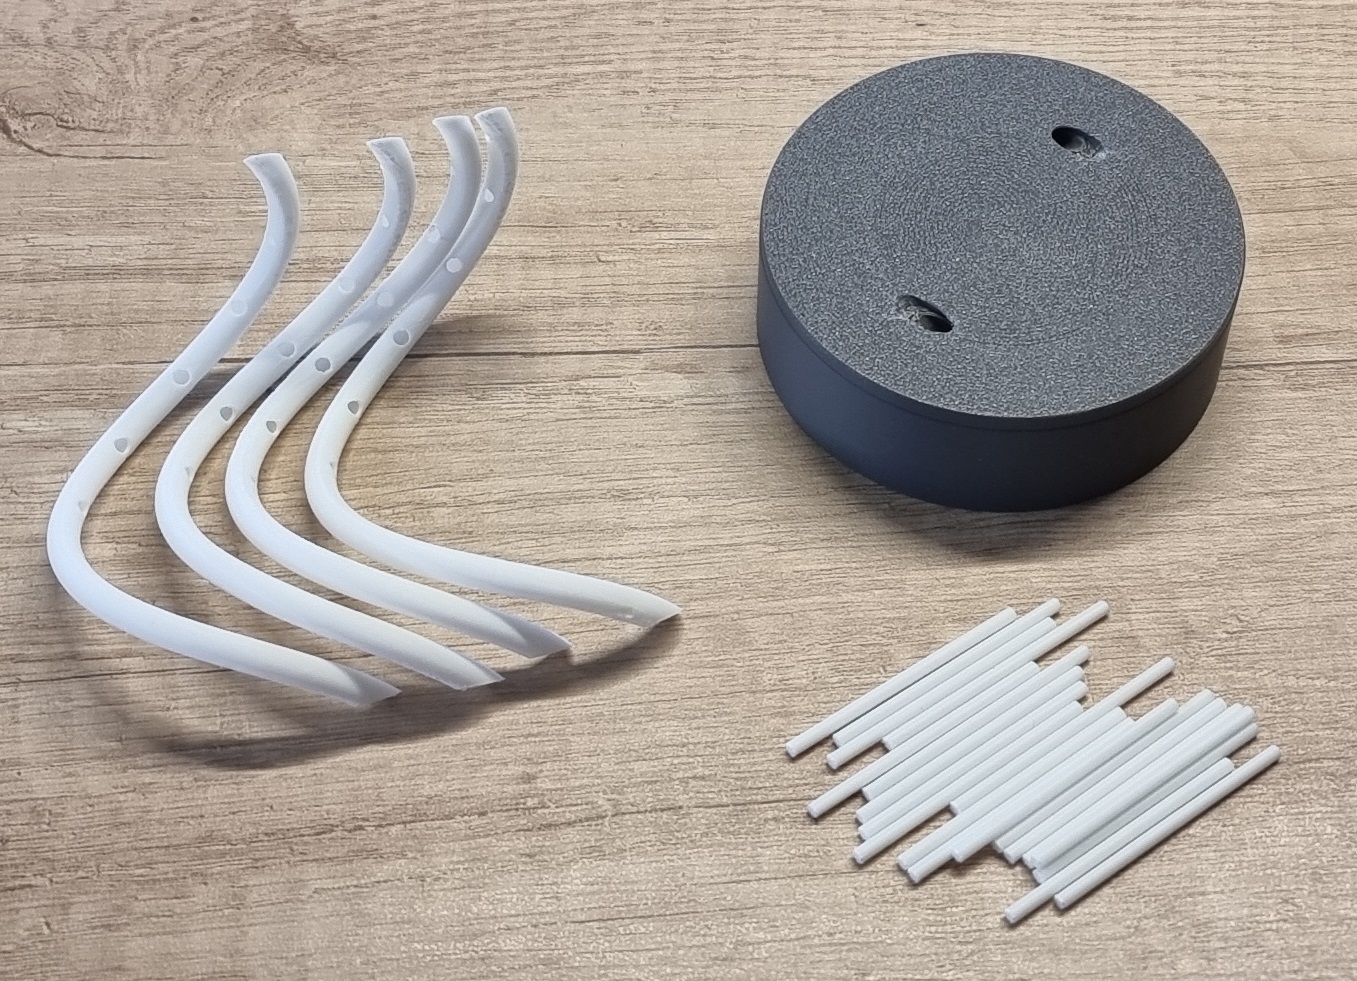
A single helix assembly is about 95mm high without the base. Print the required amount of copies to achieve the desired height.
The print profile has single and double height helix available.
Decide which plate to print. If you plan to use an LED or EL wire to illuminate the hollow helix model use the thick plate. The thick plate is also recommended if you plan to have a tall model. In this case, you hide some weights inside it to make it stable.
Print all of the required parts. If you plan to install illumination I recommend printing at least the helix parts in white, semi-transparent, or transparent material.
Support removal will be difficult but the helix is somewhat flexible. I found it the easiest to start at the top, slowly cutting away the supports with side cutters and a knife.
Since supports are also protruding into the model through the holes you need to pay attention to completely remove them if you plan to illuminate the model.
Go slow and be patient.
Step 2
If stacking multiple copies, glue the helix parts together first. Make sure you orient them correctly. It is worth going slow and aligning everything well to get the best look at the end.
I made the mistake of trying to glue them afterward (assemble the previous level first). While it can be done it is more difficult, especially if you plan to install the EL wire for illumination.
Glue one helix onto the base. Make sure it is aligned. If you look from the top it should be visible if the helix is not centered.

Slide a few base pairs (the thin small tubes) into the glued helix but do not glue them yet. This will help you align the second helix.

Step 3
Add the second helix. This will require some patience if you have a tall model. Use the base pairs to make sure the helix is aligned. Also, look from the top. The base pairs should only protrude into the helix by about 1 mm or less.
Glue the second helix into the base once it is positioned properly. You can remove the base pairs.

Step 4
If you plan to use the EL wire I recommend installing it now. If you glue the base pairs too deep into the helix you won't be able to do it later.
Start at the bottom.
Apply a bit of glue onto both ends of the base pairs. Also, apply glue to the helix holes. If using superglue you will need to work fast.

Quickly slide the base pair part into the helix hole and then into the opposite one. The base pairs need to be inserted into the helix only about 1 mm or less (helix part wall thickness). Hold until the glue sets. If using epoxy you can install several base pairs and then hold until the glue sets.
Alternatively, insert the base pair first and apply the glue onto the joint. If going this way, rotate the base pair to ensure the glue is distributed evenly along the edge.
Continue until you glue all of the base pairs.
Step 5
That is it, your DNA model is complete.

If you install the EL wire you will get a nice soft glow effect.
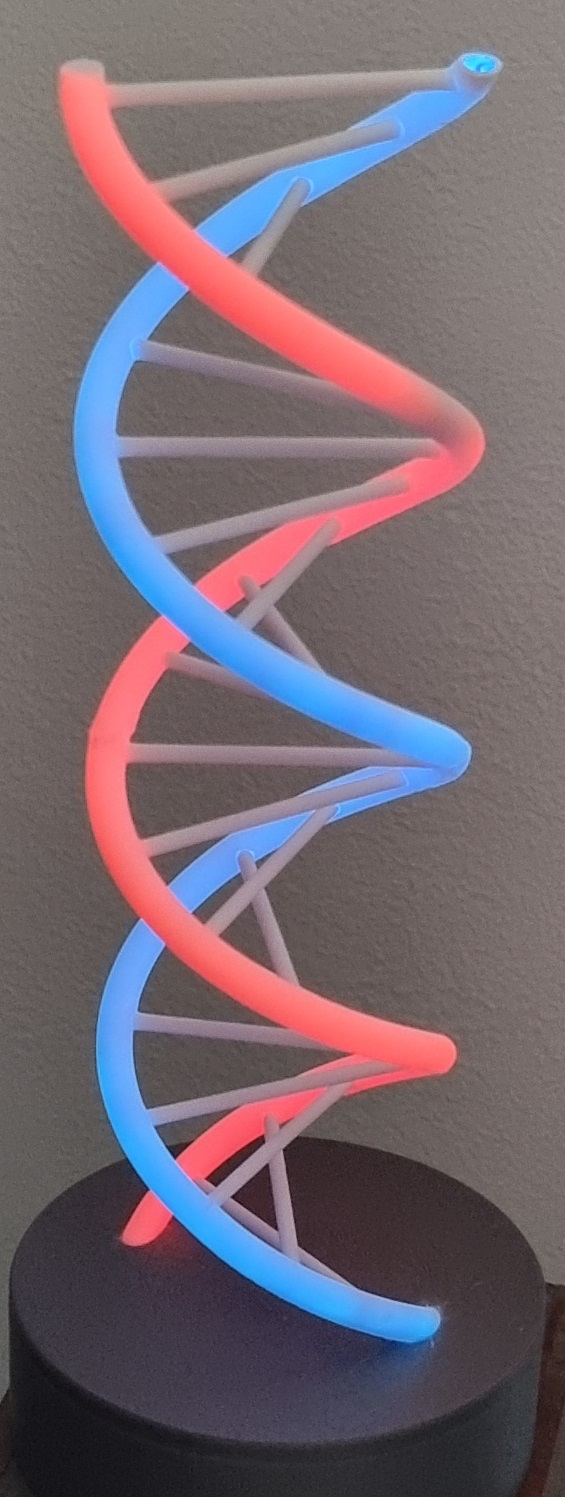
DNA model - anatomically correct and stackable

Publicado em 15 de jan de 2025