Você está no 3DFinder
Buscamos em Thingiverse, MakerWorld e Printables ao mesmo tempo para te dar o melhor de cada uma.
Descrição
A pendulum wave is a physics demonstration where a series of pendulums with gradually increasing lengths are set swinging simultaneously, creating a visual effect of traveling waves appearing to move across the pendulums, showcasing concepts like periodicity, wave behavior, and beat frequencies as the different lengths cause the pendulums to oscillate at slightly different rates; essentially, it visually demonstrates wave motion through the coordinated swinging of multiple pendulums with varying lengths.
Key points about pendulum waves:
Varying lengths:
Each pendulum in the setup has a slightly different length, leading to different oscillation periods.
Visual wave effect:
When all pendulums are started at the same time, the varying swing patterns create a visible wave-like pattern moving across the system.
Demonstration of physics concepts:
This setup can be used to teach about concepts like wave propagation, standing waves, beat frequencies, and the relationship between length and oscillation period.
(Description generated with AI assistance)
Assembly Instructions
Print all the parts. The top beam prints with supports. All of the other parts print without supports.
The legs can be glued into place or slipped in place without glue. In the illustrations here you will notice tape being used to temporarily hold the legs in place during assembly. Glue is not required, but if you wish to keep it assembled for a long period of time, use glue.
Place 8 marbles in the marble holders. The marbles used here are standard toy marbles that measure 15.6mm to 15.8 mm.
 <img src="https://makerworld.bblmw.com/makerworld/model/DSM00000000987228/design/2025-01-12_e9115c54a8011.jpeg" alt="A ball on a string
Description automatically generated with medium confidence" width="314" height="344" />
 <img src="https://makerworld.bblmw.com/makerworld/model/DSM00000000987228/design/2025-01-12_a4bd7181ac4ea.jpeg" alt="A close-up of a piece of metal
Description automatically generated" width="346" height="259" />
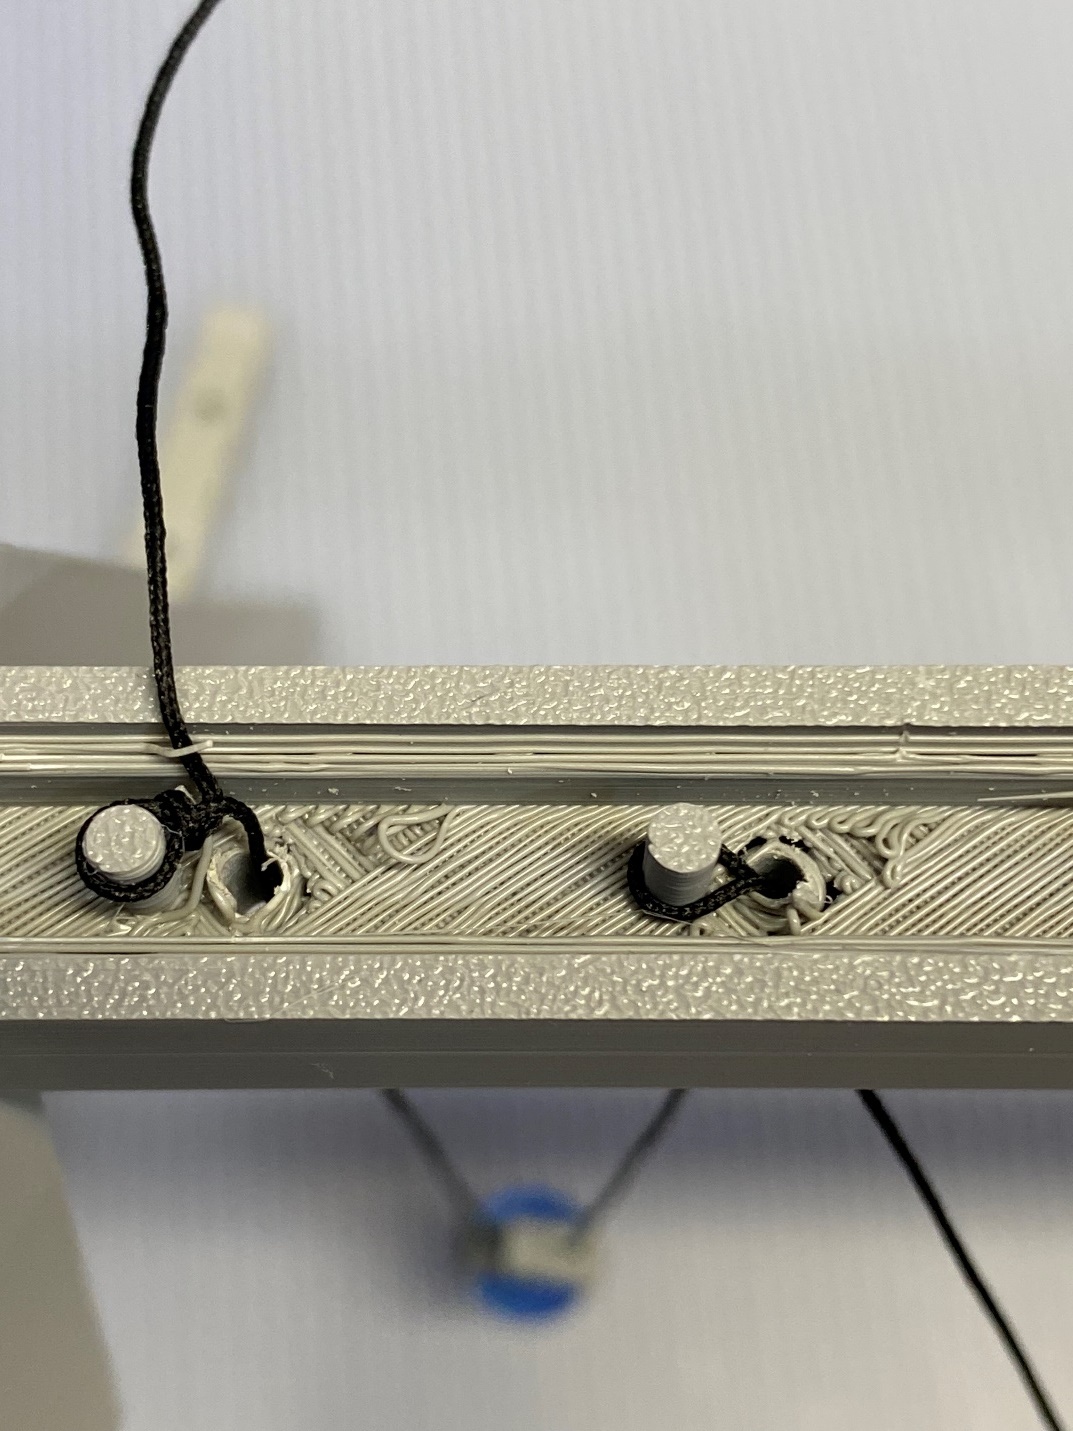
Continue the process of adding marbles by repeating the process. You may be able to save some time by bending the string and pushing the bend up through the hole and placing it over the peg. But if that doesn’t work, simply thread a marble holder onto the string and thread the bitter end up the hole, around the peg, and back down the hole.
<img src="https://makerworld.bblmw.com/makerworld/model/DSM00000000987228/design/2025-01-12_a9dab5c217651.jpeg" alt="A close-up of a model of a bridge
Description automatically generated" width="374" height="246" />
Placing the string just once around the peg will simplify the adjustment process.
Each marble should be on a slightly shorter string as you progress through the installation.
<img src="https://makerworld.bblmw.com/makerworld/model/DSM00000000987228/design/2025-01-12_95f6f731226bd.jpeg" alt="A close-up of a device
Description automatically generated" width="240" height="320" /> <img src="https://makerworld.bblmw.com/makerworld/model/DSM00000000987228/design/2025-01-12_9220f55c19533.jpeg" alt="A close-up of a machine
Description automatically generated" width="240" height="320" />
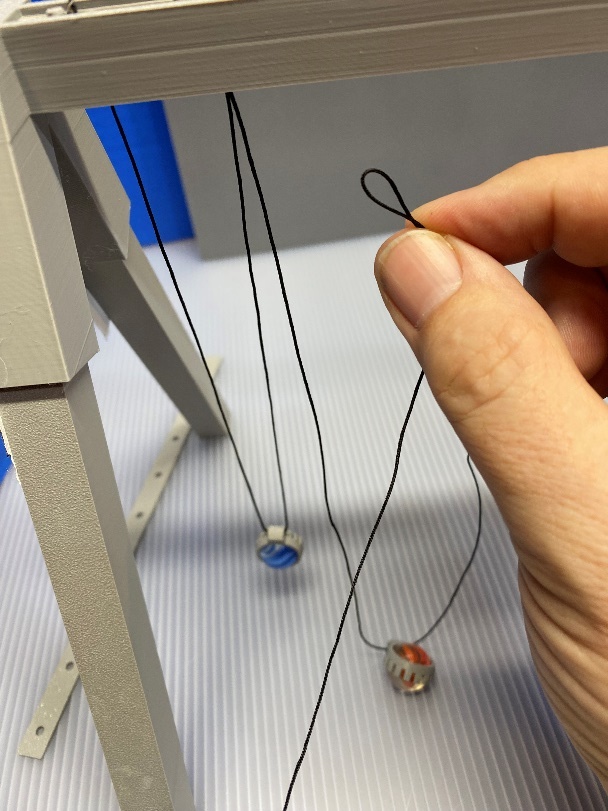
Tie the string to the last peg after all the marbles are installed. Lay some extra string in the top of the beam before installing the top plate. The extra string can be used for future adjustments if needed.
<img src="https://makerworld.bblmw.com/makerworld/model/DSM00000000987228/design/2025-01-12_ee8c6bd2b4d4e.jpeg" alt="A hand holding a pendulum
Description automatically generated" width="315" height="236" />
Carefully adjust the strings so that the strings get shorter in equal increments. In this picture, more adjustment is required as the marbles in the middle are nearly equal and the ones on the right are too short. This is close, but not quite there yet.
<img src="https://makerworld.bblmw.com/makerworld/model/DSM00000000987228/design/2025-01-12_2dc956a2cbec8.jpeg" alt="A close-up of a bridge
Description automatically generated" width="314" height="235" />
Here is a view of the strings from underneath the top beam. Ensure that there are no twists in the strings and that the marbles are not twisted out of alignment.
<img src="https://makerworld.bblmw.com/makerworld/model/DSM00000000987228/design/2025-01-12_f419085142cf6.jpeg" alt="A pendulum with balls from strings
Description automatically generated" width="624" height="468" />
Here is the finished Pendulum Wave, ready to go.
To operate the Pendulum Wave, use the start stick and press in on one side against the marbles. Hold the marbles at an angle close to the angle of the legs. Quickly withdraw the start stick to start all the marbles swinging equally. Watch and enjoy as the wave pattern develops and changes.