Você está no 3DFinder
Buscamos em Thingiverse, MakerWorld e Printables ao mesmo tempo para te dar o melhor de cada uma.
Descrição
Kepler's Candy Dish - An Orbital Simulator for Your Coffee Table
Serving as a handsome candy dish while not in use for experimentation, this project is designed to demonstrate the behavior of bodies in orbit, the exploration of which is credited in part to Johannes Kepler(1571 - 1630). It has 2 parts:
- a dish conforming to a hyperbolic funnel shape to simulate the gravitational field of a celestial body.
- a ramp with which the entry angle and velocity of a marble can be precisely selected. The ramp is held in place by a dovetail spring pin included in the profile.
Inspired by a gravity well exhibit in a mall I visited as a kid where patrons would watch the curiously long roll time of a quarter spiraling down a large smooth funnel. The quarter had a fixed rolling path and would always follow a circular spiraling pattern determined by the drop-in ramp, but I wondered if eccentric(non-circular) orbits could be modeled given variations in the entry vector that were not allowed in the exhibit.

This demonstration requires a sphere to act as the orbiting body. It was designed around a 10 mm stainless steel sphere but balls or marbles of diameters up to about ½ inch and down to 0.177” (BB gun projectile) will work. I think more mass is generally better, but observing the behavior with orbiting bodies of various mass is part of the experiment!
The dish profile was not arbitrarily selected. I used Excel with an equation approximating gravitational force to generate a graph. That was screenshotted, used as a canvas and traced in F360. The curvature images are taken throughout the prototyping process. Informed by several test models, the final dish profile has a less dramatic curve - still proportional to force of gravity.

Conclusion:
So, can orbits of various eccentricities be repeatably modeled by controlling the launch vector’s direction and magnitude? My hypothesis was generally correct that orbital paths can be crudely modeled but as expected, the relatively small scale of the model makes it disadvantaged against factors such as friction and surface imperfections. A much larger model with a more massive ball would make the phenomena more observable. You basically get 1 good elliptical period before the orbit significantly decays. This still does an impressively good job demonstrating Kepler's laws despite the limitations. Plus, what it lacks in scientific fidelity, it makes up for in charm being a stylish dish for candy, your car keys, EDC dump, cat food…. See below for a short description of Kepler’s laws and how each can be observed using this learning aid.
Notes on Printing and Assembly Instructions:
- There are a few print profiles. Basically, A multi-color, single color - the protractor ticks are simply extruded into the dish model. Another will have the hole in the bottom closed
- There is a dovetail spring pin that holds the ramp to the dish that I developed specifically for this application. I recommend that this is printed lying flat with concentric 100% infill - as it is in the print profile. It will press fit nicely to start but some C/A glue should be used to keep it in place.
- As you might expect the dish works best when the layer lines have been sanded smooth. I took about 10 minutes total with 120, 220, and 320 manually and with the orbital😉 power sander. The launch ramp also benefits from a few strokes with 220 grit sandpaper.
- Assembly is simple and self-explanatory.
Other Notes:
- Launching from the top of the ramp will result in escape trajectory(wall collision) at almost all entry angles. Use the ticks on the side of the ramp to experiment with ideal entry velocity. The first launch ramp was too steep. The redesigned one is better.
- There is 15% infill near the top to ensure geometric fidelity at the dish surface and 5% infill near the bottom to conserve material.
- I left the hole in the center of the dish open to allow for future plans of a detachable base which would have a chute to return the ball after each run. There are holes in the bottom for indexing pins that would be on the base. Alternatively, I would make another profile with the hole closed - so your candy doesn't fall out! This could be done with a primitive shape in the slicer.
- There is a great deal of flexibility and choices in the hyperbolic funnel profile. The first one was way too flat, the second had too much curvature. This iteration is better but surely it can be improved upon.
The print comes in 3 parts. The dish, the ramp, and a custom designed pin to attach the ramp to the bowl with a satisfying snapping action. The ramp is captured, removable, and is allowed to pivot toward any desired entry angle. The pin was an interesting design opportunity and this is the 5th iteration. The first iteration was far simpler but allowed movement too freely so that it would be accidentally bumped while trying to carefully place the marble. The next iteration added enough friction to prevent such movement but it had too much play - meaning that in addition to rotating, it was also free to translate which hindered repeatability. It also protruded into the body of the ramp too far which became a problem when I decided I needed to redesign the ramp with a reduced slope. I'm pleased with this iteration of this spring dovetail design; a few other thoughts about it:
- It must be printed lying down to correctly align the layer lines with the forces needed to activate the spring. This is why it's not integral to the ramp. It is also best to print it with 100% concentric infill.
- The spring dovetail feature was selected to pull the 2 parts together, increasing the friction resistance between the 2 faces - meeting design criterion described above.
- 5 of these pins are on my desk from prototyping and natrually they've turned into fidget toys(very satisfying). Measuring them after 100’s if cycles is indicating no plastic deformation or dimensional creep so far.
- The peg on the top of the pin is meant to have a press fit into the bottom of the ramp. It works well but will probably work loose over time because the dovetail end is always putting tension on it. I recommend assembling with C/A glue to ensure the peg stays firmly fixed to the ramp.
Notes on final redesign before contest deadline:
- More attempts at weight and time saving: dialing in infill, minimum possible top layer thickness, etc… 15% reduction down to 170 grams
- After testing with dozens of marble sizes and weights, I hypothesized that the dish profile’s slope is too severe near the center and too gradual near the edge. The new revision splits the difference it seems to work noticeably better at sustaining orbits and exhibiting Kepler’s Laws.
- Attempting to minimize the need for sanding with variable layer heights in the most critical area of the dish slope. I had no luck with this so it's reverted to 0.2. It simply ruined the surface with bubbles but it may have been the filament… I scrapped the idea.
- Final redesign of the ramp and dovetail spring pin. This one is snug with no play and pops in and out with a satisfying snap action. I'm pretty happy with it. Please consider gluing the pin to the ramp.
- I thought the launch ramp was too steep. The new one is less steep making more of the ramp usable and providing finer speed calibration.
- 2 color design for the dish.
- Working on a profile with the hole in the bottom closed.
Kepler’s Laws of Planetary Motion on Display:
Learn more about Johannes Kepler and his 3 laws with this short video from NASA’s archive:
Here are some key points on how Kepler’s laws are exhibited with this project.
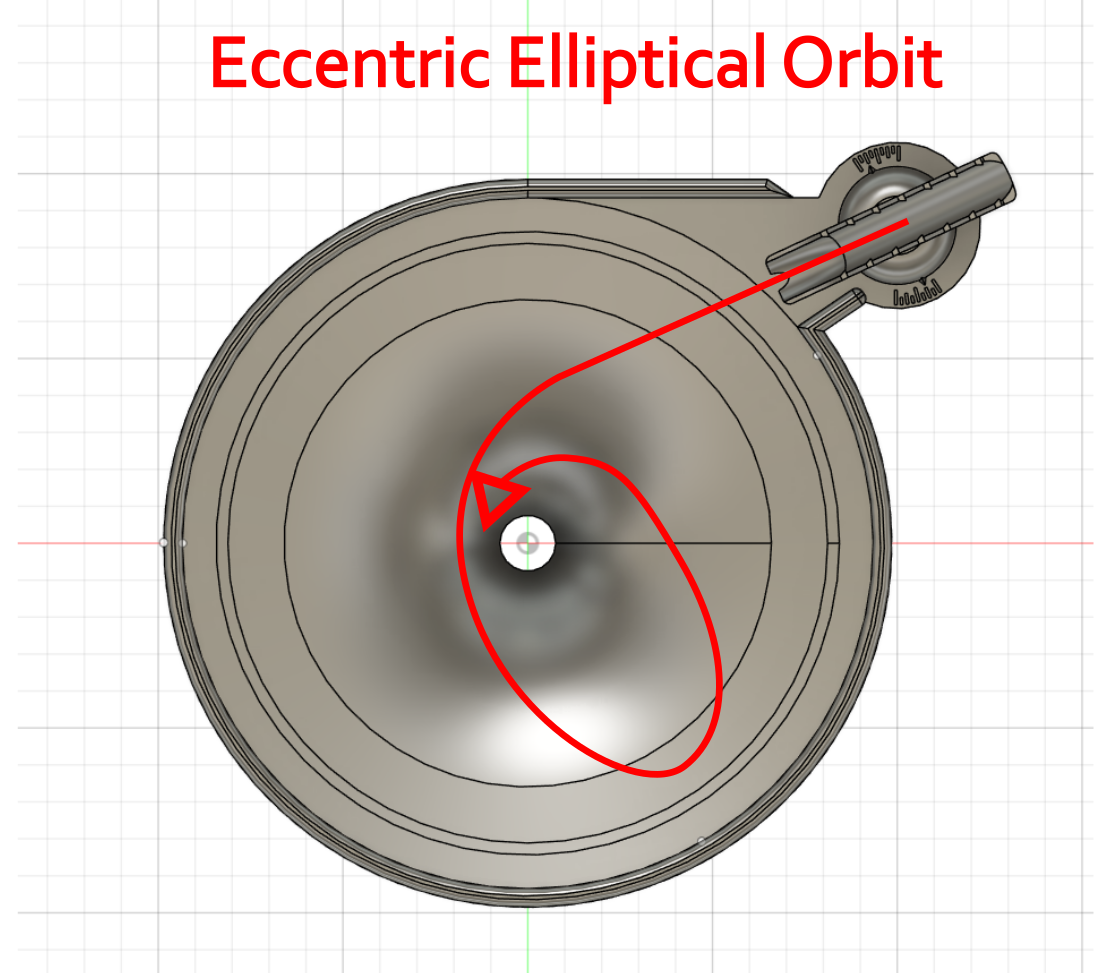
- The Law of Orbits - Orbits are elliptical with the attracting body at one focal point
- Demonstrated by: Adjusting the entry angle to create both circular and elongated elliptical paths
- Observable in the dish: Launch the marble with a non-tangential entry angle and watch it trace an elliptical path.
- The Law of Equal Areas - A line from the central body to the orbiting body sweeps out equal areas in equal times
- Demonstrated by: Watching the marble speed up as it approaches the center and slow down as it moves farther out
- Observable in the dish: The marble moves noticeably faster at the "perihelion" (closest approach) than at "aphelion" (farthest point)
- The Law of Periods - The square of the orbital period is proportional to the cube of the semi-major axis
- Demonstrated by: Comparing orbit times at different average distances from the center
- Observable in the dish: Larger orbits take longer to complete than smaller ones.
Thank you for checking out my project and submission for the Physics Contest.
