Você está no 3DFinder
Buscamos em Thingiverse, MakerWorld e Printables ao mesmo tempo para te dar o melhor de cada uma.
Descrição
This project just won first place in MakerWorld's Physics Education contest! I'm honored – thank you.
Major Update - 21 Jan 2025:
- The Modular Wind Tunnel for STEM Education and all of its accessories are now FREE and published under a license more amenable to community contributions.
- I am doing this in an effort to maximize the reach of the project – I'd love to see the project grow into more applications: homes, classrooms, makerspaces, etc. The more we can get kids participating, the better!
- I greatly appreciate all of those who have purchased the designs from my Printables Store and I am especially grateful to my Club members for their ongoing support. Your support has allowed me to recover my initial investments in a new printer, hardware, and (lots of) filament for testing, and has supported my ongoing work for development of new additions – still coming!
- Please recognize that my making the project free going forward is not meant to devalue those who have chosen to purchase initially or recently – I am grateful for your support!
- I will keep my Printables Club open as a way for you to monetarily support my work. Designs I am working on in “beta” status – such as the forthcoming force balances, new LabPacks, and a control panel – will be posted soon as Club downloads as an additional incentive.
- I will reserve the right to post future accessories as paid Store downloads or Club exclusives, but my intent for now is to pivot toward a more-open model in general for my STEM projects.
- Commercial licensing is still available upon request – reach out privately.
Also:
- I recently presented a report on this project to the American Institute of Aeronautics and Astronautics at the SCITECH 2025 conference in Orlando. You can download a copy of my paper and/or presentation here!
UPDATE 1/15/2025:
Wow! The initial response to this posting has been thrilling. Thank you for all of your kind comments and boosts.
NEW! For those who wish to contribute compatible modules, components, test articles, etc for community use can now so as a remix to this new model, which provides the necessary remixable license alongside reference design files (F3D and STEP) for the project's four most-critical interfaces:
- Large duct
- Small duct
- Test section wall module
- Gridfinity test article base.
I can't wait to see what the community adds to this effort. Thanks again for your support!
Project Introduction
This is a major design project for a functional, interactive, modular low-speed wind tunnel designed entirely around FDM/FFF 3D printing.
As a high-speed aerodynamics research engineer professionally, I am always interested in getting more kids excited about science, engineering, and math (STEM).
I designed this wind tunnel principally as a platform for rich STEM play and exploration for my two daughters (ages 3 and 7). I hope to teach them about what I do and to engage their scientific curiosity.
In addition to play at home, I also plan to offer demonstrations to their Girl Scout troops and science classes. By posting it for public use here, I hope that others will find creative ways to reach the kids in their own lives and communities. With luck, perhaps we’ll get a few more kids excited about science and engineering!
With these use cases as the primary motivation, I designed this project to optimize for fun, educational value, ease of use, and safety; it is not intended to be a high-performance or highly-accurate research instrument. That said, the design was broadly informed by many relevant best-practices and guidelines used in larger, active wind tunnel research and test facilities.
The project description below is organized as follows:
- Printer Requirements - required build volumes and recommendations
- Low-Speed In-Draft Wind Tunnel Overview - a brief guide to tunnel components, flow diagnostics, and operation
- Modular Test Articles and Support Adapters - a description of the included aerodynamic test articles and fixtures for various popular objects and toys
- Additional test articles and accessories will follow as separate models on my account.
- Major Tunnel Components to Print - a high-level overview of the parts required for minimally-viable and fully-configured builds
- Approximate Cost Estimate - a cost estimate for filament usage and recommended hardware/accessories
- Components for Purchase - A complete list of recommended purchases for hardware, diagnostics, and recommended accessories
- Printing Recommendations - printing and assembly techniques for the project in general, some for specific individual parts
- References - additional links and resources where you can learn more about wind tunnels, aerospace engineering, and fluid mechanics
Enjoy! Please reach out to me here or find me elsewhere at [https://www.hofferth.net/.](https://www.hofferth.net/.)
Printer Requirements
The largest project components were designed for compatibility with printers that have a 256x256x256 mm print volume (e.g., Bambu A1, X1, P1P, P1S, Creality K1 Max, or Prusa XL) – this is the standard (baseline) configuration. Most other parts downstream of the stilling chamber and contraction were all designed to print on a Prusa Mini+ (180x180x180mm).
An enclosure will likely be beneficial for preventing warping, but may not be required depending on print settings and material choices. More guidance is provided below.
An alternate configuration for small printers: To print even the largest chamber components on a smaller printer like a Mk3/Mk4 (210 x 250 x 220), Ender 3/5 (220x220), or even Prusa Mini / Bambu A1 Mini (180x180), see the “Small Printers - Alternate Chamber” print profile.
Low-Speed In-Draft Wind Tunnel Overview
There are many different types of wind tunnels, each used for different purposes or speed regimes. This is an in-draft (or open-return) low-speed wind tunnel. In this concept, air from the room is drawn through the tunnel by a fan, accelerated over a test model, decelerated, and exhausted freely into the room. The in-draft tunnel is a simple concept, similar in architecture to the earliest wind tunnels used by Orville and Wilbur Wright.
As it enters the bellmouth inlet and proceeds into the tunnel, air is first processed by a set of “flow conditioning” components: a honeycomb flow straightener serves to align the flow and break up large-scale turbulence, and a set of mesh screens breaks up progressively smaller scales of turbulence. Empty duct sections then further allow the remaining smallest scales of turbulence to relax – or decay – due to viscosity.
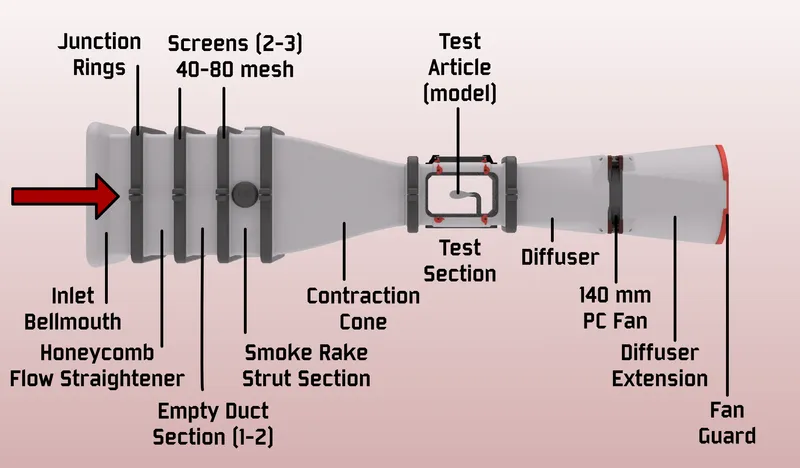
Then, the flow is then pulled through a contraction cone, which squeezes the flow into a smaller cross-section (here by a 4:1 area ratio), causing pressure to drop as it accelerates to test velocity.
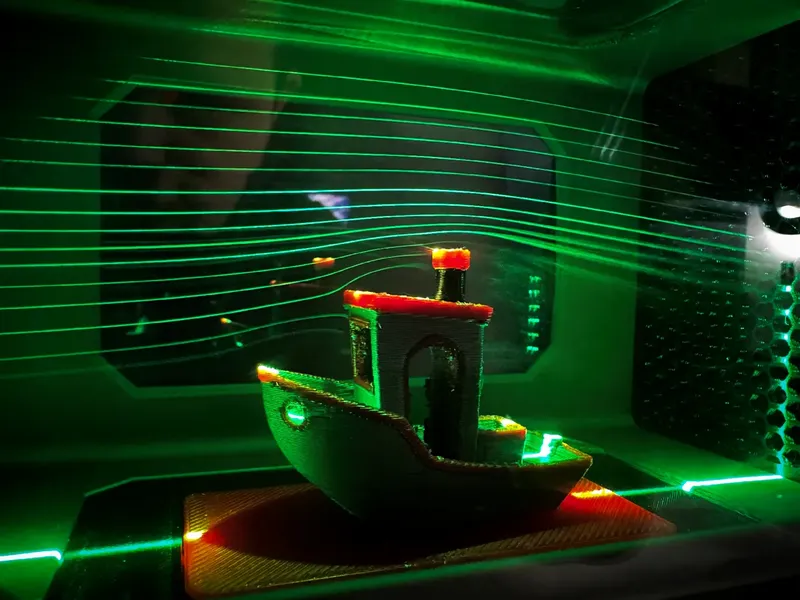
Airflow then enters the test section where various test articles (or models) are placed for flow visualization or measurement of data (forces, moments, pressures, shear stresses, etc.). In this wind tunnel, lines of smoke or fog can be injected upstream of the contraction cone, producing streaklines over the test articles. Visualization may be aided by a laser sheet that illuminates only a thin sheet of the smoke flow, isolating certain flow features.
Downstream of the test section, a diffuser slowly expands the flow out to a larger area, exchanging flow velocity for static pressure as it approaches the fan and exhaust.
Because this 3D-printed wind tunnel design was created to be highly modular, the configuration of the wind tunnel itself can be a source of rich experimentation. Start with just the core components (contraction, test section, diffuser, and fan) and see how the flow improves as you add the additional upstream flow-conditioning components (bell-mouth inlet, honeycomb, screens, empty duct sections).
- How does the honeycomb section contribute to flow uniformity?
- How do various screen configurations affect flow steadiness?
- How does the extended diffuser section help?
- How does the performance of the provided diffuser and Noctua fan differ from the upgrade option?
NASA's Beginner's Guide to Wind Tunnels is a great place to learn more about the basics of wind tunnel concepts, and additional references are provided at the end of this description.
Modular Test Articles and Support Adapters
All of the following test-articles and adapter bases of various types are included in the project. Most of the basic modular test-article supports are based on the popular Gridfinity standard, magnetically attached to the test-section floor and very easily swapped without tools.
Magnetic hot-swappable test-article bases (Gridfinity-compatible in 2x1 pattern)
- Traditional aero models on a strut/sting base
- Configurable angles of attack, sideslip, and roll
- Large flat plate with side fences (notice the boundary layer)
- Example aircraft and spacecraft shapes
- AGARD-B
- SpaceX Starship, oriented for ascent and belly-flop landing
- Negative volume for interface provided to aid remixes
- Other interesting aero models:
- An F1-style rear wing derived from this public-domain design
- Bases for 3D printing favorites:
- Base for Emoji extruder bobble-heads and compatible remixes
- Base for 3UDC miniature display connectors and accessories — great for kit card aircraft such as those by @Nakozen.
- Bases for interactive exploration:
- "Brick"
- "Brick" Technic (plus compatible smooth and dimpled spheres)
- "Brick" DUPLO
- Strut for miniature paper airplanes (from card stock or playing/index cards)
- Bases for popular miniature toys:
- 1:43 and 1:64 die-cast cars (e.g. Matchbox)
- Fischer-Price Little People
- A specific 1:43 F1 car model from Bburago
Sidewall-mounted test article support
- Magnetic hot-swap mounting and print-in-place AoA adjustment
- Supports “half-span” aircraft models, such as:
- e.g., F-22 Raptor by @DeltaX (shared here with permission)
- Negative volume for interface provided to aid remixes
Major Tunnel Components to Print
Below are the major 3D-printed components of the wind tunnel project. The items in boldrepresent the bare minimum for a functioning wind tunnel configuration: essentially, you will need at least a contraction cone, basic test section, diffuser, and fan joined together with printable “junction rings”.
The numerous additional components listed will all add value, whether in the form of improved flow quality, test-article support/modularity, ease-of-use, or flow-diagnostics support.
- Inlet and Flow Conditioning
- Inlet bellmouth (1)
- Honeycomb flow straightener (1)
- Empty duct section(s) (1-2)
- Smoke-rake strut support section (1) and various smoke wands:
- Full-span centerline strut
- Short-span triple strut
- Quick-install cylindrical strut
- Rake strut port cover (4)
- Contraction cone (1)
- Large junction rings (1-4+)
- Modular Test Section (1) Frame
- Acrylic windows (1-4)
- Quick-release retainer tabs (8-16)
- Blank wall (0-4)
- Gridfinity-compatible modular test article support floor (1)
- LED ceiling module for Aputure MC RGBW panel (1)
- X/Y support gantry for 520nm laser sheet (1)
- Small junction rings (2)
- Diffuser with Fan Interface (1)
- Extended Diffuser (1)
- Fan Guard (1)
- Stands (2-4)
Available Separately:
- Gridfinity organizer tray for test-article modules and accessories
- Window base
- Rake strut bases
- Rake port-cover bases
- Test section floor/ceiling module bases
- Test section LED and laser module bases
- MicroFogger base
- Alternate support stands using ½" EMT Conduit and RepRack-compatible design
- End supports with carrying handles
- Cradles for upstream chamber
- Cradles for test section
- Cradles for standard diffuser and 140mm PC fan
- Cradles for upgrade diffuser and 8" duct fan
- Diffuser and fan upgrade kit - significantly increase maximum test-section velocity with a longer, broader diffuser and an 8-inch duct fan (AC Infinity Cloudline A8/S8/T8). Install a separate nacelle and splitter plate, or try it without.
- Lab Pack: Aerodynamic Drag Basics
- Compare wake flows behind airfoil, flat plate, bullet, cylinder, and prism shapes
- All have equal frontal area but very different drag coefficients
- Learn concepts core to “streamlining” for drag reduction
- Lab Pack: Vortex Generators
- Visualize the wall flows around 4 basic “vortex generator” shapes
- Learn how creating momentum exchange in the boundary layer can delay stall, preserve control surface effectiveness, and more.
Approximate Cost Estimate
The wind tunnel project can be started for under $200 including filament for the printed tunnel components and necessary purchased elements (fan, power supply, and miscellaneous hardware).
- Filament: ~$100 (~5 kg est.)
- 140mm PC fan and power supply: $50
- Hardware: ~$50
These additional accessories (~$100-300) are highly recommended for the full experience:
- Smoke generator:
- Commercial handheld smoke generator using vegetable glycerin and propylene glycol (VG/PG) (e.g., Vosentech, PMI, LensGo, Ulanzi etc.): $100-250, or
- Conventional water-based smoke generator $50, or
- DIY handheld VG/PG option $50
- LED panel light as flood illumination:
- Aputure MC RGBWW (secure-mount ceiling module provided): $90
- Alternate similar LED panels: <$50
- Laser line generator for planar smoke-flow visualization:
- OxLasers: $40
Specific Components for Purchase (affiliate links)
- Fan and fan power
- Noctua NF-A14 Industrial iPPC 3000rpm PWM (or similar 140mm) PC fan
- Variable-speed PC fan power supply (> 10W) or similar
- Alternate diffuser upgrade design for AC Infinity Cloudline A8 Duct Fan
- Flow conditioning screens
- O-rings to seal between modules (optional, really)
- ASTM A568-160 (test section, small size)
- ASTM A568-275 (upstream, large size)
- Magnets
- Refrigerator Magnets (6x2 mm) (Gridfinity test-article bases and rake strut ports)
- Refrigerator Magnets (10x3 mm) (Gridfinity test-section floor)
- Heat-set inserts
- 5mm x 10mm (module junction rings)
- 2.5mm x 4mm (test section tabs + modules)
- Lighting
- Smoke Generator (power and fan-speed controls highly recommended). Examples:
- Vosentech MicroFogger 5 Pro (pictured, recommended)
- PMI SmokeGenie or Smoke Ninja
- Ulanzi Filmog Ace FM01
- DIY option (vape coil + fan)
- Flex tubing for smoke rake connections
- “Smoke Juice”
Printing Recommendations
The vast majority of the parts for this project are fairly straight-forward to print in obvious orientations with basic slicer settings, and do not generally require supports. However, there are a few suggestions to keep in mind:
General printing recommendations:
- PETG is recommended for most parts, but PLA will likely work just fine. In general, I simply wanted the increased robustness of PETG to reduce fear of shattering some of the larger parts if dropped or mishandled during transport. This will also be advantageous if you plan to transport it in a hot car to demonstrate it at a school, etc.
- Be confident in your application of best practices for bed adhesion and limiting the warping of the largest parts. I printed most of these using a Bambu X1 Carbon with a Textured PEI build plate and bed temperature of 85ºC. Minimize part cooling and chamber fan usage for the first ~10 layers – turn off the aux part-cooling fan. Keep your plate clean (free of dust and finger residue) using manufacturer's recommendations.
- All tunnel modules (except the inlet bellmouth) are intended to be printed with the flange face without an O-ring groove flat on the bed, but can also be printed on the opposite flange without much difficulty, as bridging across the O-ring groove is trivial.
- Consider using an 0.6 or 0.8 mm nozzle for the largest components to reduce print time with minimal relevant loss of detail resolution.
Part-specific printing and assembly guidance:
- Honeycomb flow straightener
- The model is provided as a single STL with two objects. The interior object should be configured to print with:
- 0 walls
- 0 top layers
- 0 bottom layers
- 20% hex grid (honeycomb) infill
- Printing it in this way is far more efficient than printing a fully-modeled hexagonal infill pattern as walls
- The part is still quite hefty – when sliced for an 0.8-mm nozzle, it consumes 1.2 kg of filament in a 26-hour print.
- For an alternate approach to creating a honeycomb flow straightener that uses much less filament, instead produce an extra “Empty Plenum Section” and pack it with lengths of common plastic drinking straws cut to 75 mm. Enclose the straws on both ends of the segment using screen mesh and one of the following techniques:
- The model is provided as a single STL with two objects. The interior object should be configured to print with:
- Screen mesh
- Two or three screen mesh sections should be installed across the inlet sections downstream of the honeycomb flow straightener. These serve to impart a small pressure drop, which breaks down the scales of turbulence in the incoming flow to progressively smaller scales, and allows those turbulent structures in the flow to decay/diffuse via viscosity, producing a cleaner, smoother airflow in the test section.
- Additionally, it is recommended to take a coarse (5 or 10 mesh) screen and install it downstream of the test section as a debris catch to prevent loose test articles from getting pulled downstream and damaging the fan.
- There are several ways to achieve installation of the screens:
- Method 1: simply slide the screens between sections as you join them securely together with the chamfered junction rings. This can be a little awkward but works.
- Method 2: insert a pause within 2-3 layers of the beginning or end of any tunnel section and print the mesh into the print permanently.
- Method 3: use the separate, thin “Print-In Screen Frame” to print the screen directly into a nice frame as for Method 2 but without risk to larger tunnel components.
- Method 4: use a soldering iron with a blunt tip (e.g., for heat-set thread inserts) to “spot weld” the screen into the flange face on either end of a tunnel component. This method is fairly easy and secure.
- Be careful of sharp edges of screen mesh, once cut to size, during assembly. Once the screen is installed and contained within the junction rings, it will be protected from contact with small fingers.
- Junction rings
- These are used to attach the components together by squeezing their chamfered flanges together as the segments are tightened together.
- One hole on each piece gets an M5x10 heat-set threaded insert. Alternatively, you can treat both ends as clearance holes and just use washers and nuts instead, but it is handy to have fewer parts to juggle.
- The larger size junction rings are offered in two varieties – half sections and quarter sections. I recommend the latter, as many more can be printed on one build plate at a time, and it is nice that this also gives you the option to tighten the flanges along both axes.
- O-rings
- O-ring grooves are provided at each component interface and have been designed to standard sizes, but they are certainly not essential for the modest goals of this project. If you do want to get some, choose the softest-durometer material you can find.
- If only to maximize the absurdity of this project being almost entirely 3D-printed, I have included designs for “printable O-rings” that can be made from a low-durometer TPU.
- Test section frame
- Most printers should be able to handle bridging across the downstream edge of the open window apertures without supports. Consider using "thick bridges” and make sure “detect bridging perimeters” is selected.
- Use M2.5x4mm threaded inserts for rotating window retainers
- Acrylic windows
- I have provided PDF and SVG vector drawings for acrylic windows for the test section. These are best fabricated by a laser cutter from 3 mm sheet to 80x130mm with 13mm-radius corners.
- Without a laser cutter, you can simply cut the acrylic sheet to the basic rectangular size - the rounded corners are not functionally necessary.
- Alternatively, you can order the windows on-demand using this preconfigured SendCutSend cart. Some fun extras are added to make the $29 minimum order.
- Diffuser and fan interface
- For this first release, the diffuser components are fairly specifically designed to mate perfectly with the Noctua NF-A14 iPPC 3000 fan model. I do intend to soon add an alternate design that is better suited to generic 140 mm fans.
- See also the aforementioned diffuser and fan upgrade kit offered separately
- Smoke rakes
- The full-span and triple-strut smoke rakes should be printed with the array of ports down on the bed – this will yield the cleanest holes and require no supports. You may want to add a brim to ensure adhesion, especially on the full-span rake.
- All three smoke struts are designed to mate with a smoke line via ¼" “Loc-Line” coolant fittings. They should fit securely if printed accurately.
- Experiment with tunnel fan speed (freestream velocity) and smoke power to find a good balance that creates clearly visible, sharp streaks of smoke in the test section. If your flow is too turbulent or the exit holes on your rakes too messy, the smoke lines will transition to turbulence and diffuse into a featureless cloud – not ideal for flow visualization.
- While not strictly necessary, I have modified my smoke rakes to have especially smooth exit ports and have been pleased with the results:
- After printing, use a drill bit to clean the exit holes to 2 mm or ~5/64". Do your best to clear any debris.
- Set into the holes segments of brass tubing 2 mm OD by 20 mm long. Keep them straight and even.
- If the tubes are not secure with just a press fit or aided with some heat, use a dab of superglue to seal them in.
Bambu Slicer - Preconfigured Plates
For users of Bambu 256^3 mm printers (P1S, P1P, X1C, X1E), a single .3MF file for Bambu Slicer is provided with 22 preconfigured print plates for an 0.4mm-nozzle setup. This uses approximately 5 kg of filament over 7 days of print time. Switching to 0.8mm nozzle for otherwise identical build plates yields a beefier print (6 kg material) and saves about a day of overall print time.
Coming Next and a Call for Feedback
In no particular order, here are some things I’m thinking about for where to take this next.
Updates to the core project files:
- Create variants of the diffuser sections that can better accommodate any standard 140mm PC fan.
- Revise the smoke-rake support section to allow the rake(s) to be translated across the test section to highlight off-center flow features without disassembly. Add new rake designs for unique configurations.
Additional “Lab Packs” and Guided Curricula:
I'd like to expand my documentation to include examples of fun group-demonstration sequences and laboratory curriculum to guide engaging, age-appropriate individual and team experimentation.
I plan to offer “Lab Packs” containing additional sets of test articles specifically highlighting interesting aero principles, and will include thorough with curriculum guides with each.
These are all works-in-progress - let me know what you'd like to see.
- Principles of lift - compare flow over a stationary and motorized rotating cylinder to visualize circulation and how it relates to lift. Compare symmetric and cambered airfoils at various angles of attack. Visualize the peak suction generated on an airfoil section using a simple fluid manometer.
- Parts of the wing - visualize the flow over an airliner-class wing and its various distinctive features: winglets, ailerons, flaps, slats, and spoilers
- Spacecraft aerodynamics - visualize flow over NASA's SLS on ascent, SpaceX's Starship during its “belly flop” maneuver, and the Space Shuttle Orbiter during a high-alpha flare.
- Automotive aero - explore various features of everyday automotive aerodynamics. See the benefits (or not) of spoilers and aero kits, and learn about various drag-reducing aerodynamic features prevalent on semi trucks.
- Formula One components – test several designs for front and rear wings (with and without “DRS” enabled) and measure the resulting downforces generated using a “kitchen scale” as a downforce balance. Understand the value of the closely-guarded flow features of the underbody floor in generating crucial downforce.
Future Wind Tunnel Upgrade Kits:
In addition, I have plans to offer various optional upgrade design packs, adding performance, efficiency, or interesting capabilities to the facility. Here are some possibilities:
- Modular Control Console Kit - Create a simple control console that can modularly incorporate fan speed control, LED/laser operation, smoke triggering (perhaps via the MicroFogger breakout board), and – optionally – interfaces to control the additional kits here:
- Instrumentation and Velocity Control Kit - build and program an Arduino-based microcontroller to read from low-cost instrumentation for measurement of pressure and test-section flow velocity and display it on a small display. Optionally, incorporate PWM fan control for closed-loop control of velocity.
- Lift-drag Balance Kit - build and calibrate a force balance for measuring lift and drag on any of the project's Gridfinity-mounted test articles. Incorporate 500g and 100g load cells into a floating 3D-printed frame as an test-section floor module, and acquire and process calibrated force data using an Arduino Uno and I2C load-cell amplifier modules.
- Model Attitude Control Kit - Add a capability for motorized pitch and roll of the test article, either via "Brick" Technic or RC servos and a microcontroller.
- Closed-loop circuit Conversion Kit - convert the default in-draft tunnel design into a full closed-loop / closed-return circuit. Learn about the advantages of this approach for flow quality, noise, and efficiency. Likely not ideal for smoke visualization.
Please don’t hesitate to reach out (either here on Printables or anywhere you can find me) with your thoughts and feedback, and I welcome your direct contributions to the project via Remixes.
How to Support My Work
What started as a casual nerdy-dad hobby project has become a much bigger (and more expensive) endeavor than I ever thought it would be. The “next steps” above are exciting possibilities for the platform, but I will need your support and contributions to justify seeing them through.
As an experiment, I have set up multiple ways for you to help:
- Purchase the recommended materials from the Amazon affiliate links above.
- Boost and download/print my designs - the incentives add up!
- Donate directly to my project funds at BuyMeACoffee.
- Sign up for a recurring membership in one of the tiers of my Printables Club, and enjoy special benefits:
- Subsonic Supporter - $3/mo: member exclusive models and beta releases, development blog updates, and community discussion/input
- Transonic Supporter - $5/mo: same as above, plus more of my gratitude ;-)
Supersonic Supporter - $10/mo: as above, plus technical support
Commercial Use License
I would be thrilled to see this in the hands of as many kids and kids-at-heart as possible, and I would love your help in making that a reality.
Of course, hobbyists, parents, non-profits, and public-school educators are all invited to produce, use, and modify/remix these designs subject to the indicated license. Go wild!
Commercial-use applications, rather, include:
- building and using a wind tunnel to promote your business or product
- using as an exhibit in a for-profit museum
- building and selling pre-fabricated copies of the wind tunnel or hardware/build kits based on the design
If any of these or similar commercial uses are something you are interested in, please feel free to get in touch to arrange terms. Thanks for your interest!
References
If you’d like to learn more about wind tunnels, fluid dynamics, or aerospace engineering in general, these are great resources!
NASA for Grades K-4:
NASA for Grades 5-8:
J. B. Barlow, W. H. Rae and A. Pope, “Low Speed Wind Tunnel Testing,” 3rd Edition, John Wiley and Sons, Hoboken, 1999.
C. Britcher and D. Landman, “Wind Tunnel Test Techniques: Design and Use At Low and High Speeds with Statistical Engineering Applications,” 1st Edition, Elsevier Academic Press, 2023.
FY Fluid Dynamics by Nicole Sharp (and her wonderful resources page)
How Wind Tunnels Work - F1 Explained by Willem Toet, Head of Aerodynamics at Sauber Motorsport
Links to Many Active Wind Tunnels, Subsonic Aerodynamic Testing Association (SATA)
Tropea, C., Yarin, A. and Foss, F. 2007. Springer Handbook of Experimental Fluid Mechanics, 1st Edition.
AEDC Test Facility Guide - Arnold Engineering Development Complex
Modular Wind Tunnel for STEM Education

Publicado em 11 de jan de 2025