Você está no 3DFinder
Buscamos em Thingiverse, MakerWorld e Printables ao mesmo tempo para te dar o melhor de cada uma.
Descrição
Hi!
Thank you for stopping in!
The Clock faces that I used will be added in Separate uploads in order to use the Maker World exclusive program on this upload. as HueForge models are not able to be used in the exclusive program.
Goku: [https://makerworld.com/en/models/900850#profileId-859810](https://makerworld.com/en/models/900850#profileId-859810)
Hardware used
Clock mechanism (56x56mm) 7.5mm base shaft. (Snug fit)
Clock hands
AA battery.
I used this clock kit, I do not have any Bambu Clock kits on had so I'm not sure if they are the same size.
[https://www.amazon.com/Movements-Mechanism-Different-Replacement-Accessories/dp/B08VGM33T4/ref=sxin_13_pa_sp_search_thematic_sspa?content-id=amzn1.sym.27b41115-b206-47c3-8621-713097e8442c%3Aamzn1.sym.27b41115-b206-47c3-8621-713097e8442c&crid=3DVNY21B0DP4Z&cv_ct_cx=clock+kit&keywords=clock+kit&pd_rd_i=B08VGM33T4&pd_rd_r=66b6a7dd-4105-4eb1-8db2-8e0f28e59776&pd_rd_w=DYWC0&pd_rd_wg=0Lvw3&pf_rd_p=27b41115-b206-47c3-8621-713097e8442c&pf_rd_r=K3RMBE17Y06SSGN9DB7S&qid=1734796838&sbo=RZvfv%2F%2FHxDF%2BO5021pAnSA%3D%3D&sprefix=clock+ki%2Caps%2C298&sr=1-2-6024b2a3-78e4-4fed-8fed-e1613be3bcce-spons&sp_csd=d2lkZ2V0TmFtZT1zcF9zZWFyY2hfdGhlbWF0aWM&psc=1](https://www.amazon.com/Movements-Mechanism-Different-Replacement-Accessories/dp/B08VGM33T4/ref=sxin_13_pa_sp_search_thematic_sspa?content-id=amzn1.sym.27b41115-b206-47c3-8621-713097e8442c%3Aamzn1.sym.27b41115-b206-47c3-8621-713097e8442c&crid=3DVNY21B0DP4Z&cv_ct_cx=clock+kit&keywords=clock+kit&pd_rd_i=B08VGM33T4&pd_rd_r=66b6a7dd-4105-4eb1-8db2-8e0f28e59776&pd_rd_w=DYWC0&pd_rd_wg=0Lvw3&pf_rd_p=27b41115-b206-47c3-8621-713097e8442c&pf_rd_r=K3RMBE17Y06SSGN9DB7S&qid=1734796838&sbo=RZvfv%2F%2FHxDF%2BO5021pAnSA%3D%3D&sprefix=clock+ki%2Caps%2C298&sr=1-2-6024b2a3-78e4-4fed-8fed-e1613be3bcce-spons&sp_csd=d2lkZ2V0TmFtZT1zcF9zZWFyY2hfdGhlbWF0aWM&psc=1)
PRINTING INSTRUCTIONS
ONLY THE BASE OF THE CLOCK IS IN A PRINT PROFILE, YOU NEED TO ADD YOUR HUEFORGE ART SEPARATELY. INSTRUCTIONS ON HOW TO DO SO ARE BELOW.
The only support to remove is where the clock mechanism goes.
This model uses negatives to cut away pieces of your Hueforge art (or other 2D art) that you make or that you download from another creator.
If you choose to make your own, ensure that it is at least 200mm wide and 200mm tall. I have had some luck scaling Hueforge art so long as I keep the Z height the same as the original.
STEP 1 OF 5
Preparing your HueForge Art.
Bring your Hueforge art into Bambu Studio
Then right-click your Hueforge art select “add negative part”.
YOU WILL NEED TO DOWNLOAD THE FILES SEPARATELY ALSO, AS THE PRINT PROFILE CAN NOT DO THIS AS A NEGATIVE.

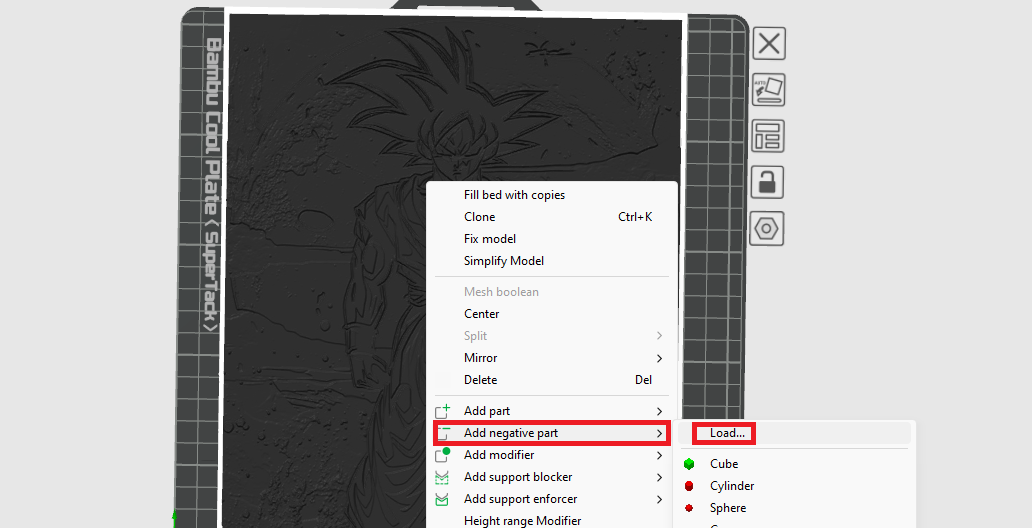
STEP 2 OF 5
Choose the “Blank Negative” or “Numbered Negative” file out of the downloaded files.
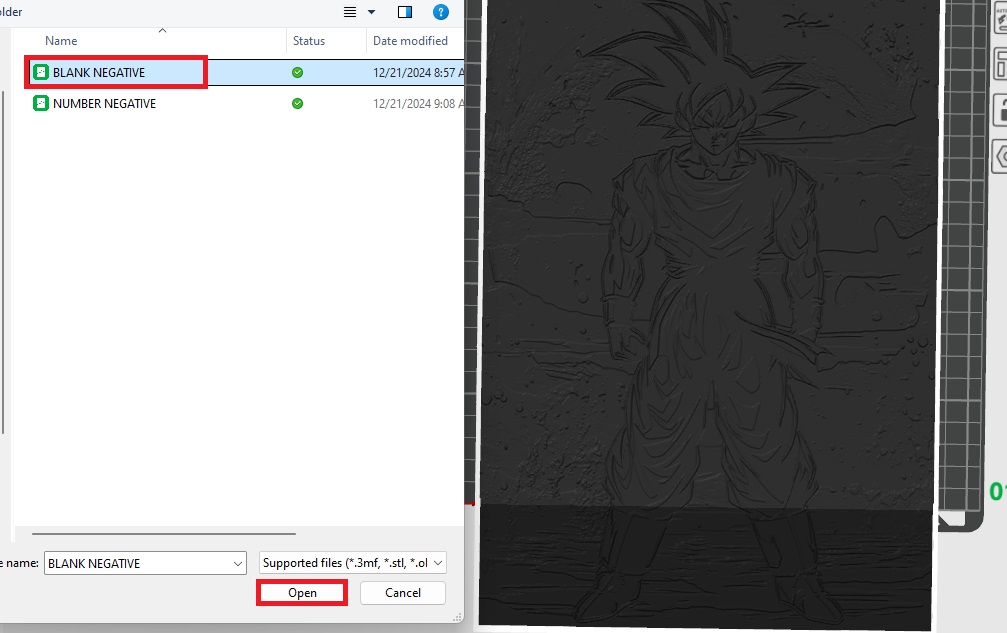
STEP 3 OF 5
Now, line up the negative using the move tool to make the window section the portion you want to be your clock face.
YOU HAVE TO MOVE IT INTO THE BUILD PLATE USING THE BLUE “Z” HANDLE SO THAT THE NEGATIVE IS PART OF THE MODEL FOR THE NEXT STEP.
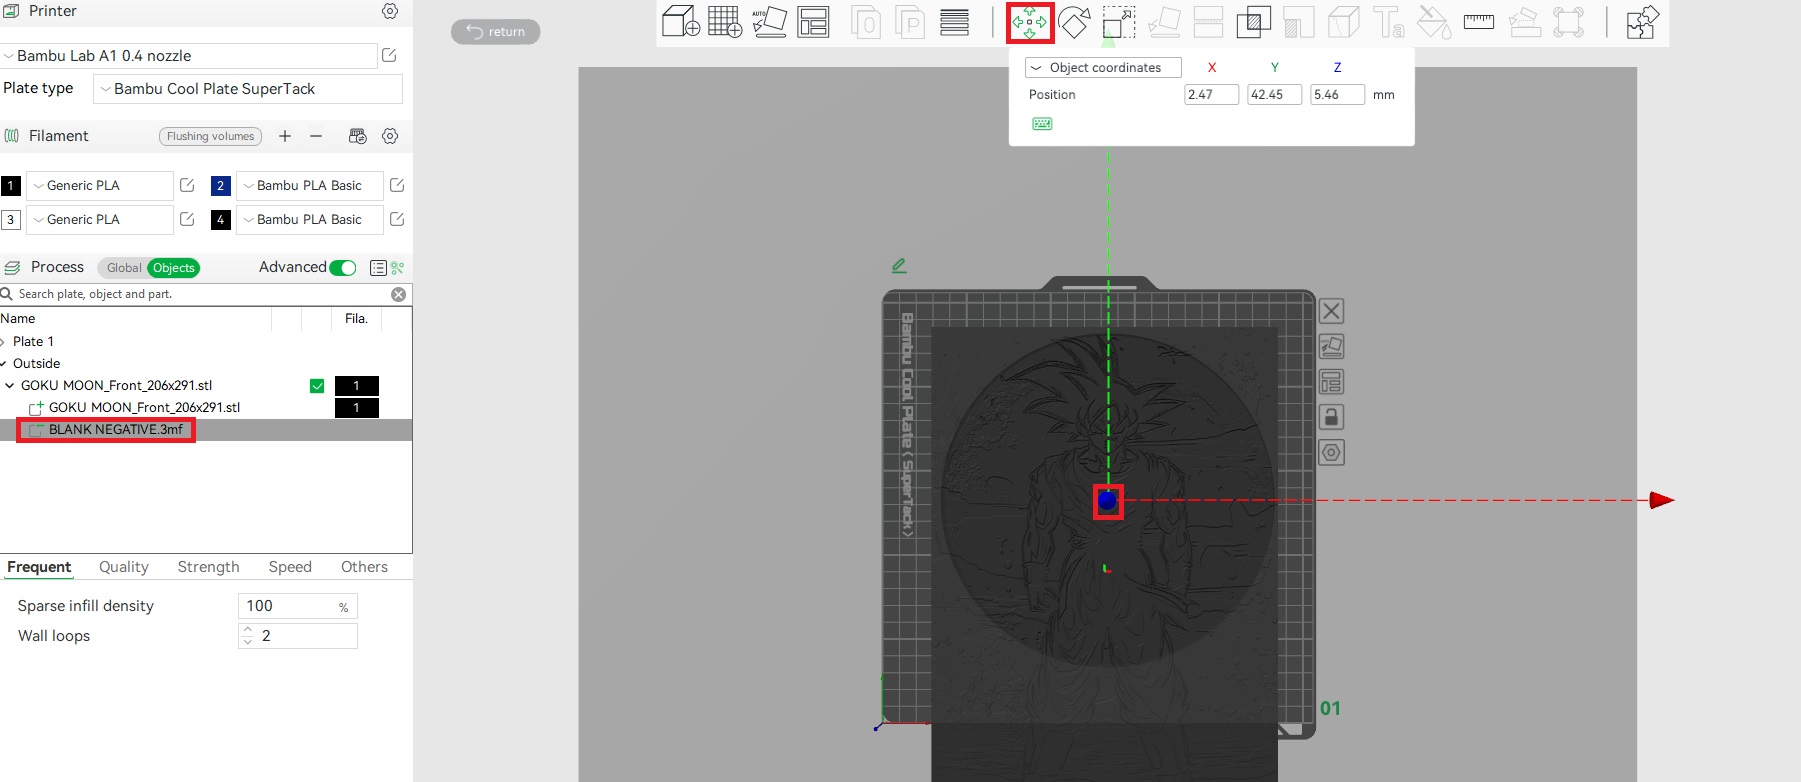
STEP 4 OF 5
Now is the time to boolean (combine) the two meshes.
on the left panel under the “objects” tab right click your Hueforge art, and select “mesh boolean” Expect this step to take a minute or two after you click a button.
IF NOTHING CHANGES, UNDO. THEN MAKE SURE YOU HAVE THE NEGATIVE MESH MOVED DOWN THOUGH THE ART AND BED.
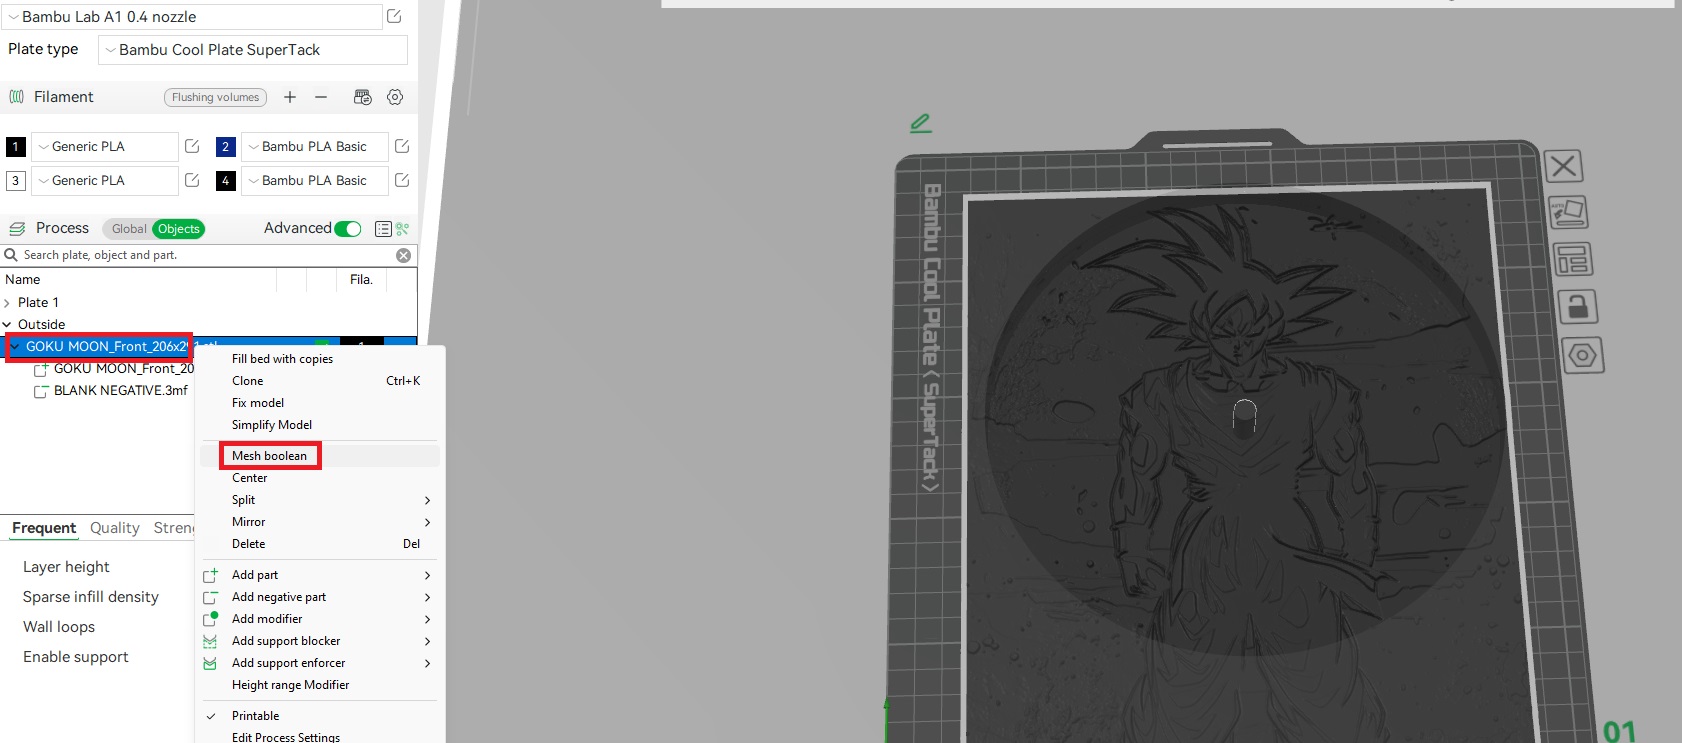
STEP 5 OF 5
Now you'll slice your Hueforge art like normal, once finished then glue onto the clock base.
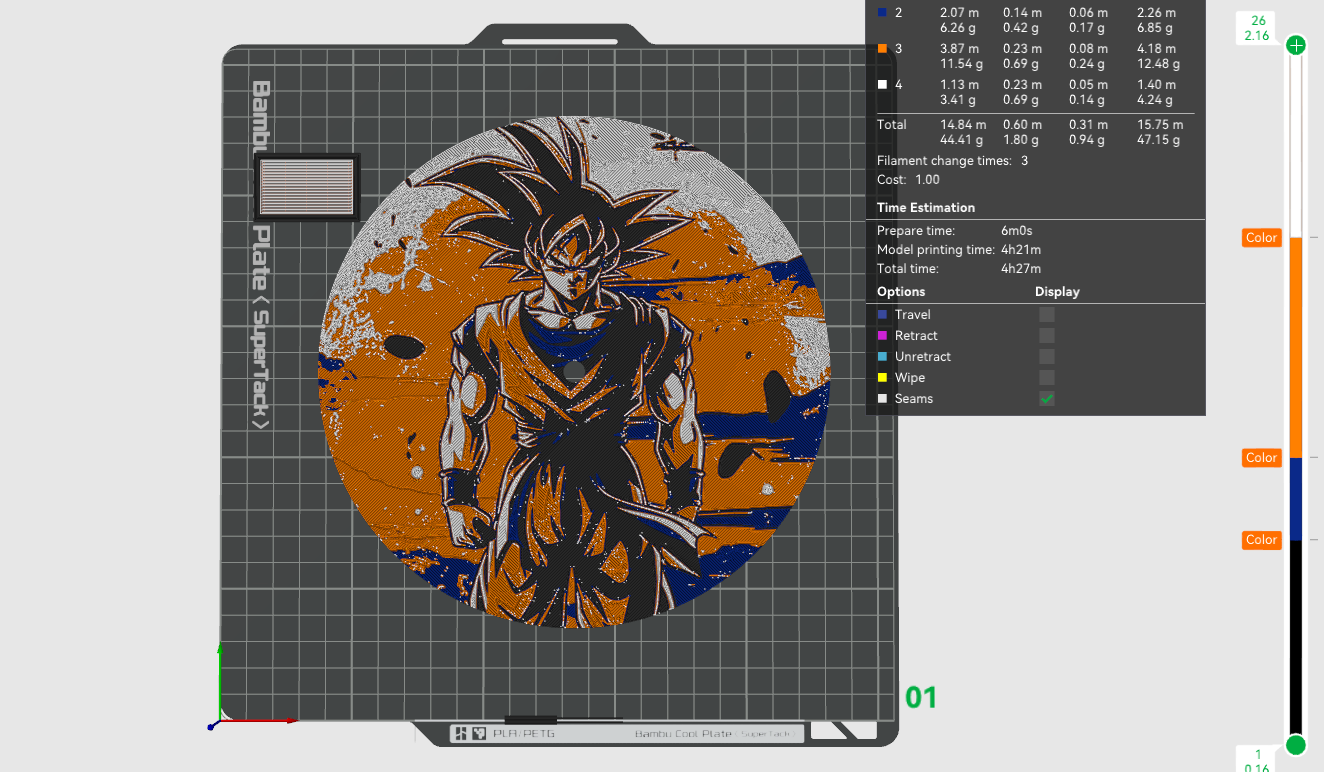
hope you enjoy! if you like it please leave a rating and a photo I would love to see what you talented people come up with!
Thank you for stopping in.
If you would like to support me it would mean the world to me.
[https://buymeacoffee.com/layeredvisions](https://buymeacoffee.com/layeredvisions)
patreon.com/LayeredVisions
Or leave me a boost.
Thank you!!!!
Hue Forge Clock Maker (5 Steps With Instructions)

Publicado em 21 de dez de 2024
Gostou deste modelo? Crie uma conta grátis para salvar seus favoritos e voltar a eles depois.
Criar conta