Você está no 3DFinder
Buscamos em Thingiverse, MakerWorld e Printables ao mesmo tempo para te dar o melhor de cada uma.
Descrição
This is strictly for personal use. The photo attached is the printed model and frame.
UPDATE: I have added some new print profiles.
All Bambu Colors to get the closest result to my photo while keeping the filaments “all in the family”. It has the suggestions that were already present in the post here for substitutions and the adjusted layers for the Orange/Yellow in the fox. I have added all of the suggested Bambu filaments to the BOM section at the bottom.
NO AMS with the all Bambu colors scheme. “NO AMS - ALL BAMBU”
NO AMS with the original color scheme. “NO AMS - ORIGINAL”
Thanks to user @Darkwing I have become aware of a feature called “Infill Combination” in the strength tab of Bambu Slicer. This feature is perfect for the background section and speeds up the print for the riser section HRM. I have added this to all the new profiles above. To turn it on for the original profile click the background painting - click objects - click the height range modifier that is “3.2 - 30mm” click the Strength tab - turn on “Infill Combination”.
Smell the Roses is a hueforge hybrid shadowbox. It is constructed with four painting prints and the frame which is two parts. I have included the frame in a separate profile. The paintings are attached to the risers with a little bit of CA glue. I glued them after it was assembled. Make sure to not go crazy with the glue and stay away from the edge of the frame so you don't get glue on it when you press and hold the pieces. This is a long post so I am going to keep it as short as possible and to the point. If you have any questions hit me up in the comments.
I used 2 AMS to print this project. It can be done with NO AMS, but will require you to delete the color swaps after slicing and replace each one with a pause. You then need to manually swap each spool as per the guides below. If you want to try with 1 AMS you can double or triple assign AMS slots when sending to print. You just have to manually swap out some spools during the print. If you pull AMS spool 4 after the print starts it will force a pause when it gets to it. You can then swap out spools 1-3 with colors 5-7, then put 4 back in and hit resume. Once 4 is done you can pull it again and repeat the process. You can also set pauses at the layer prior to the filament changes if it requires some create slot swapping.
PLEASE READ CAREFULLY
The frame: The frame is attached in this post as a separate print profile. The frame has a 40mm recess. If you want to use it for your own personal project be mindful that the depth you have to work with is 40mm from the front of the frame to the base layer of the background. If you create your own 200x200 hueforge shadowbox painting import it into Bambu Studio. Right click it and hit center. Then right click the plate and and add a primitive cube. Resize the cube to 208.5mm x 208.5mm x 0.96mm. Right click the new cube and hit center. Press CTRL-A (select all) and right click over the models and hit merge. Now you have your original painting with a brim that will hold it in the frame and allow the full image to be visible. This works the similar to my original commercial frame in my clubs above. Your hueforge project needs to have a “min depth” setting of 0.96 to do this. I also recommend adding a height range modifier to your project to print the first 0.96mm @ 0.16mm layer height to speed up the print as there is no blending in the “min depth” region of hueforges. To assemble place the painting in the frame with the top oriented towards the hanger cutout. Gently and evenly push down from the sides until it is all the way in. Do the same with the frame lock making sure not to bind it by pressing any side in too much further than the others. You may need a hard object to gently push it in all the way because it is intentionally a tight fit. I often use scissors to push it all the way in by laying them across the lock with the point inside the hex cutout in the frame. I have two hangers on this one because I wasn't sure about the weight. It ended up hanging fine with the center hanger. If you want to use the two cutouts to hang with two screws make sure the screw heads fit the frame holes. A flat tapered head screw will probably work best. The frame lock has two groves on it and is aligned with the center of the two screws holes so you can use it as a template to mark your wall by putting it on top of a level. Here is a VIDEO OF THE ASSEMBLY
The Paintings:
There are 4 paintings. Print each painting with a 0.8mm layer height with 100% infill. The background has risers merged and the run from 3.20-30mm. I have set the profile to print that section with 15% gyroid along with some other tweaks from the hueforge settings. Each painting has a min depth of 0.96mm and can be printed with HRM's of 0.16mm layers between 0-0.96mm. These are already set in the attached 3MF. I have included a couple of workable color substitutes for specific paintings in case you wanted to use all Bambu Lab colors. Pay attention to each individual paintings suggested substitutes if you decide to go that route. If you have hueforge you can import the STLs and see how color substitutes will change the outcome before printings.
I use the TD-1 to measure my filament opacity which is why you see the names I have assigned to them in Hueforge. This gives me an accurate prediction. Filament TD can vary from brand to brand and even from spool to spool. If you want to measure your own for accurate predictions in Hueforge check out MY WEBSITE where I have TD-1 units for sale. I will also put the shadow box up for sale. This is a big project and I understand not everyone has all these colors, the time or the hardware to recreate it.
The Background:
This painting uses 9 colors. With 2 AMS you need to swap AMS slot 2/color 2 with color 9 when 2 finishes printing and color 3 starts.
Filaments Used:
PLA BambuLab Matte Charcoal Transmission Distance: 0.6
PLA PolyTerra TD-1 Ash Gray Transmission Distance: 0.7
PLA Bambu Lab TD-1 Blue Gray 2 Transmission Distance: 2.8
PLA Polylite TD-1 Yellow Transmission Distance: 10
PLA BambuLab TD-1 Jade White Transmission Distance: 6
PLA Bambu Lab Mistletoe Green - TD1 Transmission Distance: 1.6
PLA BambuLab TD-1 Bambu Green Transmission Distance: 4
PLA BambuLab TD-1 Yellow Transmission Distance: 5.3
PLA Polylite TD-1 Wine Red Transmission Distance: 1.9
The Polyterra Matte ash gray should substitute with the Bambu Dark Gray.
The Polylite Yellow is really high TD and there is no substitute. I would recommend using the Gray or Matte Gray. It won't have the yellow tinge to it, but it does match the wall better than trying the other yellow options.
The Polylite Wine red is low TD so either of the Bambu Matte Reds should sub well.
This print uses 9 unique filaments
Swap Instructions:
Start with Charcoal
At layer #13 (1.12mm) swap to TD-1 Ash Gray
At layer #17 (1.44mm) swap to TD-1 Blue Gray 2
At layer #21 (1.76mm) swap to TD-1 Yellow
At layer #25 (2.08mm) swap to TD-1 Jade White
At layer #28 (2.32mm) swap to Mistletoe Green - TD1
At layer #30 (2.48mm) swap to TD-1 Bambu Green
At layer #32 (2.64mm) swap to TD-1 Yellow
At layer #36 (2.96mm) swap to TD-1 Wine Red
At layer #40 (3.28mm) swap to Charcoal for the rest.
The Rose Bush:
Filaments Used:
PLA BambuLab Matte Charcoal Transmission Distance: 0.6
PLA Bambu Lab Mistletoe Green - TD1 Transmission Distance: 1.6
PLA BambuLab TD-1 Bambu Green Transmission Distance: 4
PLA BambuLab TD-1 Yellow Transmission Distance: 5.3
PLA BambuLab TD-1 Red Transmission Distance: 4.3
This print uses 5 unique filaments
Swap Instructions:
Start with Charcoal Black
At layer #13 (1.12mm) swap to Mistletoe Green - TD1
At layer #17 (1.44mm) swap to TD-1 Bambu Green
At layer #21 (1.76mm) swap to TD-1 Yellow
At layer #25 (2.08mm) swap to Black
At layer #30 (2.48mm) swap to TD-1 Red for the rest.
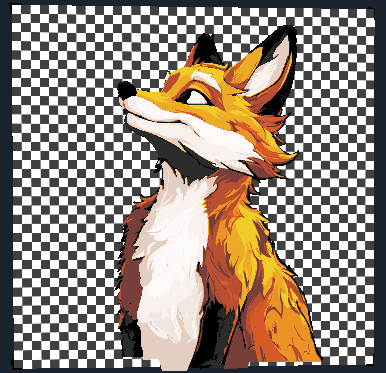
The Fox:
This painting uses 9 colors. With 2 AMS you need to swap AMS slot 2/color 2 with color 9 when 2 finishes printing and color 3 starts.
Filaments Used:
PLA BambuLab Matte Charcoal Transmission Distance: 0.6
PLA PolyTerra TD-1 Ash Gray Transmission Distance: 0.7
PLA BambuLab TD-1 Red Transmission Distance: 4.3
PLA BambuLab TD-1 Orange Transmission Distance: 5.8
PLA Polylite TD-1 Yellow Transmission Distance: 10
PLA Bambu Lab TD-1 Brown Transmission Distance: 1.4
PLA BambuLab Matte TD-1 Latte Brown Transmission Distance: 0.7
PLA Bambu Lab Beige - TD1 Transmission Distance: 3.4
PLA BambuLab TD-1 Jade White Transmission Distance: 6
This print uses 9 unique filaments
The Polyterra Matte ash gray should substitute with the Bambu Dark Gray.
The Polylite Yellow is really high TD and there is no substitute. The Bambu yellow is a lot lower TD and will make the fox too yellow if you use the provided swap instructions below. If you add 2 more layers of the orange (swap at layer 24 instead of 22) and sub in the Bumbu Yellow it will look better. Here is a pic with the prediction of the adjustments above and the substituted Bambu Yellow:
Swap Instructions:
Start with Charcoal Black
At layer #12 (1.04mm) swap to TD-1 Ash Gray
At layer #15 (1.28mm) swap to Black
At layer #17 (1.44mm) swap to TD-1 Red
At layer #20 (1.68mm) swap to TD-1 Orange
At layer #22 (1.84mm) swap to TD-1 Yellow
At layer #28 (2.32mm) swap to TD-1 Brown
At layer #29 (2.4mm) swap to TD-1 Latte Brown
At layer #31 (2.56mm) swap to Beige - TD1
At layer #34 (2.8mm) swap to TD-1 Jade White for the rest.
The Foreground:
Once again the Polyterra Matte ash gray should substitute with the Bambu Dark Gray.
Filaments Used:
PLA BambuLab Matte Charcoal Transmission Distance: 0.6
PLA PolyTerra TD-1 Ash Gray Transmission Distance: 0.7
PLA Bambu Lab TD-1 Blue Gray 2 Transmission Distance: 2.8
PLA Bambu Lab Mistletoe Green - TD1 Transmission Distance: 1.6
PLA BambuLab TD-1 Bambu Green Transmission Distance: 4
PLA BambuLab TD-1 Yellow Transmission Distance: 5.3
PLA BambuLab TD-1 Red Transmission Distance: 4.3
This print uses 7 unique filaments
Swap Instructions:
Start with Charcoal Black
At layer #12 (1.04mm) swap to TD-1 Ash Gray
At layer #15 (1.28mm) swap to TD-1 Blue Gray 2
At layer #18 (1.52mm) swap to Black
At layer #20 (1.68mm) swap to Mistletoe Green - TD1
At layer #25 (2.08mm) swap to TD-1 Bambu Green
At layer #28 (2.32mm) swap to TD-1 Yellow
At layer #33 (2.72mm) swap to Black
At layer #35 (2.88mm) swap to TD-1 Red for the rest.
Once again if you have questions hit me up in the comments.
Smell The Roses Shadowbox

Publicado em 16 de dez de 2024