Você está no 3DFinder
Buscamos em Thingiverse, MakerWorld e Printables ao mesmo tempo para te dar o melhor de cada uma.
Descrição
This festive block countdown calendar counts down the days until Christmas. One complete model (base and blocks) takes approximately 5.5 hours to print.
- Customize:
- use Make My Sign to customize the panels.
- three bases to choose from (plain, snowflake, and trees)
- three block styles to choose from (classic, candy cane, and snowflake)
- Tealight: light it up with an LED tealight
- Assembly:
- Friction fit
- no glue required
- Blocks and frame fold together
PLEASE carefully read the following information for print settings, tips, and assembly.

Tips for Success
- Plate: Use a textured build plate if at all possible. The finish it gives this little block calendar is amazing.
- Keep it clean: Make sure your plate is clean. Skin oils can cause prints not to stick and then you'll be sad :(
- Be patient: resist the urge to pull off the items from the build plate until they've had a chance to cool. The panels especially can be damaged if you try to press fit them into the frames while still warm. Ask me how I know.
- Printer Settings: I highly recommend using the print settings contained in the files. I make settings changes to ensure quality, fit and repeatability. Read below if you're curious as to the reasoning behind each setting.
- Blocks: There are two in each set. They look similar but are slightly different. Be sure you print both an A block and a B block.
Instructions
Print the Parts
Each print profile contains all files necessary for printing as well as instructions on the first plate if you get lost. If you wish to make your own panels, see below for more information.
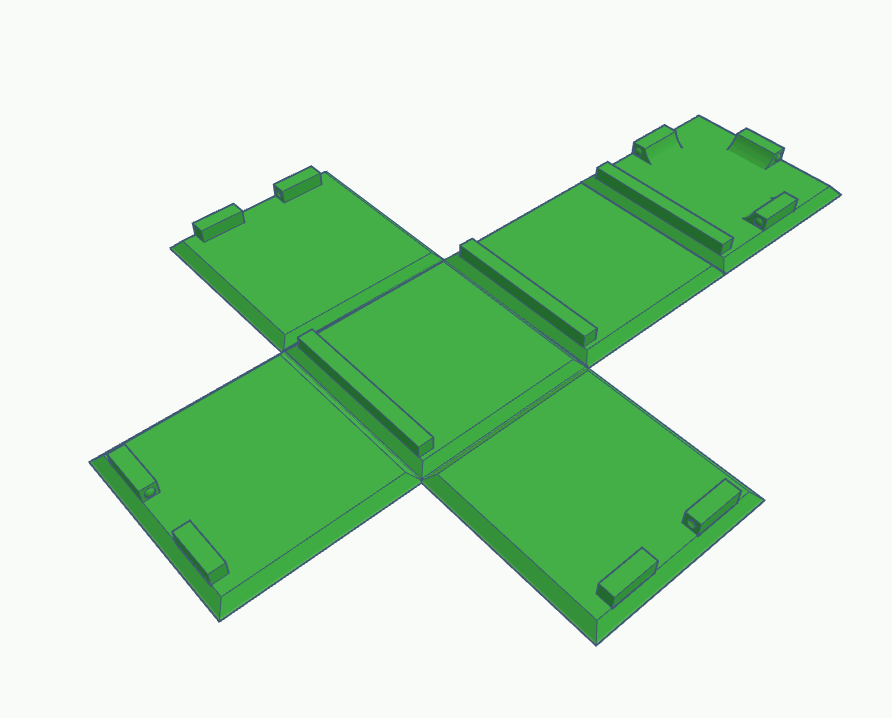
After printing, you should have the following pieces:
- 1 frame
- 1 top and bottom set
- 1 Block A
- 1 Block B
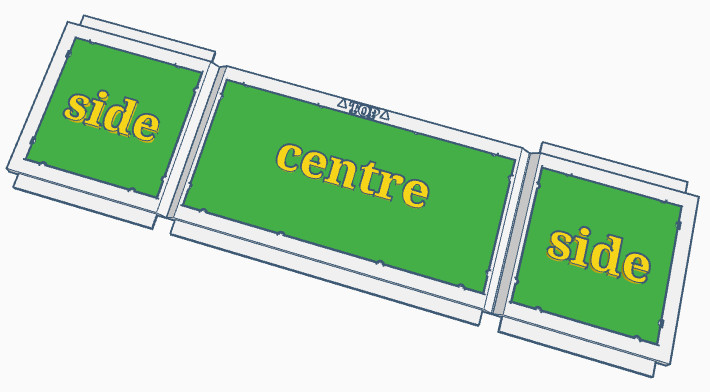
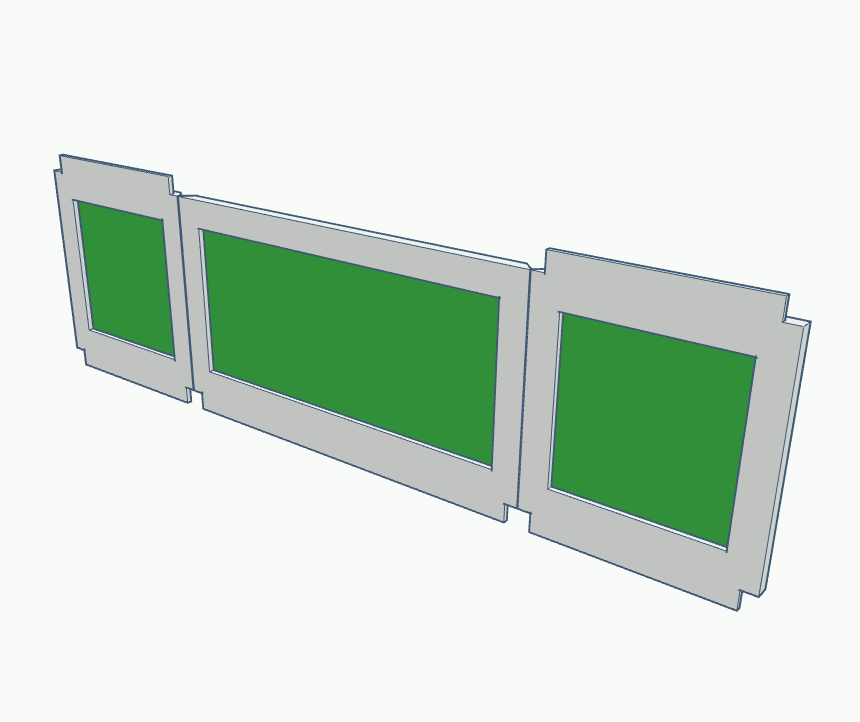
- 1 centre panel
- 2 side panels
Assembly
Blocks fold up and snap into place. It shouldn't take much force; they should lock into place firmly.
Panels snap fit into the frame. Press down on the corners and you should hear snapping noises when they've been fully seated. The frames can also be easily popped out again if you want to swap them out. Note there's a top and bottom to the frame. The top is marked and has no middle tab.
Fold the frame sides inwards then insert the tabs into the top and bottom pieces.
Make My Sign Instructions
Customize your calendar using Make My Sign.
- Start with a blank sign set to rectangular.
- Corner radius: 0
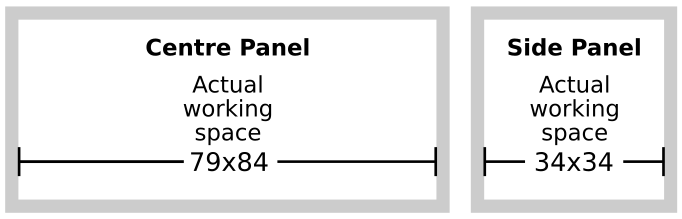
- Centre Panel dimensions: 39mm x 84mm
- Side Panel dimensions: 39mm x 39mm
- Border weight: none
- Thickness: Base Plate 1mm; everything else 0.6mm
Important: when you begin designing your sign, keep within the usable working area otherwise the sign won't fit into the frame.
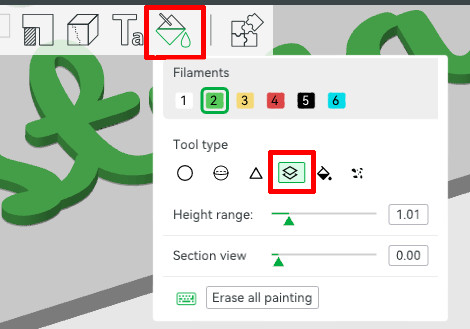
Painting Your Sign in Studio (AMS)
- Open the .3mf for your sign
- Select the sign and click the Paint Bucket.
- Select the Height Range button and use your mouse to paint the raised letters.
Painting Your Sign in Studio (no AMS)
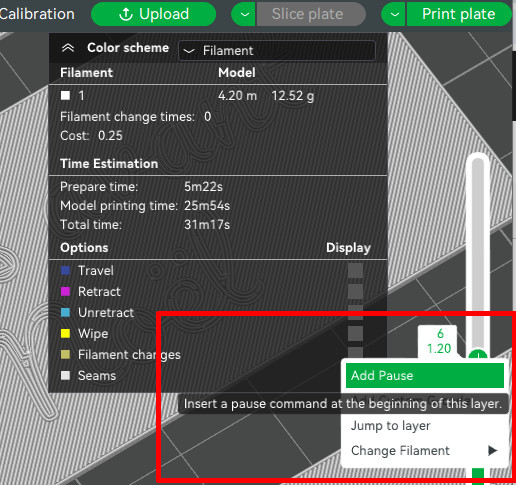
You can still have a multi-colour sign by using the Add Pause feature for Non-AMS owners.
- Open the .3mf for your sign
- Slice plate.
- On the Preview Tab, use the layer slider on the right hand side to scroll down to where the letters start. If you use the recommended layer height of 0.2mm, then it will be layer 6.
- Right-click the Plus sign and choose Add Pause.
- Re-slice the plate and print the file.
- The printer will pause at the start of layer 6 (or whatever other layer you chose) to allow you to change filament.
Print Settings
Global
- Layer height: 0.2mm (please do not change; the pieces depend upon layer height to ensure fit and colour quality)
- Only One Wall on First Layer: On (prevented some weirdness happening due to the complexity of the first layer)
- Detect Thin Walls: On (necessary to capture all the details of the models)
- Sparse Infill Pattern: 15% Gyroid (gyroid is my preferred infill; change if you'd like to)
- First Layer Speed: 15 mm/s (This is only necessary for the frame and blocks; unfortunately Studio doesn't allow me to change first layer speed for individual models. However, it doesn't add much time to the other models so I made it a global change.)
Frame - A1 Mini Only
- Infill Direction: 0 (The default of 45 resulted in poor strength along the folds. Normally this isn't a problem but because the frame needed to be rotated 45 degrees to fit on the A1 mini's plate, the infill direction needed to compensate to match.)
Base (Top and Bottom)
- Outer wall speed: 30 mm/s (The base pieces have a sharp overhang at the top; a slower outer wall speed helps this. If you're an advanced user, I recommend upping it to 50 mm/s and then turn on adaptive layers for the base for the best quality)
Blocks
- Elephant foot compensation: 0 (will help the details stick better and gap fill)
- Initial layer flow: 1.1 (same reason as above)
About the Model
I've barely eaten or slept since the idea for this popped into my brain. I combined an old proof-of-concept lantern idea I had with a block calendar idea. The result is something I'm happy to have finished. It wasn't quite what I imagined, but it's probably better for it because I tend to overcomplicate things. As it is, I barely kept the complication to a minimum by juggling all the different customization options!
Filament used in display models:
Models were printed with an X1C and an A1 Mini in the following colours:
- Red Silk PLA (Hello3D)
- Jade Green Silk PLA (CC3D)
- Glorious Gold Silk PLA (Spectrum)
- White Silk PLA (Hello3D)
- Basic Black PLA (Bambu Labs)
- Basic White PLA (Bambu Labs)