Você está no 3DFinder
Buscamos em Thingiverse, MakerWorld e Printables ao mesmo tempo para te dar o melhor de cada uma.
Descrição
DESCRIPTION
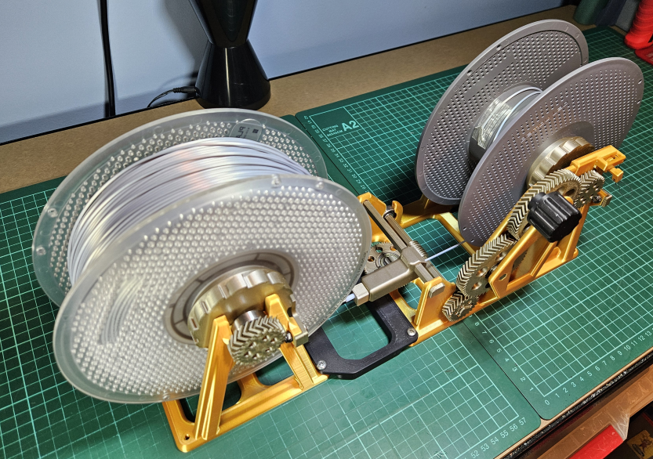
Once you get into the Bambu Lab AMS eco-system you'll quickly realise that using filament from a cardboard spool is unwise. The challenge comes from how to get your filament off the cardboard spool and onto a more durable plastic spool. Besides cardboard spools, this design is also applicable to small diameter spools, too.
Here's my machine design that will get you there. This design has gone through various optimisations and improvements. The version is now at V2.x.
This project helps those interested to build my respooler design. My design takes a more pragmatic approach to the respooler concept that results in fewer parts than other typical designs. I do, to a small extent (two joints) use glue and three screws. If you're a puritan and want to use only 3D printed parts that clip together, this design is not for you.
I have a (unique) filament winding technique that is robust, yet simple to implement. In addition, my design extensively uses 608 bearings (11 pieces). The bearings significantly reduce parts friction and smooths out the transfer step.
The spooler hubs are tapered to accommodate a range of reel hub diameter sizes from 47 to 64mm.
NOTES
- Please ensure that you fully read the Build Guide to ensure that you are across all the build instructions and tips that I share.
- If you have already printed my original respooler, unfortunately there is no upgrade path to V2.0. Though, some parts can be taken from V2.0 and used on earlier versions, e.g. the V2.0 handle winder assembly.
- If you have a V1.x Respooler and want to print the new V2.0, some parts can be re-used. Note the individual part file name. Each part is versioned with a version number as part of the file name.
- I hope that you can find this print useful, too. If so, you can support my work by buying me a coffee …
Buy Me a Coffee
[https://buymeacoffee.com/dansoussi](https://buymeacoffee.com/dansoussi) - Remember to leave me some feedback or even a “boost” to keep me enthused to make more of these designs.
-------------------------------------------------
PARTS LIST
- 3D printed parts profiles:
- Frame 2.0.3mf
- Gears, Shafts, Spindle and Handle 2.0.3mf
- Donor Spooler 2.2.3mf
- 11 x 608 bearings
- ~80mm of 4mm OD/2mm ID PTFE tube
- 1 x 3.0mm x 10mm self-tapping screw
- 5 x M4 x 10mm bolt
- 1 x M4 nut
- 2 x M4 Nylon locking nut (or ordinary M4 nut with Loctite)
- 2 x M4 x 15/16mm bolt
- 4 x M4 brass threaded inserts
- CA (Super Glue) glue
- Loctite Threadlocker (or similar)
Note: Some of the above parts can be sourced from the Bambu Lab Maker’s Supply.
WINDING PROCESS
For a 1Kg roll, the winding process takes a few minutes to complete. Best results are achieved by applying some light pressure on the donor spool to avoid the filament from feeding out faster than you are winding. Rotate the handle clockwise. A ratchet mechanism will prevent anticlockwise handle rotation, hence also prevent the spooled reel from unexpectedly unwinding.
Do you think that the manual winding is too much like hard work? Perhaps there is an answer. See my electric motor drive add-on build. You can find out more at my Maker World link …
Respooler Motor Drive by Wiseone - MakerWorld
[https://makerworld.com/en/models/795504#profileId-734585](https://makerworld.com/en/models/795504#profileId-734585)
ASSEMBLY
The parts assembly should be straight forward. You can also refer to the included animated exploded view graphics to assist your assembly.
I also made a video that you can find on YouTube demonstrating the assembly process.
[https://youtu.be/lTljMvsa6rE](https://youtu.be/lTljMvsa6rE)
Start by assembling the donor spool.
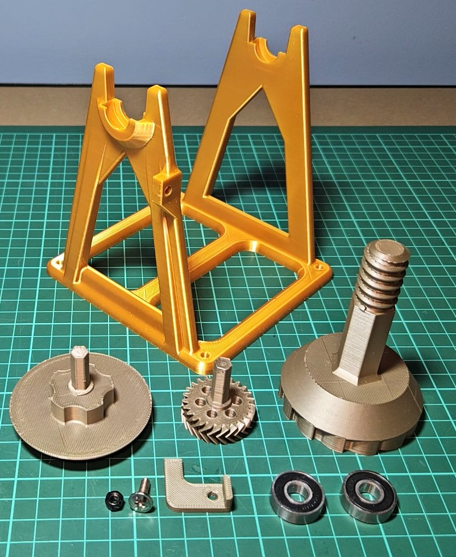
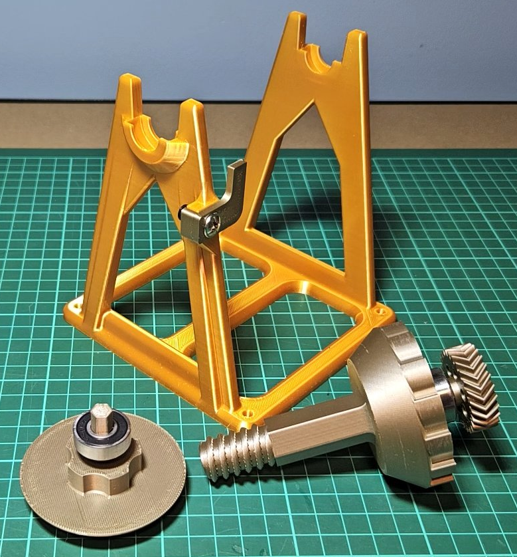
Donor spool parts:
- 6 printed parts.
- Two x 608 bearings.
- 1 x M4 x 15/16mm bolt and Nylon locking nut
Tighten the ratchet screw (into the locking nut) to ensure that the spool cannot turn backwards. The donor spool should click as it rotates. Further adjustments to this ratchet screw can be done later to get good filament feed tension.
Respooler parts:
- 22 printed parts.
- 9 x 608 bearings.
- 1 x M4 x 15/16mm bolt and Nylon locking nut
- ~80mm of 4mm OD/2mm ID PTFE tube
- 1 x 3.0mm x 10mm self-tapping screw
- 1 x M4 x 10mm bolt and nut
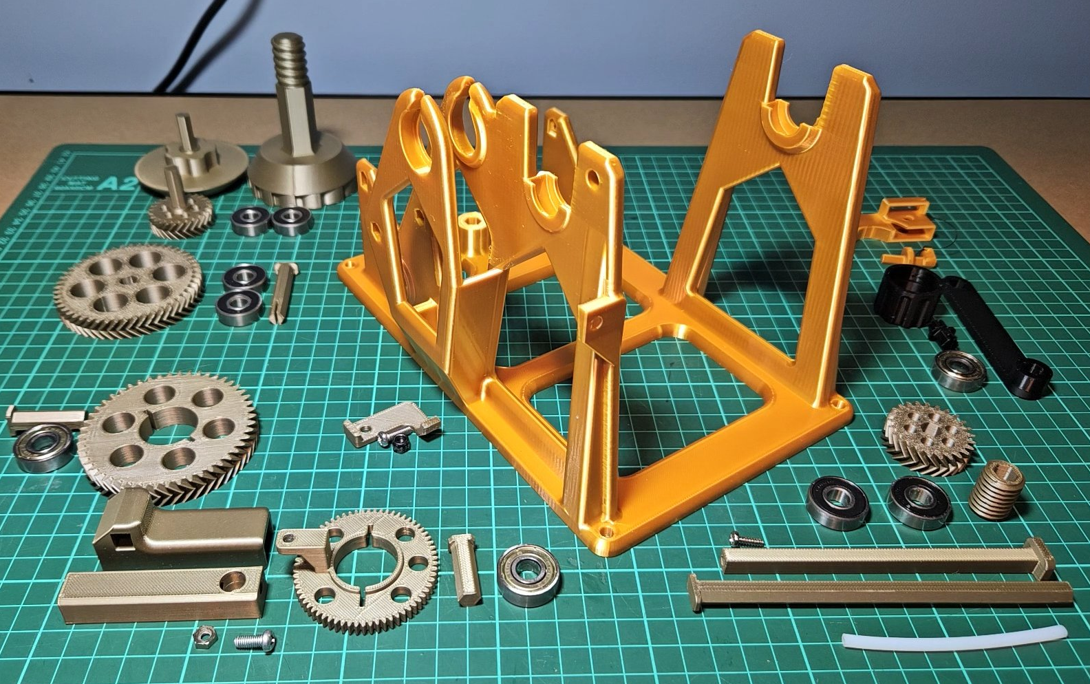
Respooler assembly:
Note that all the shafts are a distinct length and will match their intended position length, only.
- Two bearings fit into the gears.
- One bearing fits into the handle.
- Two bearings fit the rotating spindle (identical to donor spool).
- Four bearings that are a press fit into the frame.
- Test fit the shafts. Some may need minor filing with sandpaper to fit.
- Assemble the filament spreader assembly.
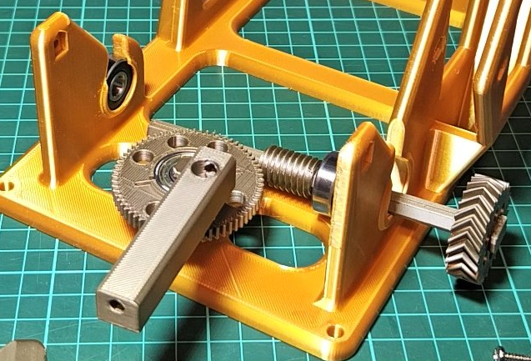
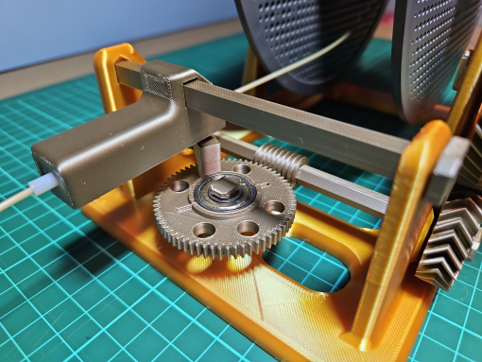
- Use the 3.0mm x 10mm self-tapping screw to hold the top shaft in-place.
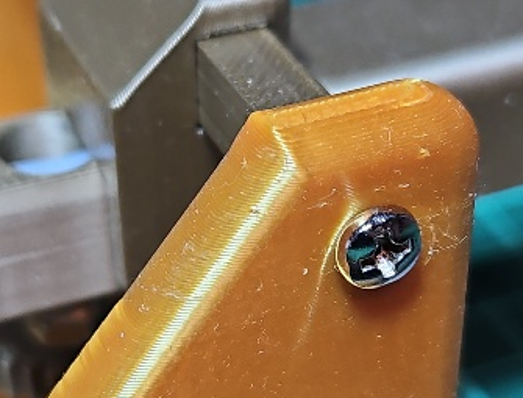
- Attach the filament guide to the horizontal gear with the M4 x 10mm bolt and nut. Place Loctite on the screw, first.
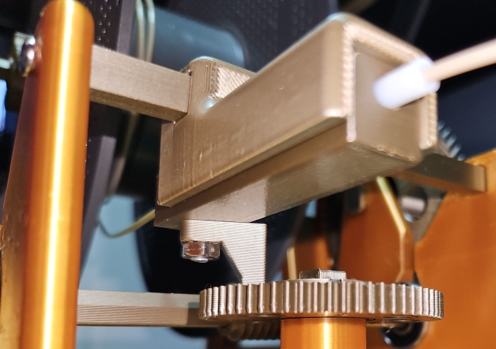
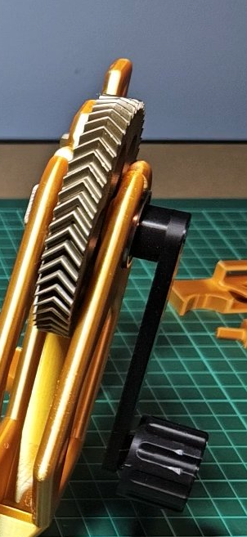
- Assembly the top gear and handle.
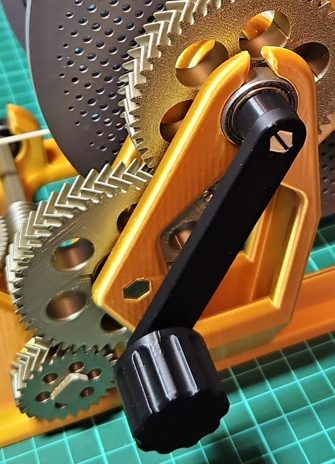
- Insert the middle gear.
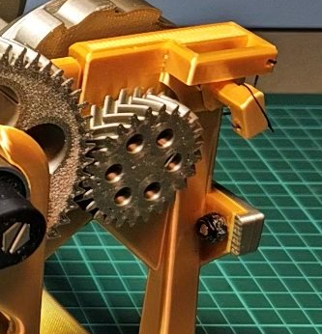
- Using the M4 x 15/16mm bolt and Nylon locking nut, attach the ratchet to the frame.
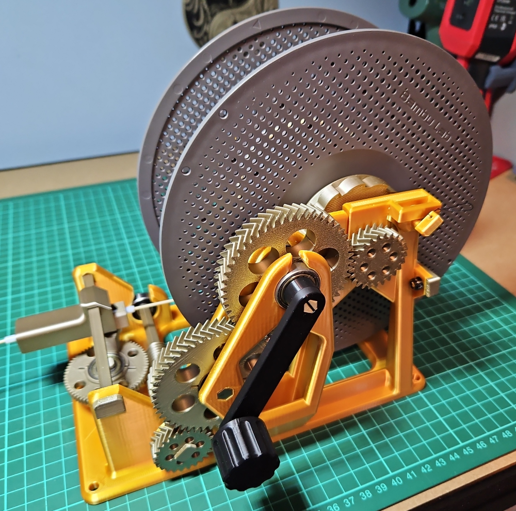
Fully assembled …
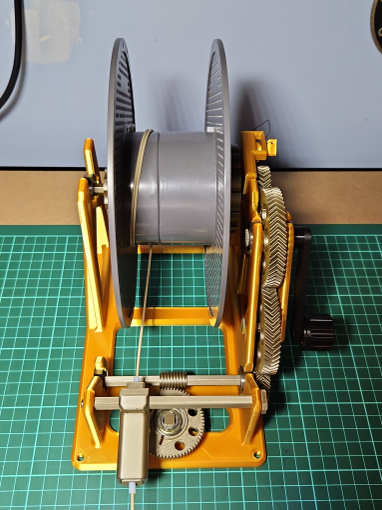
PTFE TUBE
The 4mm outside diameter (OD) PTFE (Teflon) tube is approximately 80mm long. The tube is a push fit into the filament guide part and serves the purpose of reducing wear on the filament guide.
RATCHETING MECHANISM
Incorporated into the respooler are two spindle ratcheting mechanisms. One for the recipient spindle and one for the donor spindle.
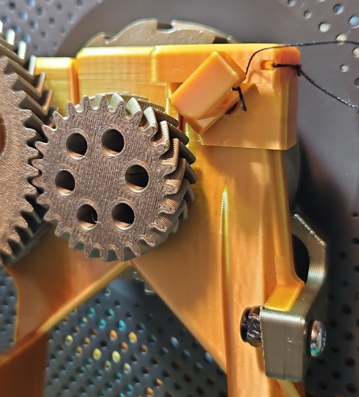
The recipient spindle mechanism is designed to rotate in the clockwise direction, only. A ratchet applies a brake preventing anti-clockwise rotation. The ratchet prevents the recipient spool from freely unravelling. A M4 bolt with a Nylon locking nut adjusts the ratchet tension.
The donor spindle can only rotate in the anti-clockwise direction. A ratchet mechanism brakes the donor spool clockwise rotation. In addition to braking rotation, the ratchet applies tension to the donor spindle, hence slowing it’s rotation. The ratchet braking and tension is controlled by the donor spool M4 bolt and Nylon locking nut.
When the respooler is rotating, the ratchet makes a characteristic clicking sound. This sound is expected and part of the normal respooler operation.
MAIN SPINDLE RETAINER
The purpose of the retainer is to prevent the main spindle from jumping if you stop the winding abruptly (Not recommended!). The retainer attaches to the top of the frame, restraining the spindle gear when the spindle is in-place. The retainer sits on top of the frame and held in-place by a simple printed locking pin that feeds into an aligned frame hole.
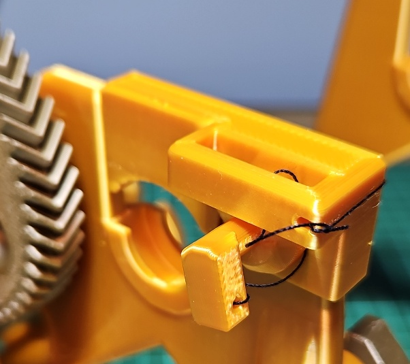
It can be useful to attach a thread from the retainer part to the locking pin. Holes for the thread have been incorporated into each part.
PARTS TO BE GLUED
I used CA (Super Glue) fast drying glue, which works well with PLA printed parts.
Donor Spool Spindle: The “spindle gear” part is to be glued into the back of the “spindle screw” part.
Recipient Spool Spindle: The “donor spindle gear” part is to be glued into the back of the “donor spindle screw” part.
PARTS TO BE SCREWED
Winder Screw: The PTFE rotating filament guide is attached to the winder gear with a nut and bolt. Use a M4 x 10mm threaded screw and a matching M4 nut. The filament guide part should be able to rotate freely, so, the nut and bolt should be a loose fit. To stop the nut from unscrewing, use Loctite Threadlocker (or similar) on the nut and bolt.
Winder Slider Screw: The winder slider rail is held in-place by a 3x10mm self-tapping screw.
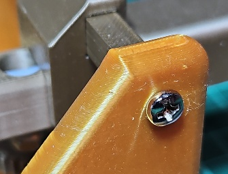
Recipient Ratchet: Attach the recipient ratchet lever to the frame with a M4 x 15/16mm bolt and M4 Nylon locking nut.
Donor Ratchet: Attach the donor ratchet lever to the donor frame with a M4 x 15/16mm bolt and M4 Nylon locking nut.
JOINING THE TWO ASSEMBLIES TOGETHER
When using the respooler, the turning of the handle action will cause the respooler assembly to move a little. I provide a 3D printed part that screws the two assemblies together. You can also consider mounting the two assemblies onto a wooden board or similar. The two assemblies have pre-drilled 5mm mounting holes in each corner.
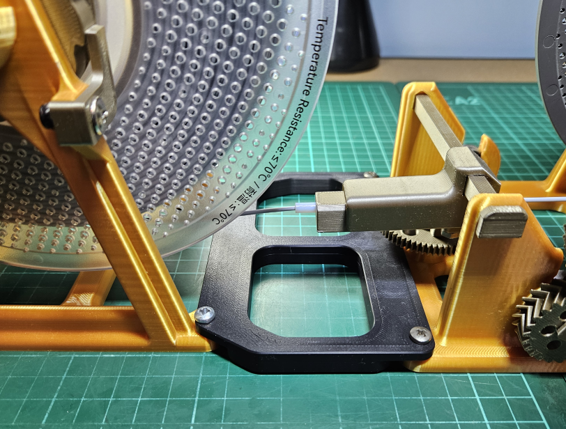
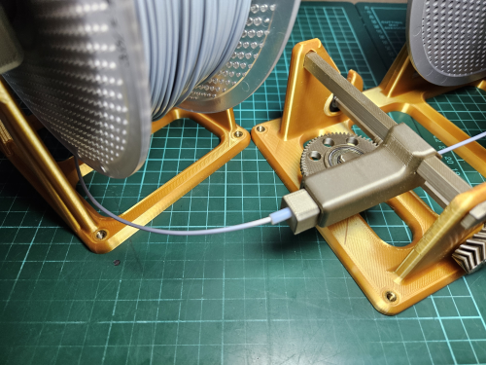
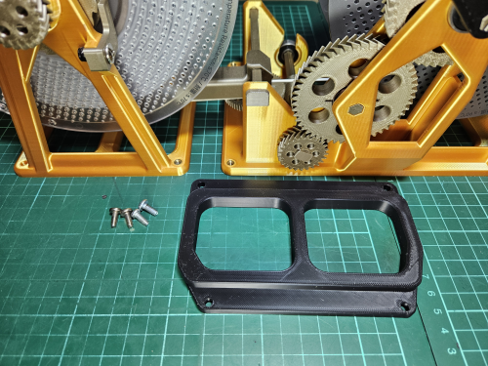
Assemblies joiner parts:
- 1 printed part.
- 4 x M4 x 10mm bolts
- 4 x M4 brass threaded inserts
CAUTION: High temperature danger! Only proceed with the next step if you feel comfortable working with a soldering iron or similar.
The four M4 brass threaded inserts are embedded into each of the two front mounting holes of the two assemblies. These inserts can be inserted prior to or after completing the assemblies. To embed brass inserts, a focused heat source like a soldering iron (ideally with a heat insert tip) is needed to push the brass insert into the mounting hole.
TIP: To avoid the melting plastic flowing into the brass insert as its being embedded, partially insert an M4 screw from the rear into the brass insert.
The assemblies are held together with a printed part with four M4 screws. This assembly approach allows the respooler assemblies to be easily separated for storage when not in use.
PRINTING INFORMATION
The 3D printed parts are separated into four print plates. The main frame, the donor spooler, joiner and miscellaneous parts plates. You can further split the parts to colour coordinate your print.
My print is made in eSUN eSilk Gold and Bambu Lab PLA Metal Iridium Gold 1.75mm filaments, with 0.2mm layer height on a Bambu X1 Carbon printer. Print supports are required for some parts; see 3MF files for details.
Both a set of print profiles and the individual STL files are included.
NON-3D PRINTED PARTS
Many of the parts used in the respooler, like bearings, nuts and bolts can be sourced from the Bambu Lab store. Here are some part numbers …
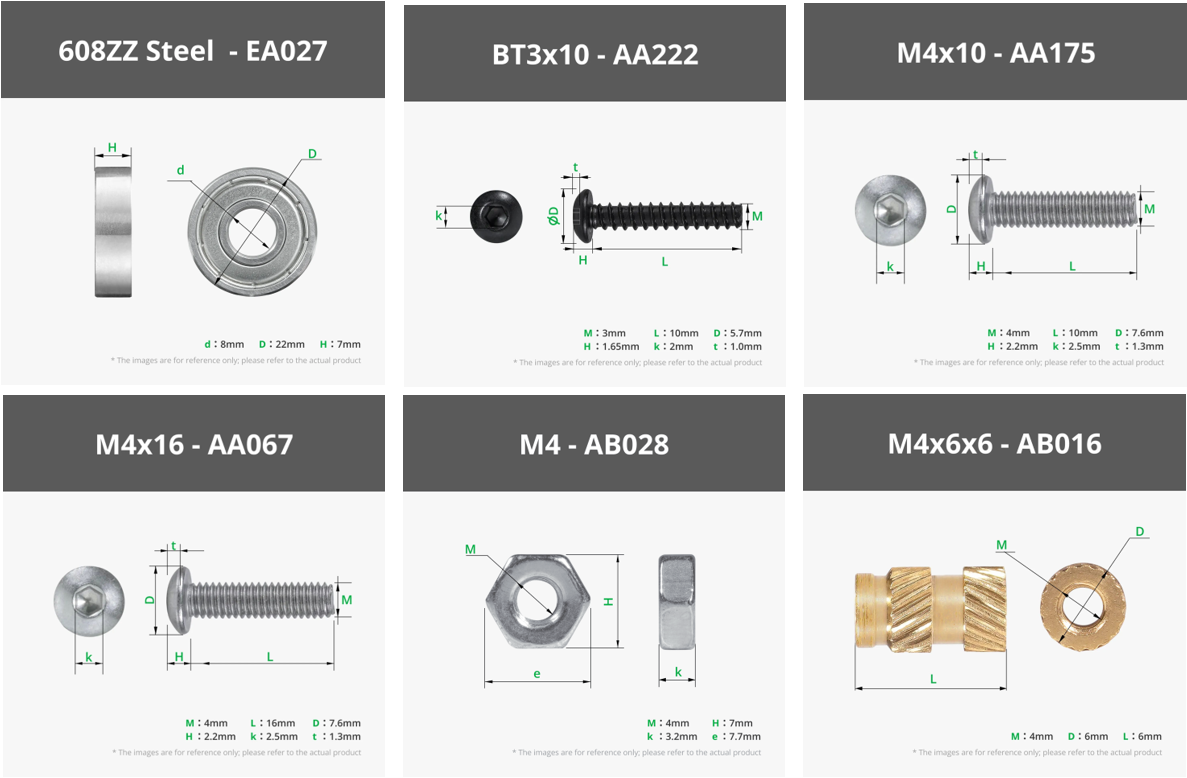
Q&A
Q: Can anyone build this respooler? I'm pleased to say that most people that persevere with the respooler build have reported excellent outcomes. I’ll also add that my V2.0 print required no parts post processing; your experience may vary. |
Q: Where can I get the bearings used? A: Fortunately, the 608 bearings are common and readily available. Here is an example (unaffiliated) supplier search that should be suitable. |
Q: Can I use printed bearings? A: There are several printable 608 bearings published. I’ve tried one version and was delighted by the outcome. To note, since these bearings are typically a print-in-place design, parts tend to be a looser spacing. Since these bearings are printed in plastic, they will become looser as they ware. |
| Q: Some shafts are hard to fit. Why? A: There can be various reasons for some shafts to be a tight fit. Simplest approach is to lightly sand that shaft's corners until shaft fits into place. |
| Q: Should a bearing feel loose, in particular on a spindle? A: Apply a thin layer of adhesive tap over the shaft and refit the bearing; a quick, but simple fix. |
| Q: The worm gear can slide on the shaft. Is that a problem? A: The shaft is hex shaped and so is the worm gear inside. Once the worm gear is placed in position, it won't slide on the shaft and will operate correctly. |
Q: I have a Respooler V1.x, should I print and move to the new V2? A: The simple answer is “not necessarily”. If you are getting good results and only do the occasional respool, V1.x delivers a good result. V2 will deliver a good respool with less manual effort, hence the redesign. If you are building a Respooler for the first time, there’s no question, build the V2 design. |
Q: Rewound filament breaking in places along the spooled wind. Why? A: When a filament is manufactured, it gets cooled coming out of the hot end, but the filament is still warm as it spools. The filament cools on the spool with a memory of the spool wrapping. (ALL) Respooling machines effectively reverses the spool wrapping, causing a torsional twist on the filament as it spools onto the new roll, which can cause some usage issues, eg. snags, breakage. An effective way to reduce the introduced filament torsion is to respool the filament a second time before use, realigning the filament into it's original formed twist. "Tougher" filaments will likely experience this torsional issue more than other filaments. |
Q: Why are my respools loose or bunched to the sides? A: Tension can be adjusted via the donor spool ratchet screw. Increase the ratchet stiffness and you will get a tighter spooling. A narrow or off-center recipient spool will gather filament higher at the ends. Check your build finish. |
Q: Is it safe to download profiles from third parties? A: The danger with third-party profiles is that I don’t own, nor control them. If I publish a design update, the third-party profile may now be out-of-step with my revised design, possibly incompatible. Hence, use at own risk. |
UPDATE 22/07/2026 V2.20
- Donor spool frame part mounting holes increased from 4 to 5mm. Now “Donor Frame 2.2.stl”
- Introduced a joiner printed part to combine the donor and respooler assemblies.
- Documentation updated. Further assembly steps added to the Build Guide.
UPDATE 29/06/2026 V2.10
- Documentation update, only. Further assembly steps added to the Build Guide.
UPDATE 28/04/2025 V2.03
- Winder slider screw details added to the parts list and to the “PARTS TO BE SCREWED” section.
UPDATE 10/03/2025 V2.01
- Part "Shaft - Handle to Knob 2.0.stl" was missing from the 3MF profile print. That STL file was available separately, but that meant hunting for it, so I corrected the 3MF file to include this STL.
- Documentation: Count of bearings should be 11, not 10 pieces.
UPDATE 01/03/2025 V2.0
- Improved filament feed guide
More even filament winding onto recipient spool with less required donor tension and less effort. - Anti-rotation mechanisms on both donor and recipient spool spindles prevent spools from unwelcome rotation.
Ratcheting mechanism integrated into donor and recipient frames. - Donor spool braking mechanism to slow down filament feed.
Donor ratchet tension adjusted by locking nut, also applies pressure to donor spindle. - Donor and recipient spindle mechanism identical and interchangeable.
For convenience and parts interchangeability, the donor and recipient spindles are now identical. - Winding handle knob now has “silky smooth” rotating knob.
Winding knob is now detached and mounted through a bearing for smooth turning. - Winding gear retuned
If carefully done, it’s possible to now wind a filament in lock-step across the spool. - Multiple minor tweaks and assembly improvements.
- If you have a V1.x Respooler and want to print the new V2.0, some parts can be re-used. Note the individual part file name. Each part is versioned with a version number as part of the file name.
Respooler Winder V2 (with a difference)

Publicado em 25 de out de 2024
Gostou deste modelo? Crie uma conta grátis para salvar seus favoritos e voltar a eles depois.
Criar conta