Você está no 3DFinder
Buscamos em Thingiverse, MakerWorld e Printables ao mesmo tempo para te dar o melhor de cada uma.
Descrição
| This 3D model is copyrighted and may only be used for personal purposes. Any commercial use, including production by a 3D printing service, requires my explicit permission. Purchase a commercial license on my Patreon page to support my work, thank you so much! |
Nur für 0.4mm Düse, die Gewinde passen sonst nicht.
Only for 0.4mm nozzle, otherwise the threads will not fit.
Ihr könnt das Model einheitlich skalieren, um kleinere Größen zu erhalten (lest dazu bitte meinen Text unten):
You can scale the model uniformly to get smaller sizes (please read my text below):
Englisch
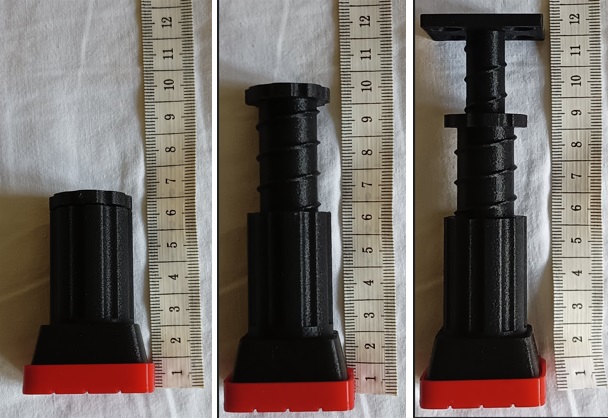
For the design of our greenhouse, I created a screw base that can meet my needs. The greenhouse is on sloping ground. The screw base is intended for level adjustment up to around 7.87in. Lower height differences and slightly higher differences should be bridgeable.
There is a base that screws on and one that just sits on the floor. The lower part of the screw base can be freely rotated and is therefore placed loosely in the base. If the lower and upper feet are screwed together, the height of the screw base would no longer be adjustable. If the lower part is firmly connected, it must be rotatable despite being screwed together.
There are two variants with different sizes of the upper foot.
Other sizes of this product
All parts have been scaled to 80% of the original size. The scaling of all parts must be identical in all axes (X,Y,Z / width, depth, height), otherwise the threads will not fit into each other. I have printed a test model with 50% of the original size, which works. I used modifiers for the screw holes. When the model is scaled, these modifiers should be brought to the correct size so that the screws to be used later fit. When resizing, the modifiers need to be repositioned individually, which is not difficult. Look at the size of the modifiers in the settings, this will give you a hole size of about 4mm for screws to be used.
General information on printing
The parts could bulge upwards at the corners. However, poor adhesion to the build plate is also conceivable, so that parts come loose during printing. This can be remedied by applying glue stick to the build plate. It holds the printed objects firmly to the board even at high temperatures.
Material used
To ensure stability, I used PAHT-CF. PAHT-CF is a composite material made of PA12 and carbon fibres, which is well suited for greenhouse applications:
- Low water absorption: PAHT-CF has the advantages of the low water absorption of PA12 and high-performance carbon fibres. This means that it retains its excellent mechanical properties and dimensional stability even in high humidity, which is common in greenhouses.
- Excellent mechanical and thermal properties: PAHT-CF offers excellent mechanical and thermal properties1. This makes it ideal for the production of technical parts such as functional prototypes, machining jigs, injection moulds, fixtures and small batch parts that could be useful in a greenhouse environment.
- High temperature resistance: The heat deflection temperature of PAHT-CF is up to 194°C (0.45MPa)1, which means that it is suitable for applications where the printed parts can be exposed to high temperatures without deforming or losing their strength.
- Exceptional Z-bonding: PAHT-CF shows much higher adhesion in the Z-layers compared to normal PA-CF. As a result, it is able to withstand strong impacts or loads without breaking or deforming.
If your environmental conditions are not so critical, you can use a less expensive filament. For example, for dry environments you could use PETG or PETG-CF. Especially if you scale to 100% as the loaded threads are stronger with more material. This material is probably sufficient for many applications. PAHT-CF tends to show higher adhesion in the Z-layers than other materials. This affects the expected load limit.
It is possible that there will be changes that will be useful. Therefore, please do not hesitate to contact me if you have any problems with the screw base or suggestions for improvement!
Have fun printing!
How to print PAHT-CF
The material is not difficult to print. Only the handling before and during printing is not quite as easy as with other 3D printing materials such as PLA. Bear in mind that nylon absorbs moisture from the environment at a rate that should not be underestimated, including PAHT-CF. The following tips can help you get neat prints.
- The most important thing when printing with PAHT-CF is drying before printing. There are many stages between wet and dry PAHT-CF, which can spoil the print result. You can dry PAHT-CF at 154°F to 194°F. I myself have dried Bambulabs PAHT-CF at 154°F. Then I repeatedly carried out test prints at intervals of several hours during the drying process. So I can assure you that it takes in certain circumstances 24 hours or longer for PAHT-CF to dry sufficiently. But that is the only hurdle. I print PAHT-CF with a hardened 0.4mm steel nozzle on the X1C without any problems. 0.6mm nozzle diameter is not necessary. If PAHT-CF still contains too much moisture, the nozzle can clog more easily, which also leads to poorer printing results. It is then easier to print with a 0.6 mm nozzle.
- If PAHT-CF is too moist, the surface of the printed object will be rough after printing. The opposite is also true. When the filament is dry, the surface will be (matt) glossy. The fact that it still feels rough is due to the carbon fibre content.
- If PAHT-CF is still too moist, the dimensional accuracy of the print will not be correct. Especially if you have to insert parts into each other or turn them inside each other. It may be possible to compensate for this by calibrating the filament directly before printing, but I do not recommend this because I think it is unsafe.
- Dry the filament for at least 24 hours at 154°F. If you are unsure and the filament has been in the AMS for a long time or is not sealed, dry for more than 24 hours. I use a filament dryer and can set the time accordingly. Such a device is a good idea. After you have dried the filament sufficiently, carry out a manual calibration (value determination by visual inspection), try to be really accurate here. Create a profile for this in which you save the calibration values. Then switch off the automatic calibration before printing.
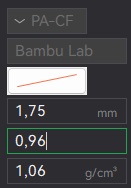
The filament profile contains the factor for the filament flow. This value is somewhere between 0.94 and 1.00. I used a value of 0.96 to get a suitable print with Bambulab PAHT-CF. If, despite a long drying time and the filament flow I recommend, you still have problems with the accuracy of fit of the parts (e.g. that they sit too tightly together), reduce the value to 0.95 or 0.94. If your prints sit a little too loosely together, increase the value a little.
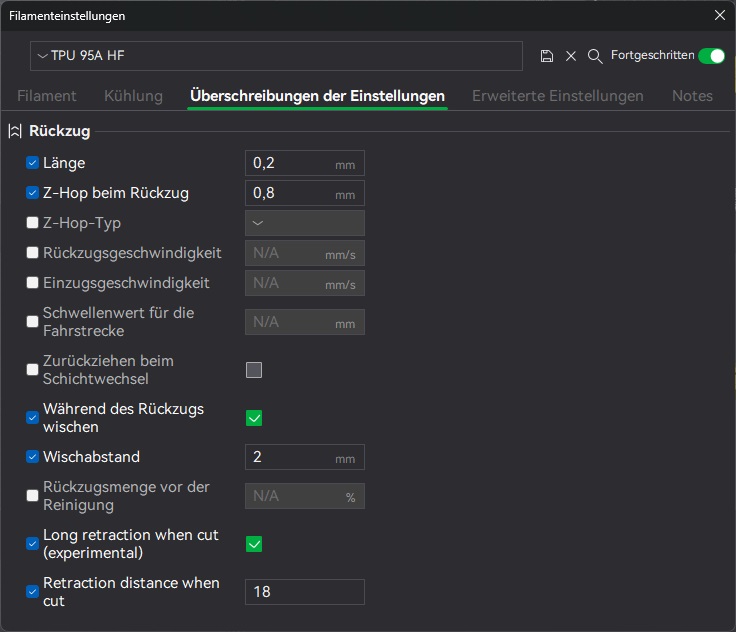
Print settings for TPU
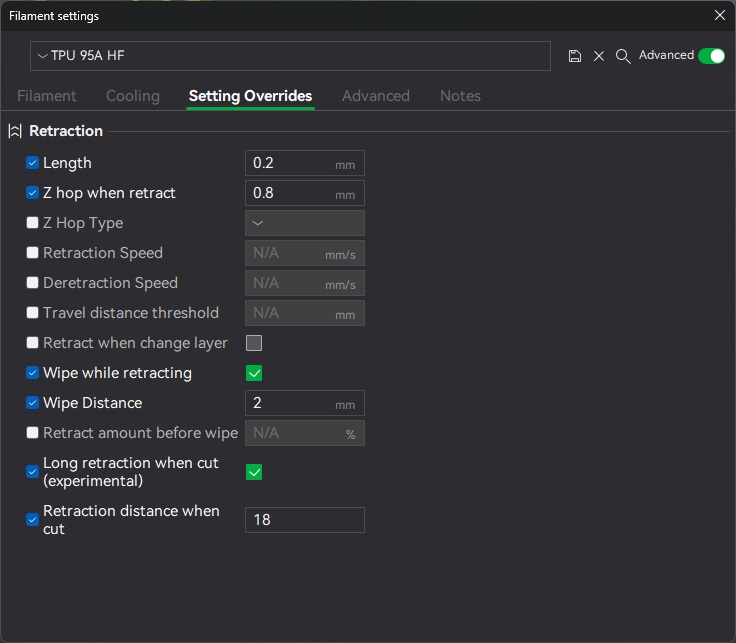
I made an effort to find the right settings. However, Makerworld made changes to my profile settings during the upload. So here are my different filament settings for TPU:
The basis is an existing TPU profile (e.g. Bambulab) in Bambu Studio, which is modified as follows:
Using AMS: no
Printing chamber: open
Printing plate temperature: 95°F
Printing temperature: Bambulab 95A HF = 455°F , Patona TPU 95A = 473°F
Maximum volume speed: Bambulab 95A HF = 2mm³/s, Patona TPU 95A = 1.2mm³/s
,
For further settings, see picture:
Deutsch
Für die Gestaltung unseres Gewächshauses habe ich einen Schraubsockel erstellt, der meine Bedürfnisse erfüllen kann. Das Gewächshaus steht auf abschüssigem Boden. Der Schraubsockel soll zum Niveauausgleich bis etwa 20cm dienen. Dabei sollen niedrigere Höhenunterschiede und etwas höhere Unterschiede überbrückbar sein.
Es gibt einen Fuß zum Anschrauben und einen, der nur auf dem Boden steht. Der untere Teil des Schraubsockels ist frei drehbar und wird deshalb lose in den Fuß gestellt. Wenn der untere und der obere Fuß verschraubt sind, wäre der Schraubsockel nicht mehr höhenverstellbar, wenn der untere Teil fest verbunden ist, er muss trotz Verschraubung drehbar sein.
Es gibt zwei Varianten mit unterschiedlicher Größe des oberen Fußes.
Weitere Größen dieses Produktes
Alle Teile wurden auf 80% der ursprünglichen Größe skaliert. Die Skalierung aller Teile muss in allen Achsen (X,Y,Z / Breite, Tiefe, Höhe) identisch sein, da sonst die Gewinde nicht ineinander passen. Ich habe ein Testmodell mit 50% der ursprünglichen Größe gedruckt, das ebenfalls funktioniert. Für die Schraubenlöcher habe ich Modifikatoren verwendet. Wenn das Modell skaliert wird, sollten diese Modifikatoren auf die richtige Größe gebracht werden, damit die zu verwendeten Schrauben später passen. Bei Größenänderung müssen die Modifikatoren einzeln neu positioniert werden, was nicht schwer ist. Schauen Sie sich die Größe der Modifikatoren in den Einstellungen ab, damit bekommen Sie eine Lochgröße von etwa 4mm für einzusetzende Schrauben.
Generelles zum Druck
Die Teile könnten sich an den Ecken nach oben wölben. Aber auch eine geringe Haftung auf der Bauplatte ist denkbar, so dass sich Teile während des Drucks lösen. Dem kann abgeholfen werden, indem Klebestift auf die Bauplatte auftragen wird. Er hält auch bei höheren Temperaturen die Druckobjekte fest an der Platte.
Verwendets Material
Damit die Stabilität gegeben ist, habe ich PAHT-CF verwendet. PAHT-CF ist ein Verbundwerkstoff aus PA12 und Kohlefasern, der für Anwendungen im Gewächshaus gut geeignet ist:
- Geringe Wasseraufnahme: PAHT-CF hat die Vorteile der geringen Wasseraufnahme von PA12 und Hochleistungs-Kohlenstofffasern. Dies bedeutet, dass es seine ausgezeichneten mechanischen Eigenschaften und Dimensionsstabilität auch bei hoher Luftfeuchtigkeit, wie sie in Gewächshäusern häufig vorkommt, beibehält.
- Hervorragende mechanische und thermische Eigenschaften: PAHT-CF bietet hervorragende mechanische und thermische Eigenschaften. Dies macht es ideal für die Herstellung von technischen Teilen, die in einem Gewächshausumfeld nützlich sein könnten.
- Hohe Temperaturbeständigkeit: Die Wärmeformbeständigkeit von PAHT-CF beträgt bis zu 194°C (0,45MPa). Dies bedeutet, dass es für Anwendungen geeignet ist, bei denen die gedruckten Teile hohen Temperaturen ausgesetzt werden können, ohne sich zu verformen oder ihre Festigkeit zu verlieren.
- Außergewöhnliche Z-Bindung: PAHT-CF zeigt im Vergleich zu normalem PA-CF eine viel höhere Haftung in den Z-Schichten. Dadurch ist es in der Lage, starken Stößen oder Belastungen standzuhalten, ohne zu brechen oder sich zu verformen.
Wenn Ihre Umgebungsbedingungen nicht so kritisch sind, können Sie auf ein weniger kostspieliges Filament zurückgreifen. Für trockene Umgebungen könnten Sie zum Beispiel PETG oder PETG-CF verwenden. Besonders, wenn Sie auf 100% skalieren, da die belasteten Gewinde durch mehr Material stärker sind. Wahrscheinlich reicht dieses Material für viele Anwendungen aus. PAHT-CF neigt dazu, eine höhere Haftung in den Z-Schichten zu zeigen als andere Materialien. Dies wirkt sich auf die zu erwartende Belastungsgrenze aus.
Es ist möglich, dass hier noch Änderungen folgen werden, die nützlich sind. Zögern Sie deshalb nicht, mich zu kontaktieren, wenn Sie Probleme mit dem Schraubsockel oder Verbesserungsvorschläge haben!
Viel Spaß beim Drucken!
Wie Sie PAHT-CF drucken
Das Material ist nicht schwer zu drucken. Nur der Umgang vor und während dem Druck ist nicht ganz so einfach, wie mit anderen 3D-Druck-Materialien, wie PLA. Bedenken Sie, dass Nylon Feuchtigkeit aus der Umgebung in einem nicht zu unterschätzendem Tempo aufnimmt, auch PAHT-CF. Die folgenden Tips könne Ihnen helfen, ordentliche Ausdrucke zu bekommen.
- Das Wichtigste beim Drucken mit PAHT-CF ist die Trocknung vor dem Druck. Es gibt viele Stufen, zwischen feuchtem und trockenem PAHT-CF, die das Druckergebnis vermasseln können. Sie können PAHT-CF mit 70°C bis 90°C trocknen. Ich selbst habe Bambulabs PAHT-CF bei 70°C getrocknet. Dann habe ich in Abständen von mehreren Stunden der Trocknung immer wieder Testdrucke ausgeführt. Somit kann ich versichern, dass es durchaus 24h oder länger dauert, bis PAHT-CF trocken genug ist. Das ist aber schon die einzige Hürde. Denn ich drucke PAHT-CF ohne Probleme mit einer gehärteten 0.4mm Stahldüse auf dem X1C. 0.6mm Düsendurchmesser sind nicht notwendig. Wenn PAHT-CF noch zu viel Feuchtigkeit enthält, kann die Düse leichter verstopfen, was auch zu schlechteren Druckergebnissen führt. Mit einer 0.6mm Düse ist es dann einfacher zu drucken.
- Wenn PAHT-CF zu feucht ist, wird die Oberfläche des Druckobjekts nach dem Druck rau sein. Es gilt auch das Gegenteil. Wenn das Filament trocken ist, wird die Oberfläche (matt) glänzend sein. Dass sie sich trotzdem rau anfühlt, liegt an dem Kohlefaseranteil.
- Wenn PAHT-CF noch zu feucht ist, wird die Maßhaltigkeit des Drucks nicht stimmen. Insbesondere, wenn Sie Teile ineinander stecken oder ineinander drehen müssen. Eventuell kann das durch die direkte Kalibrierung des Filaments vor dem Druck ausgeglichen werden, aber das empfehle ich nicht, weil ich es für unsicher halte.
- Trocknen Sie das Filament wenigstens 24h bei 70°C. Wenn Sie unsicher sind und das Filament schon längere Zeit im AMS war oder nicht verschlossen, trocknen Sie auch mehr als 24h. Ich benutze einen Filamenttrockner und kann die Zeit entsprechend einstellen. So ein Gerät ist eine gute Idee. Nachdem Sie das Filament ausreichend getrocknet haben, führen Sie eine manuelle Kalibrierung (Wertebestimmung durch Sichtprüfung) durch, versuchen Sie hier wirklich genau zu sein. Legen Sie ein Profil dafür an, worin sie die Werte der Kalibrierung speichern. Schalten Sie anschließend die automatische Kalibrierung vor dem Druck aus.
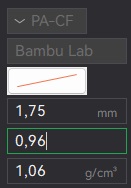
Das Filamentprofil enthält den Faktor für den Filamentfluss. Dieser Wert liegt irgendwo zwischen 0.94 uns 1.00. Ich habe einen Wert von 0.96 verwendet, um einen passenden Druck mit Bambulab PAHT-CF zu erhalten. Wenn Sie trotz langer Trocknungszeit und dem von mir empfohlenen Filamentfluss noch Probleme mit der Passgenauigkeit der Teile haben (z.B. dass diese zu stramm ineinander sitzen), verringern Sie den Wert auf 0.95 oder 0.94. Wenn Ihre Ausdrucke etwas zu locker ineinander sitzen, erhöhen Sie den Wert ein wenig.
Druckeinstellungen für TPU
Ich habe mir Mühe gegeben, die richtigen Einstellungen zu finden. Beim Hochladen wurden aber Änderungen von Makerworld an meinen Profileinstellungen vorgenommen. Deshalb hier meine abweichenden Filamenteinstellungen für TPU:
Grundlage ist ein bereits in Bambu Studio vorhandenes TPU-Profil (z.B. Bambulab), das wie folgt geändert wird:
Benutzung AMS: nein, externe Zuführung
Druckkammer: offen
Druckplatte Temperatur: 35°C
Drucktemperatur: Bambulab 95A HF = 235°C, Patona TPU 95A = 245°C
Maximale Volumengeschwindigkeit: Bambulab 95A HF = 2mm³/s, Patona TPU 95A = 1,2mm³/s
Weitere Einstellungen, siehe Bild:
Adjustable Foot - versatile Screw Base

Publicado em 27 de jun de 2024
Gostou deste modelo? Crie uma conta grátis para salvar seus favoritos e voltar a eles depois.
Criar conta