Você está no 3DFinder
Buscamos em Thingiverse, MakerWorld e Printables ao mesmo tempo para te dar o melhor de cada uma.
Descrição
Important! For optimal results, see the Customization Guide below
Filament Zero
The last baseplate you'll ever need.
If you are doing Gridfinity, you'll need baseplates that are:
- standard: compatible with standard Gridfinity bins
- practical: reliably prints on all Bambu printers (0.4mm nozzle, PLU)
- strong: holds bins securely in place & stand up to 100s of bin take-outs and drop-ins
If you care about maximum efficiency, or just want to save a buck, you'll need Filament Zero:
- First-principles, ground-up re-engineered, endgame Gridfinity baseplate system
- Up to 10x lighter than standard Gridfinity baseplates (0.133g/tile)
- Up to 12x faster than standard Gridfinity baseplates (18.8s/tile)
Filament Zero comes in three models. Whatever your needs, one of these Filament Zero models is the most efficient baseplate you can print. Full stop:
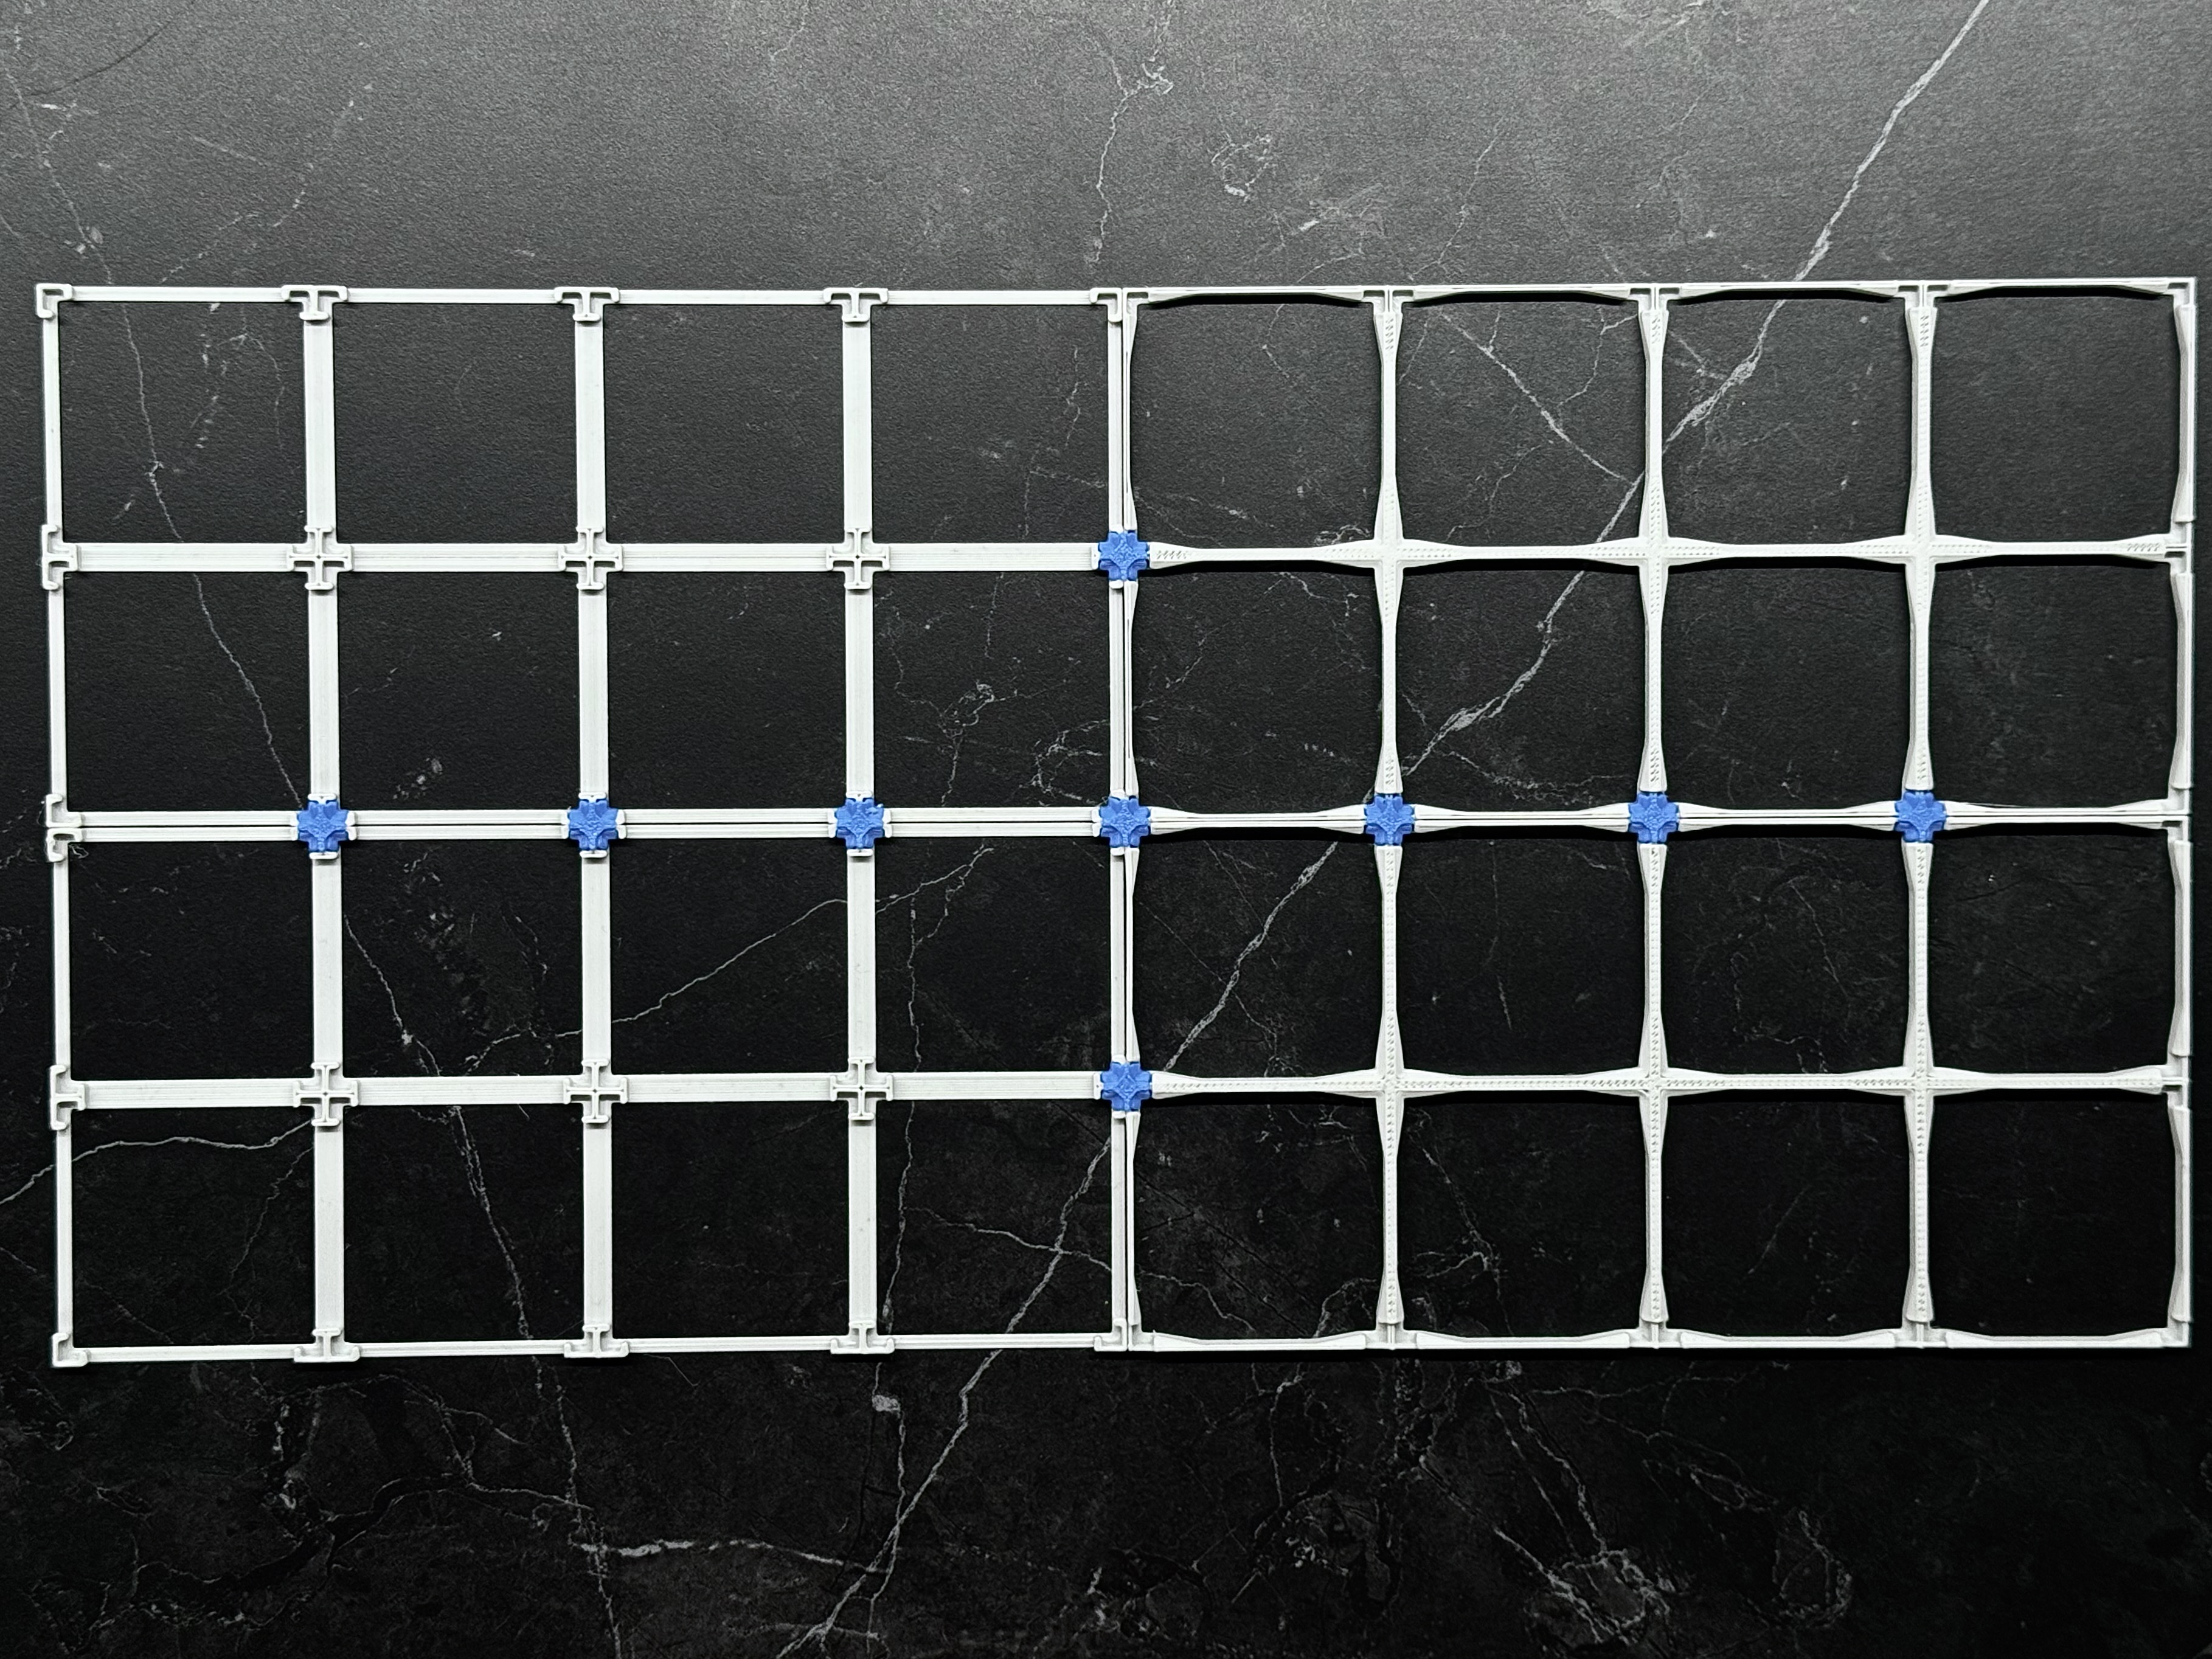
- ultralight Net (0.133g, 18.8s/tile)
- semi-rigid Tape (0.295g, 33.4s/tile)
- rigid Beam (0.460g, 66.1s/tile)
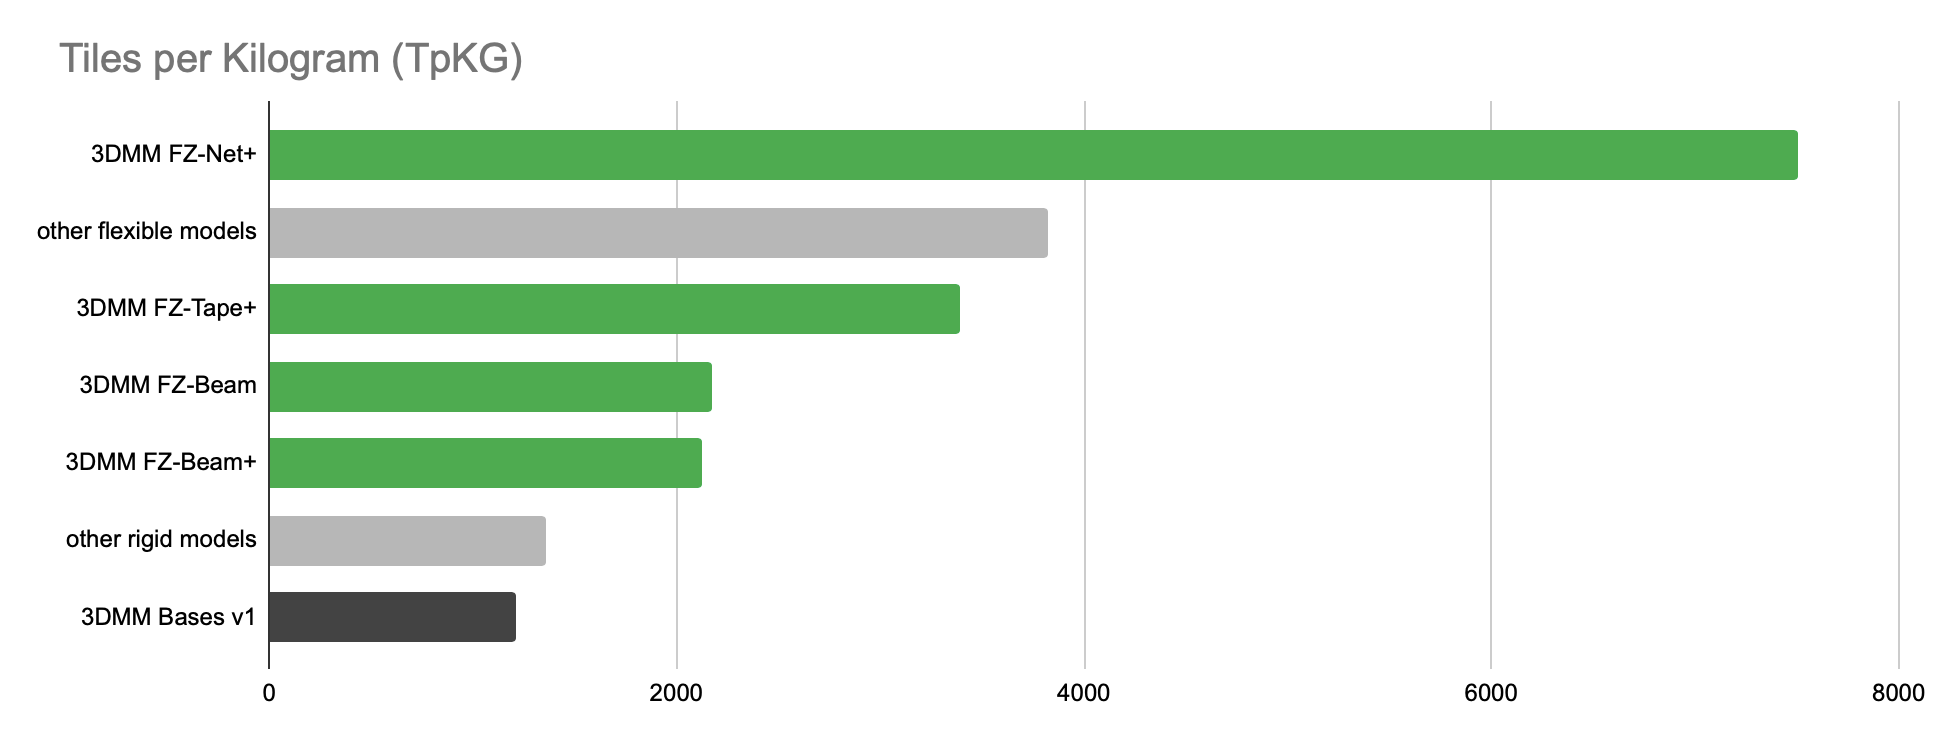
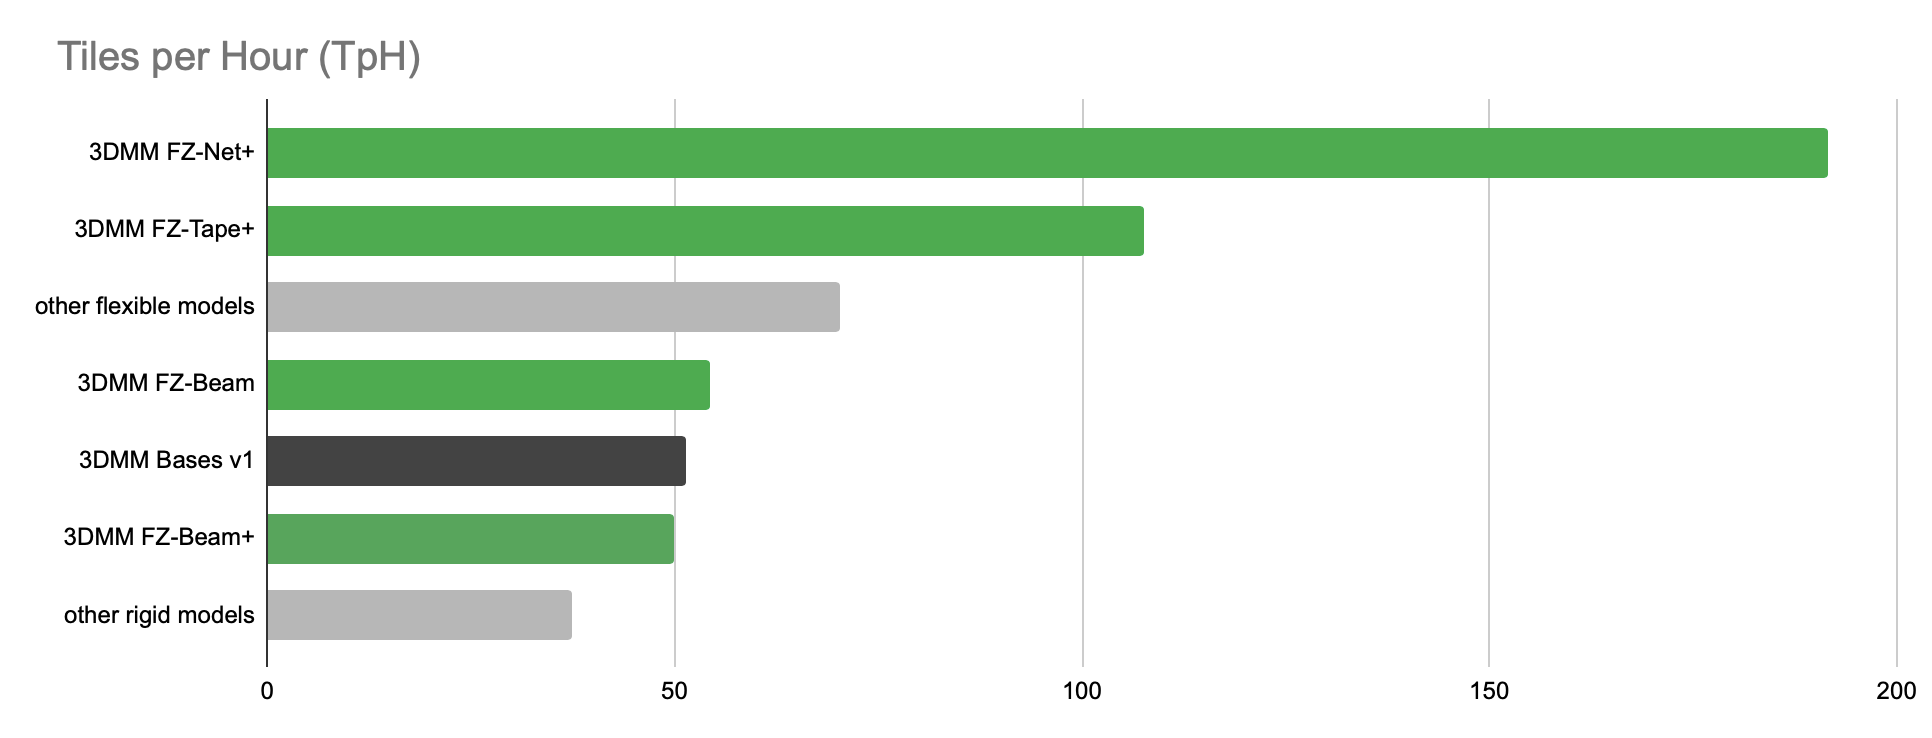
Print up to 7,500 tiles per KG at over 190 tiles per hour. Up to 2x lighter and 2.7x faster than anything else on MakerWorld (July 2026).
Features
Filament Zero is designed to save you money and time:
- Impossibly light & fast: not 0.1g more than absolutely necessary & it'll be done before you notice it started
- Choose from 3 strength options: flexible Net, semi-rigid Tape and rigid Beam
- Sparse Gridfinity - beyond impossibly light & fast: halve your print time and filament again with sparse baseplates
Filament Zero lets you create any gridfinity layout you need effortlessly:
- Interlocking: strong baseplate interlocking system
- Any Custom Grid Size: set any width and length (half-unit increments)
- Built-In, Custom Drawer Spacers: add drawer-fit spacers to any side (mm increments)
- Any Custom Shape: Ls, circles, triangles, etc…
- Powerful Multi Baseplate Generator: all the plates you need to cover any area in one click
Four Filament Zero Models
Filament Zero comes in four models to meet all your baseplate needs. There are trade-offs between model weight and model strength. During design, I realized there were three main tradeoff points for various use cases. Rather than making one model to meet everybody's needs, I made three main models to address the three main optimal weight strength trade-offs. The fourth model, FZBeam+ is an interlocking vs aesthetics & time trade-off.
FZ Model Quick Selection Guide
There are two main decisions you need to make to choose your model:
- Strength? How rigid and strong do you need your baseplates to be?
- Flexible: FZNet+ (lightest)
- X-Y rigid: FZTape+ (balanced)
- X-Y-Z rigid: FZBeam / FZBeam+ (strongest)
- Interlocking? Do you prefer to have your baseplates fully interlocked? The “+” in the model name indicates interlocking.
- Yes: FZNet+, FZTape+ or FZBeam+
- No: FZNet+, FZTape+ or FZBeam
About the Models
- FZ Net+ (lightest, flexible) — Think fisherman's net. Choose this if you want the lightest, fastest option and you are going to fully fill your grid with bins. The primary structural requirement for baseplates is to hold your bins together. Net does exactly that and nothing more… at 190 tiles per hour and 7,500 tiles per kilogram. Nearly 2x the tiles per kilogram and 2.7x the tiles per hour of the lightest base on MakerWorld, of any kind.
- FZ Tape+ (optimal, X-Y rigid) — Semi-rigid: rigid in the X/Y plane when placed on a flat surface, flexible in Z. The best overall performance. Strong in all the ways that matter yet still unbelievably fast and lightweight to print. It's in the same weight class as the best flexible base on MakerWorld, yet is strong and prints 1.5x faster.
- FZ Beam (strongest, X-Y-Z rigid) — Fully rigid, strong and the most like classic gridfinity-like styling. To me, this is the most aesthetically pleasing lightweight model anywhere while also being the most efficient rigid base on MakerWorld: 1.7x more tiles per kilogram and 1.5x more tiles per hour than the previous rigid record holder.
- FZ Beam+ (FZ Beam + Interlocking) – For slightly more print time, but about the same weight, you can print FZ-Beam plates with full interlocking capabilities.
How strong does a baseplate actually need to be?
Step back and ask what a gridfinity baseplate actually does: it holds your bins in place. Once bins are seated and the plate is resting on a flat surface, the surface provides all the vertical support. Gravity holds everything down. The only job left for the baseplate is resisting horizontal forces: keeping bins from sliding apart when you push, pull, and rummage. Structurally, that's a tension-and-shear problem in the plane of the plate, not a stiffness problem.
That insight is what makes the three regimes possible:
- Net takes the insight to its logical conclusion. Like a fisherman's net, it only resists tension. On a flat surface with bins seated, that's genuinely all you need, and it's why Net can be so radically light. The trade-off: it has essentially no rigidity of its own. It's a conforming skeleton, not a structure. Handle it empty and it flops; that's the point.
- Tape adds in-plane rigidity. Sitting on a flat surface, it's rigid in X and Y: bins stay locked in their grid, and the plate keeps its shape as you load and unload. It still flexes in Z, so it conforms to slightly uneven surfaces and pops out of drawers easily. For most real-world use, this is the sweet spot: everything a baseplate must do rigidly, it does rigidly.
- Beam is rigid in all directions, the classical gridfinity experience. It resists twisting and bending even when picked up and feels like a solid foundation in the hand. If you move plates around with bins on them, or your surface isn't flat, or you simply want the familiar feel, Beam is the one, and it's still lighter and faster than any other rigid base on MakerWorld.
The progression is simple: each step up adds rigidity in a new direction, and costs filament and time. Pick the regime that matches how you actually use your grid.
Aesthetics (for the few seconds you'll see it)
Let's be honest: a baseplate spends its life hidden under bins. Once your grid is loaded, you'll never see it. So Net and Tape make no apologies for looking like what they are: pure function, though beauty is in the eye of the beholder.
Beam is the exception. Its strength comes from triangles, arranged to maximize strength per gram as printed, and a key innovation was removing all the rounded, extended parts of the original gridfinity profile: they serve no mechanical purpose and dramatically slow down printing. What's left is a faceted, multi-triangle surface that looks almost prismatic. The goal was always strength per weight; the looks are what optimization happens to look like.
The Interlock System
Need your baseplates locked together? No sliding, no drifting — a single unified grid before a single bin goes down. We've got you covered.
The system itself was a happy accident. In stripping out every gram of unnecessary filament, the corners emptied out since the bins never touch them. That empty corner space turned out to be the natural home for an interlocking cap. Net and Tape became interlocking the moment I designed the cap; the only real work was creating Beam+, the interlocking variant of Beam.
The result: small caps that snap into the corners where plates meet, resisting both tension and shear. They print in minutes by the dozen, and every interlocking plate is compatible with every other, so you can mix and match Net+, Tape+, and Beam+ freely in one locked grid.
Interlocks also unlock more advanced custom shapes: while the customizer handles basic shapes like Ls, circles, triangles etc, shapes with a holes or a complex perimeters may need to be printed in two or more pieces. The interlock system then lets you connect those parts together to form a solid whole.
Filament Zero Performance
Weight: Filament is Money
How much filament do you need to complete your Gridfinity baseplate job? One way to answer that is to figure out the average weight per tile for a particular gridfinity base plate. Filament Zero is so light, though. (down to 0.133g/tile), that it's hard to compare this way. Instead, I've started comparing models by how many tiles can you get out of a kilogram of filament: Tiles per Kilogram or TpKG.
Speed: Time is our most precious resource
I don't know about you, but I hate waiting for 3D prints to complete. To me, print speed is even more important than filament use, though the two go hand in hand. Though I aggressively optimized every print profile, I did not change the print speed settings. That means you can probably use Sport Mode or even Ludacris Mode to print these in even less time (not tested!). However, These models already print so fast that the final print time is dominated by the printer's prep time.
Performance by The Numbers
| Models | Type | 4x4 print weight | 4x4 print time (*) | 6x6 print weight | 6x6 print time (*) | Tiles /kG | Tiles /Hr |
|---|---|---|---|---|---|---|---|
| Filament Zero Net+ | flexible, interlocking | 2.29g | 5.5m | 4.8g | 11.3m | 7,500 | 191 |
| Filament Zero Tape+ | X-Y-rigid, interlocking | 4.88g | 9.5m | 10.6g | 20.1m | 3,387 | 108 |
| Filament Zero Beam | X-Y-Z-rigid | 7.68g | 17.5m | 16.6g | 39.7m | 2,173 | 54 |
| Filament Zero Beam+ | X-Y-Z-rigid, interlocking | 7.91g | 19.6m | 16.9g | 43.2m | 2,128 | 50 |
| 3DMM Baseplates v1 | X-Y-Z-rigid | 13.95g | 16.3m | 29.8g | 42.0m | 1,208 | 51 |
Customization Guide
Your drawer isn't 4x4. Nobody's is. The whole point of gridfinity is a system that fits your space — and stock rectangular baseplates almost never do. The customizer is where Filament Zero goes from "efficient baseplate" to "the exact baseplate your drawer has been waiting for": any size, half-unit precision, spacers for a perfect friction fit, custom shapes for odd corners, even auto-generated plate sets for big areas.
Beginner Customization Guide: Pick a model, Pick a size → Download & Print
- Start Customizing:
- Click “Customize” below the print profiles
- Select the “Single Baseplate” option
- Look for the customization options in the Customize panel, usually on the left.
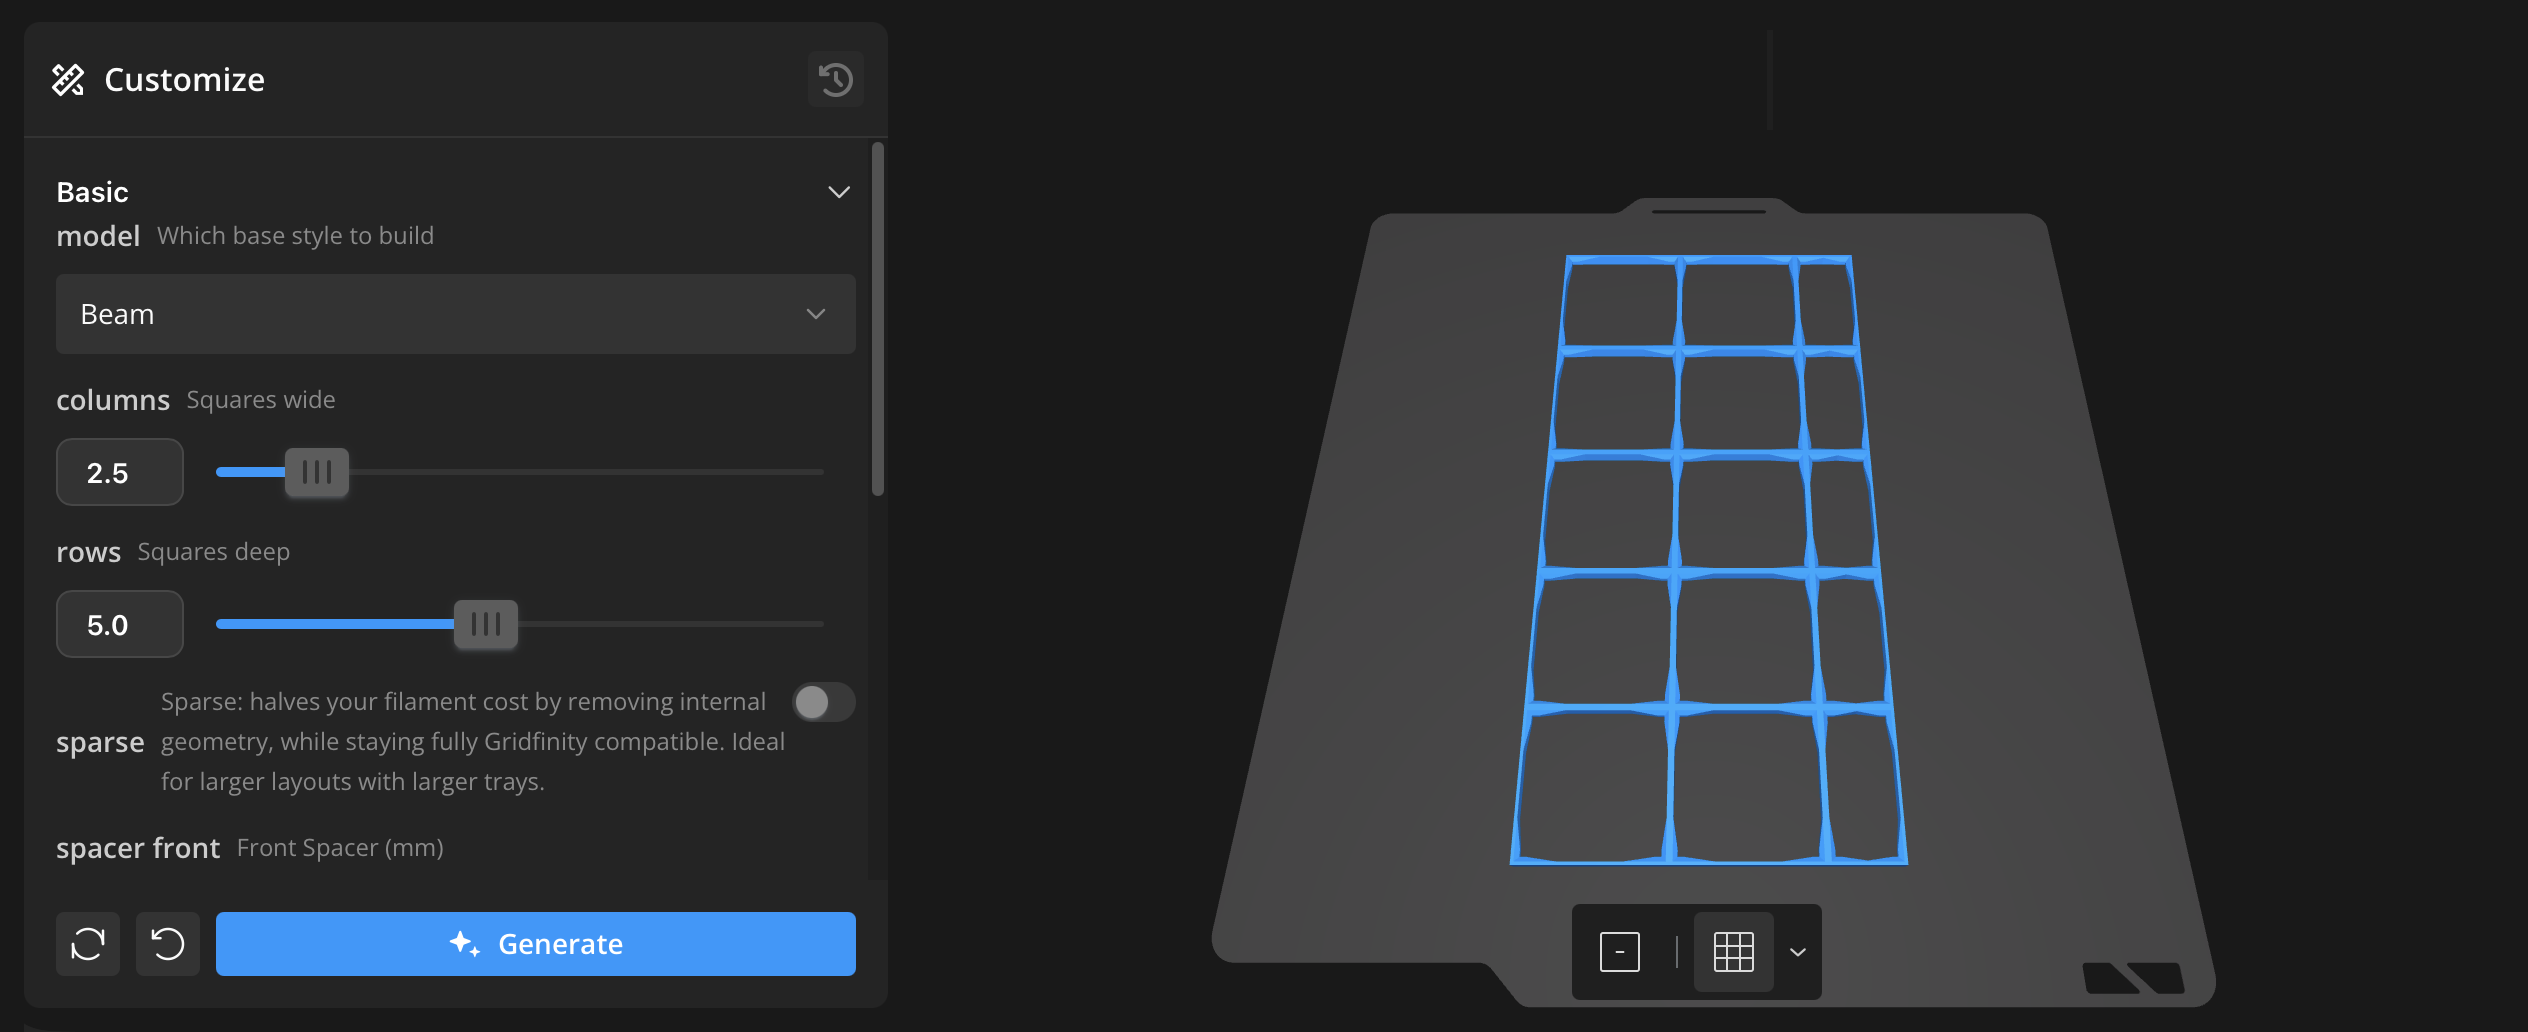
- Pick your Filament Zero Model: In the Customize panel, the Model dropdown chooses which base style to build:
- Beam — rigid, classic feel (choose Beam+ if you plan to interlock multiple plates)
- Tape+ — semi-rigid: holds bins firmly, flexes to lift out of drawers
- Net+ — ultralight and flexible: absolute minimum filament and print time
- Set your size: Under Grid, set columns (squares wide) and rows (squares deep). A gridfinity square is 42mm, so a 4x4 plate is 168x168mm.
- Generate: Click “Generate” and after few moments, you'll see your model in the preview.
- Download: See the Download and Print Guide below
That's it. A custom-sized baseplate in under a minute, no modeling required.
Parametric Model Maker Download & Print Guide
Question: “Why are my custom FZ prints way slower and use way more filament than claimed?”
Answer: The MakerWorld Parametric Model Maker doesn't support all the print-profile controls Filament Zero needs.
Here's how to use the customizer AND get FZ's full performance:
- Customize & Export you Filament Zero Baseplate(s) as STL
- Customize as you like (Beginner Customization Guide above or Features Guide below)
- Click Download (top right)
- When it asks for 3MF vs STL: Select STL!
- Download and Open Matching Filament Zero Base Print Profile
- On this page, select one of the base profiles that match your model choice (Net+, Tape+, Beam or Beam+)
- Click “open in Bambu studio” to download and open it.
- Delete the existing objects (Edit → Delete All)
- Set the Printer to match your Printer
- Save (optional): You can re-use this file and skip Step 2 in the future.
- Import your Custom STL into the optimized Filament Zero Print Profile
- Add in your custom STL (File → Import → STL - or just drag the file into Bambu Studio)
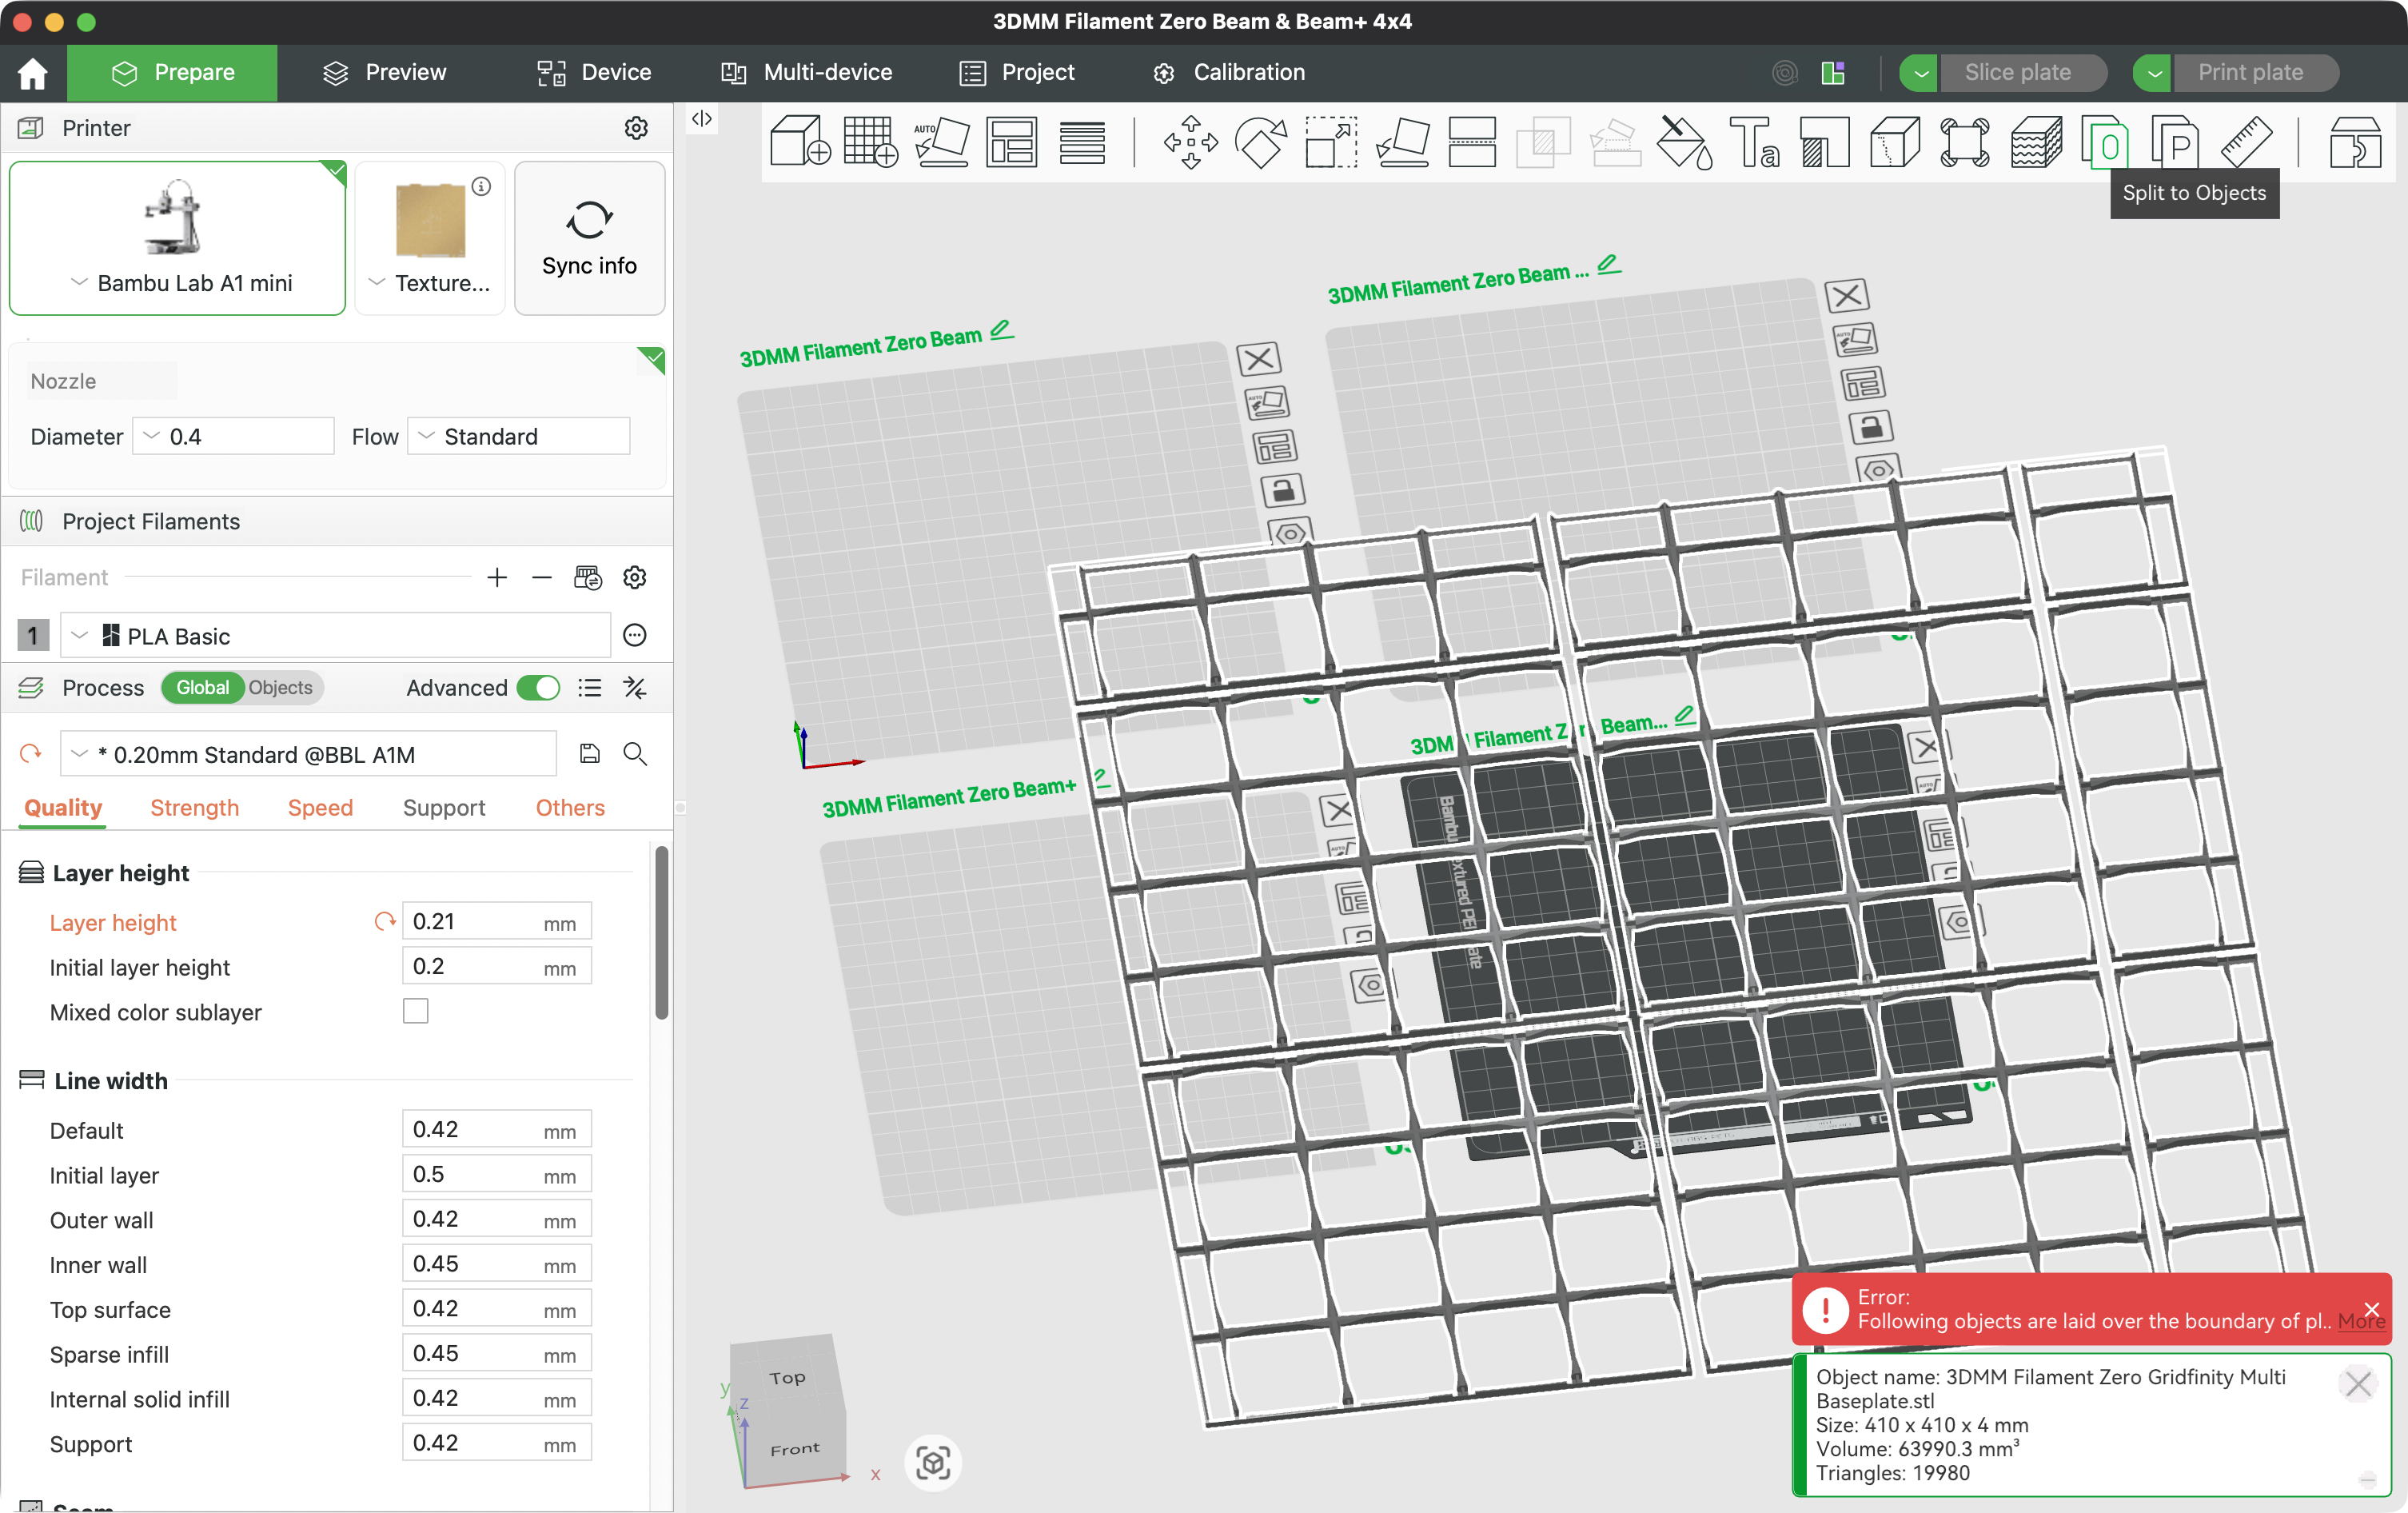
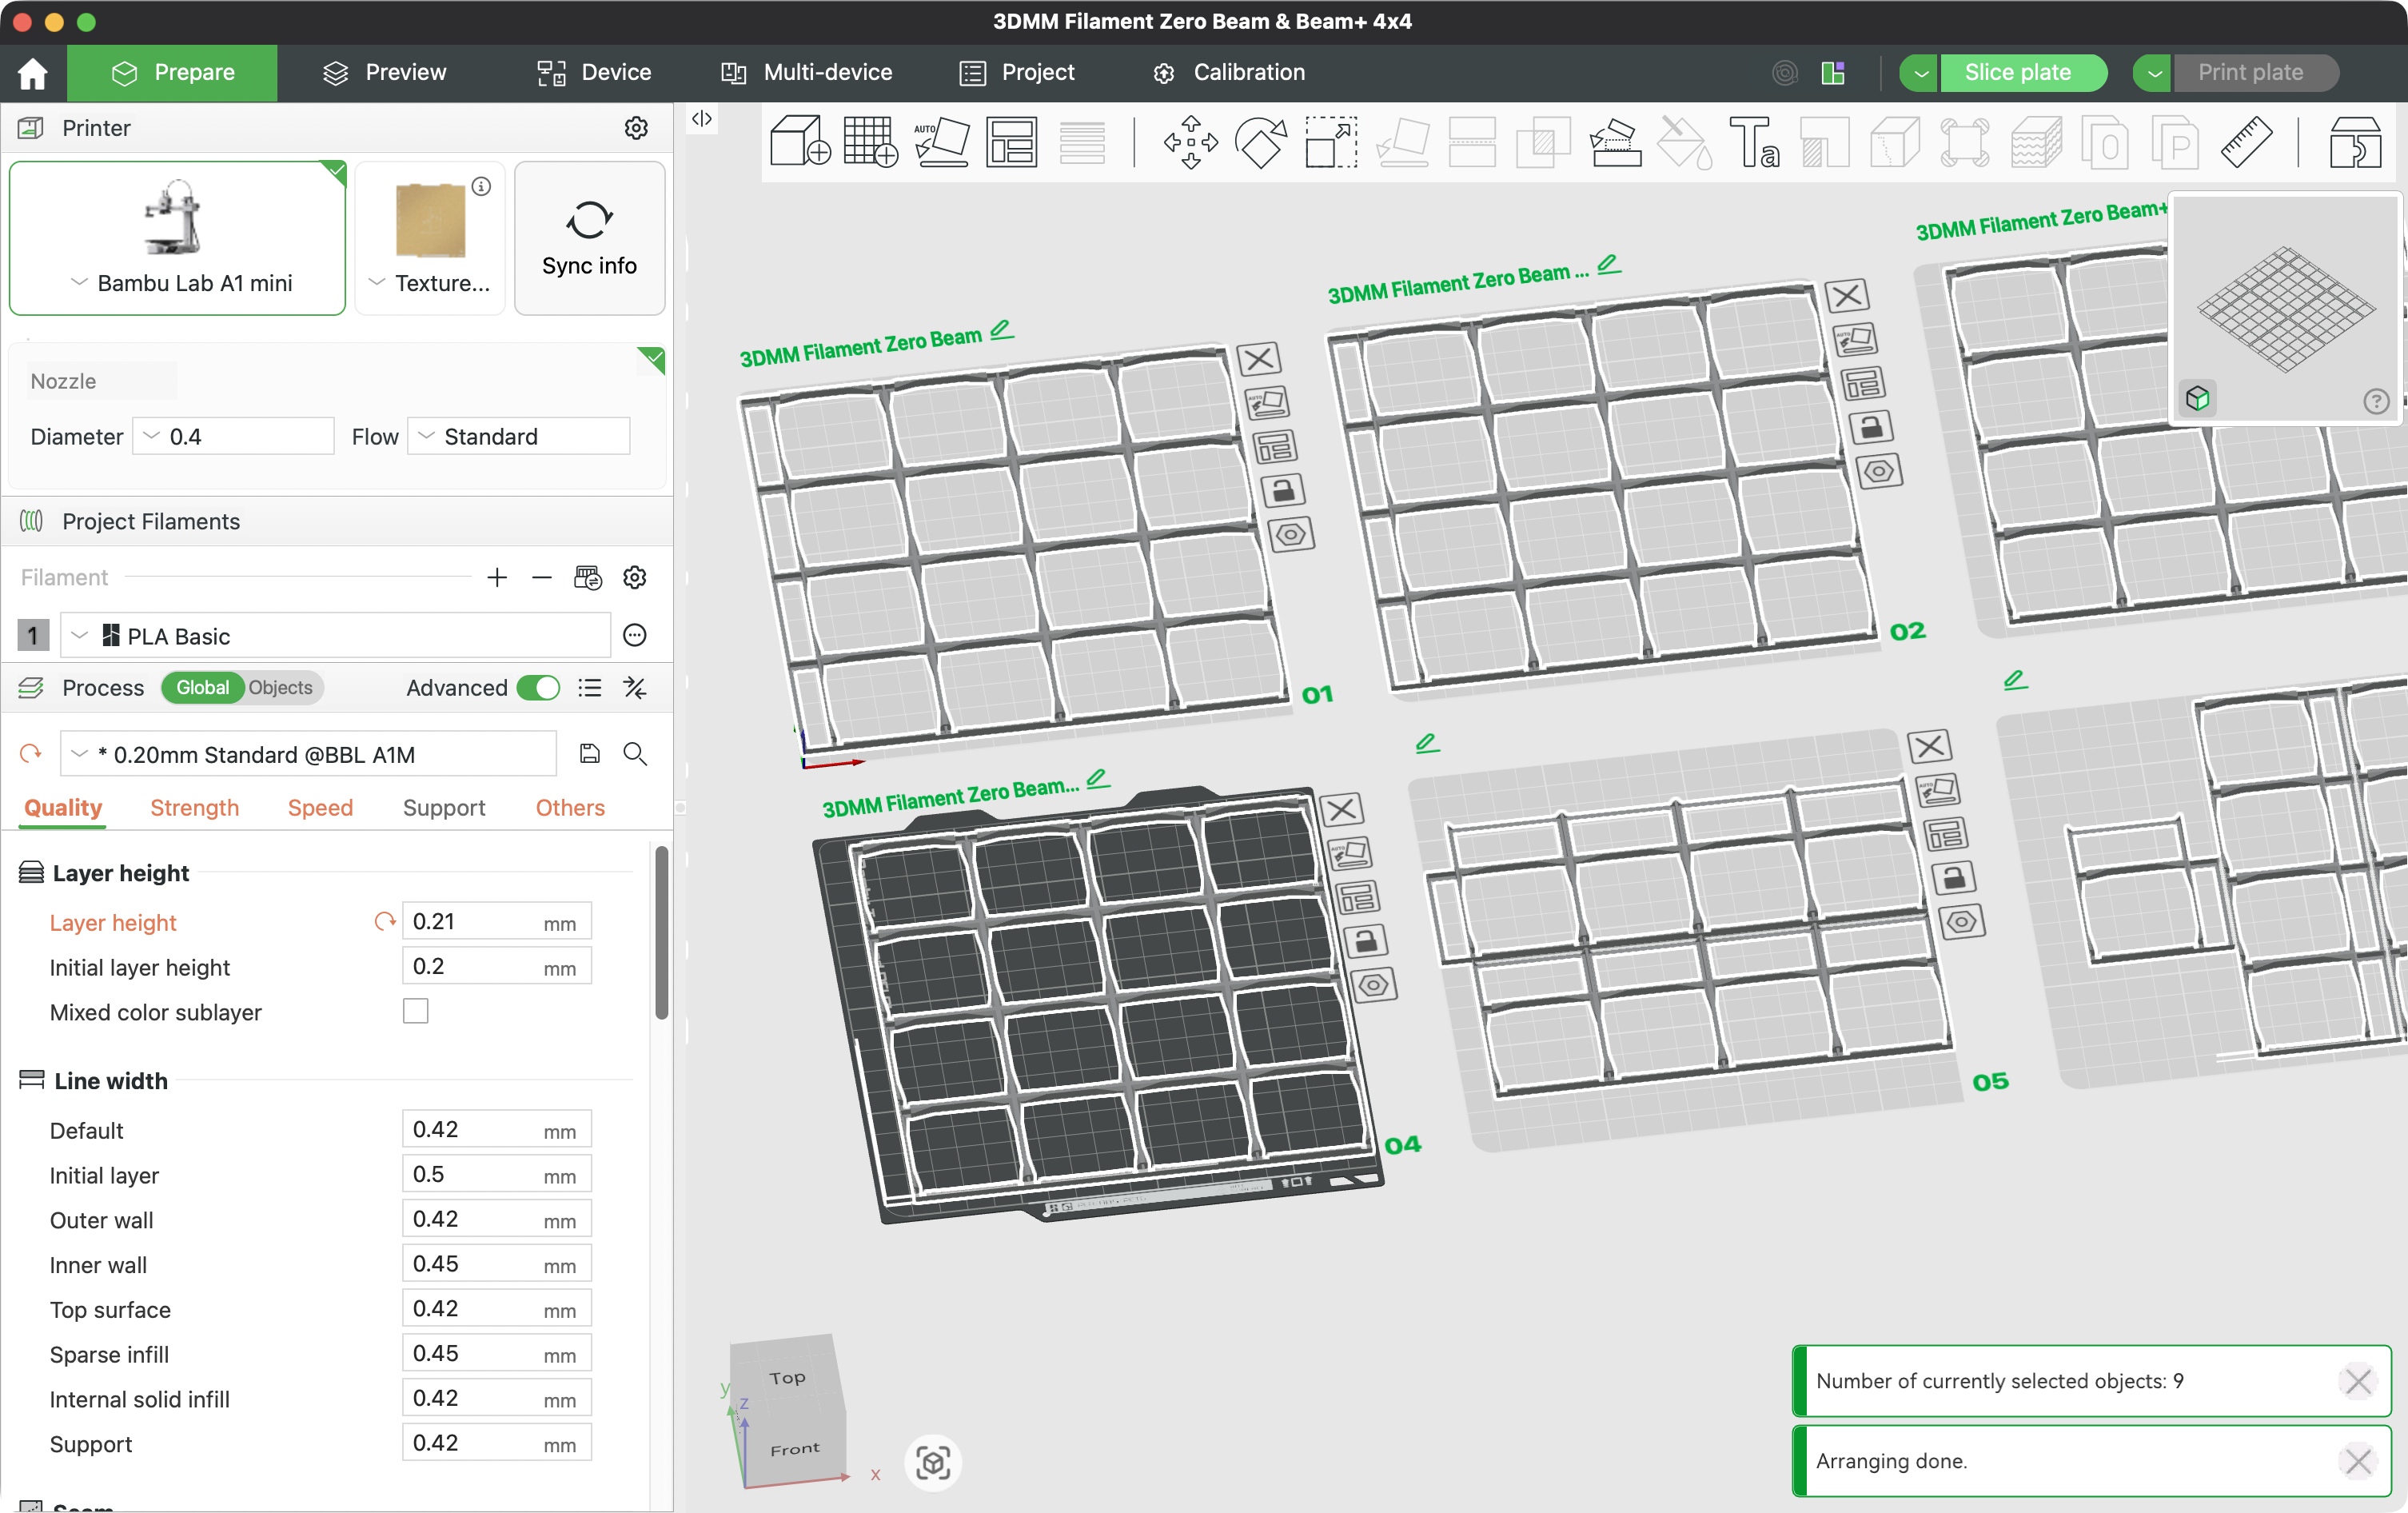
- IMPORTANT if your STL has more than one baseplate: Click the “Split to Objects” icon (with your STL selected) then press “A” to auto-arrange objects across all plates (see Multi Baseplate Print Prep below)
NOW you can print with maximum efficiency.
I wish this was easer. You should be able to just download the 3MF and have it work perfectly. I'll be petitioning MakerWorld to better support advanced 3MF print profiles in the Parametric Model Maker.
Features Guide
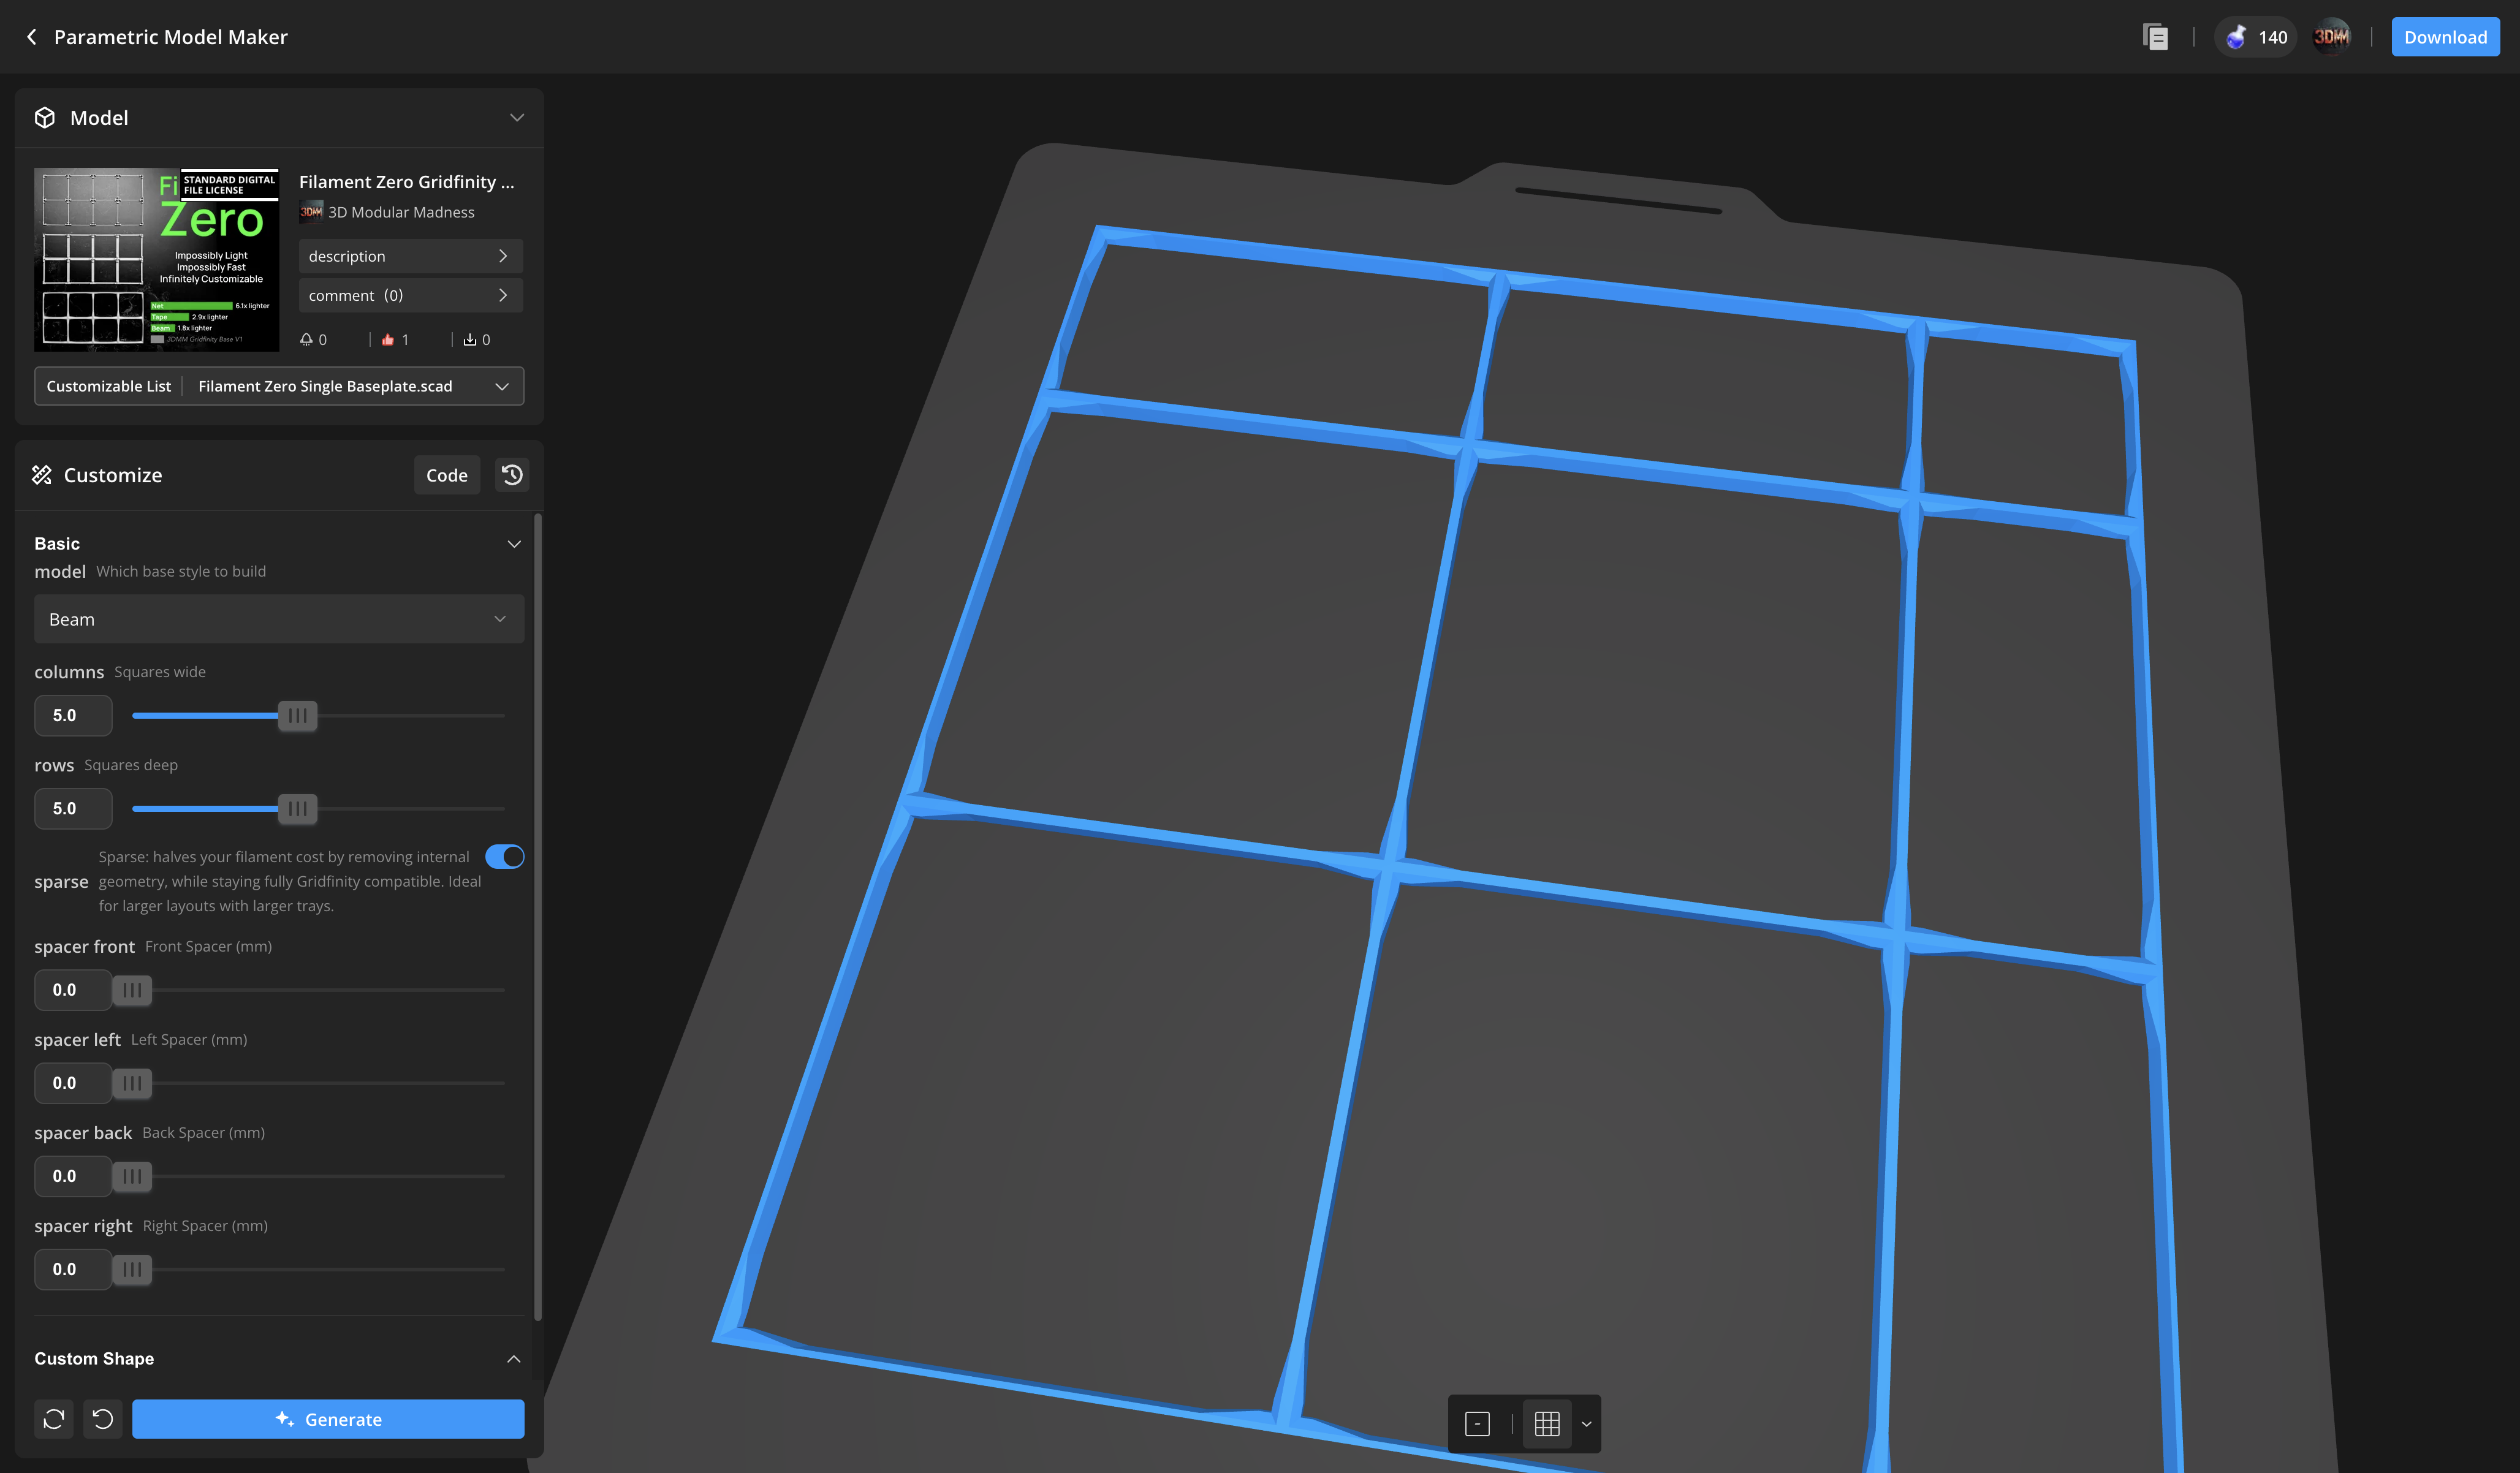
Sparse Gridfinity
Bigger project? Bigger savings. Sparse mode removes inner geometry, creating 84x84mm cells wherever they fit — halving material and doubling print speed on top of everything above. For larger gridfinity layouts, and especially larger trays, this is all you need. Net+ in sparse mode approaches 20,000 standard squares per kilogram and nearly 500 squares per hour. But the sweet spot is Tape+ at 7,692/kg and 271/h: the extra rigidity is the right compromise for a sparse layout while keeping incredible efficiency. Run a few test prints and experiment with your layout.
| Model with Sparse Layout | Type | 6x6 print weight | 6x6 print time (*) | Tiles /kG | Tiles /Hr |
|---|---|---|---|---|---|
| Filament Zero Net+ Sparse | flexible, interlocking | 1.9g | 4.6m | 18,848 | 473 |
| Filament Zero Tape+ Sparse | X-Y-rigid, interlocking | 4.7g | 8.0m | 7,692 | 271 |
| Filament Zero Beam Sparse | X-Y-Z-rigid | 8.8g | 15.4m | 4,110 | 140 |
| Filament Zero Beam+ Sparse | X-Y-Z-rigid, interlocking | 8.9g | 17.2m | 4036 | 126 |
| 3DMM Baseplates v1 | X-Y-Z-rigid | 29.8g | 42.0m | 1,208 | 51 |
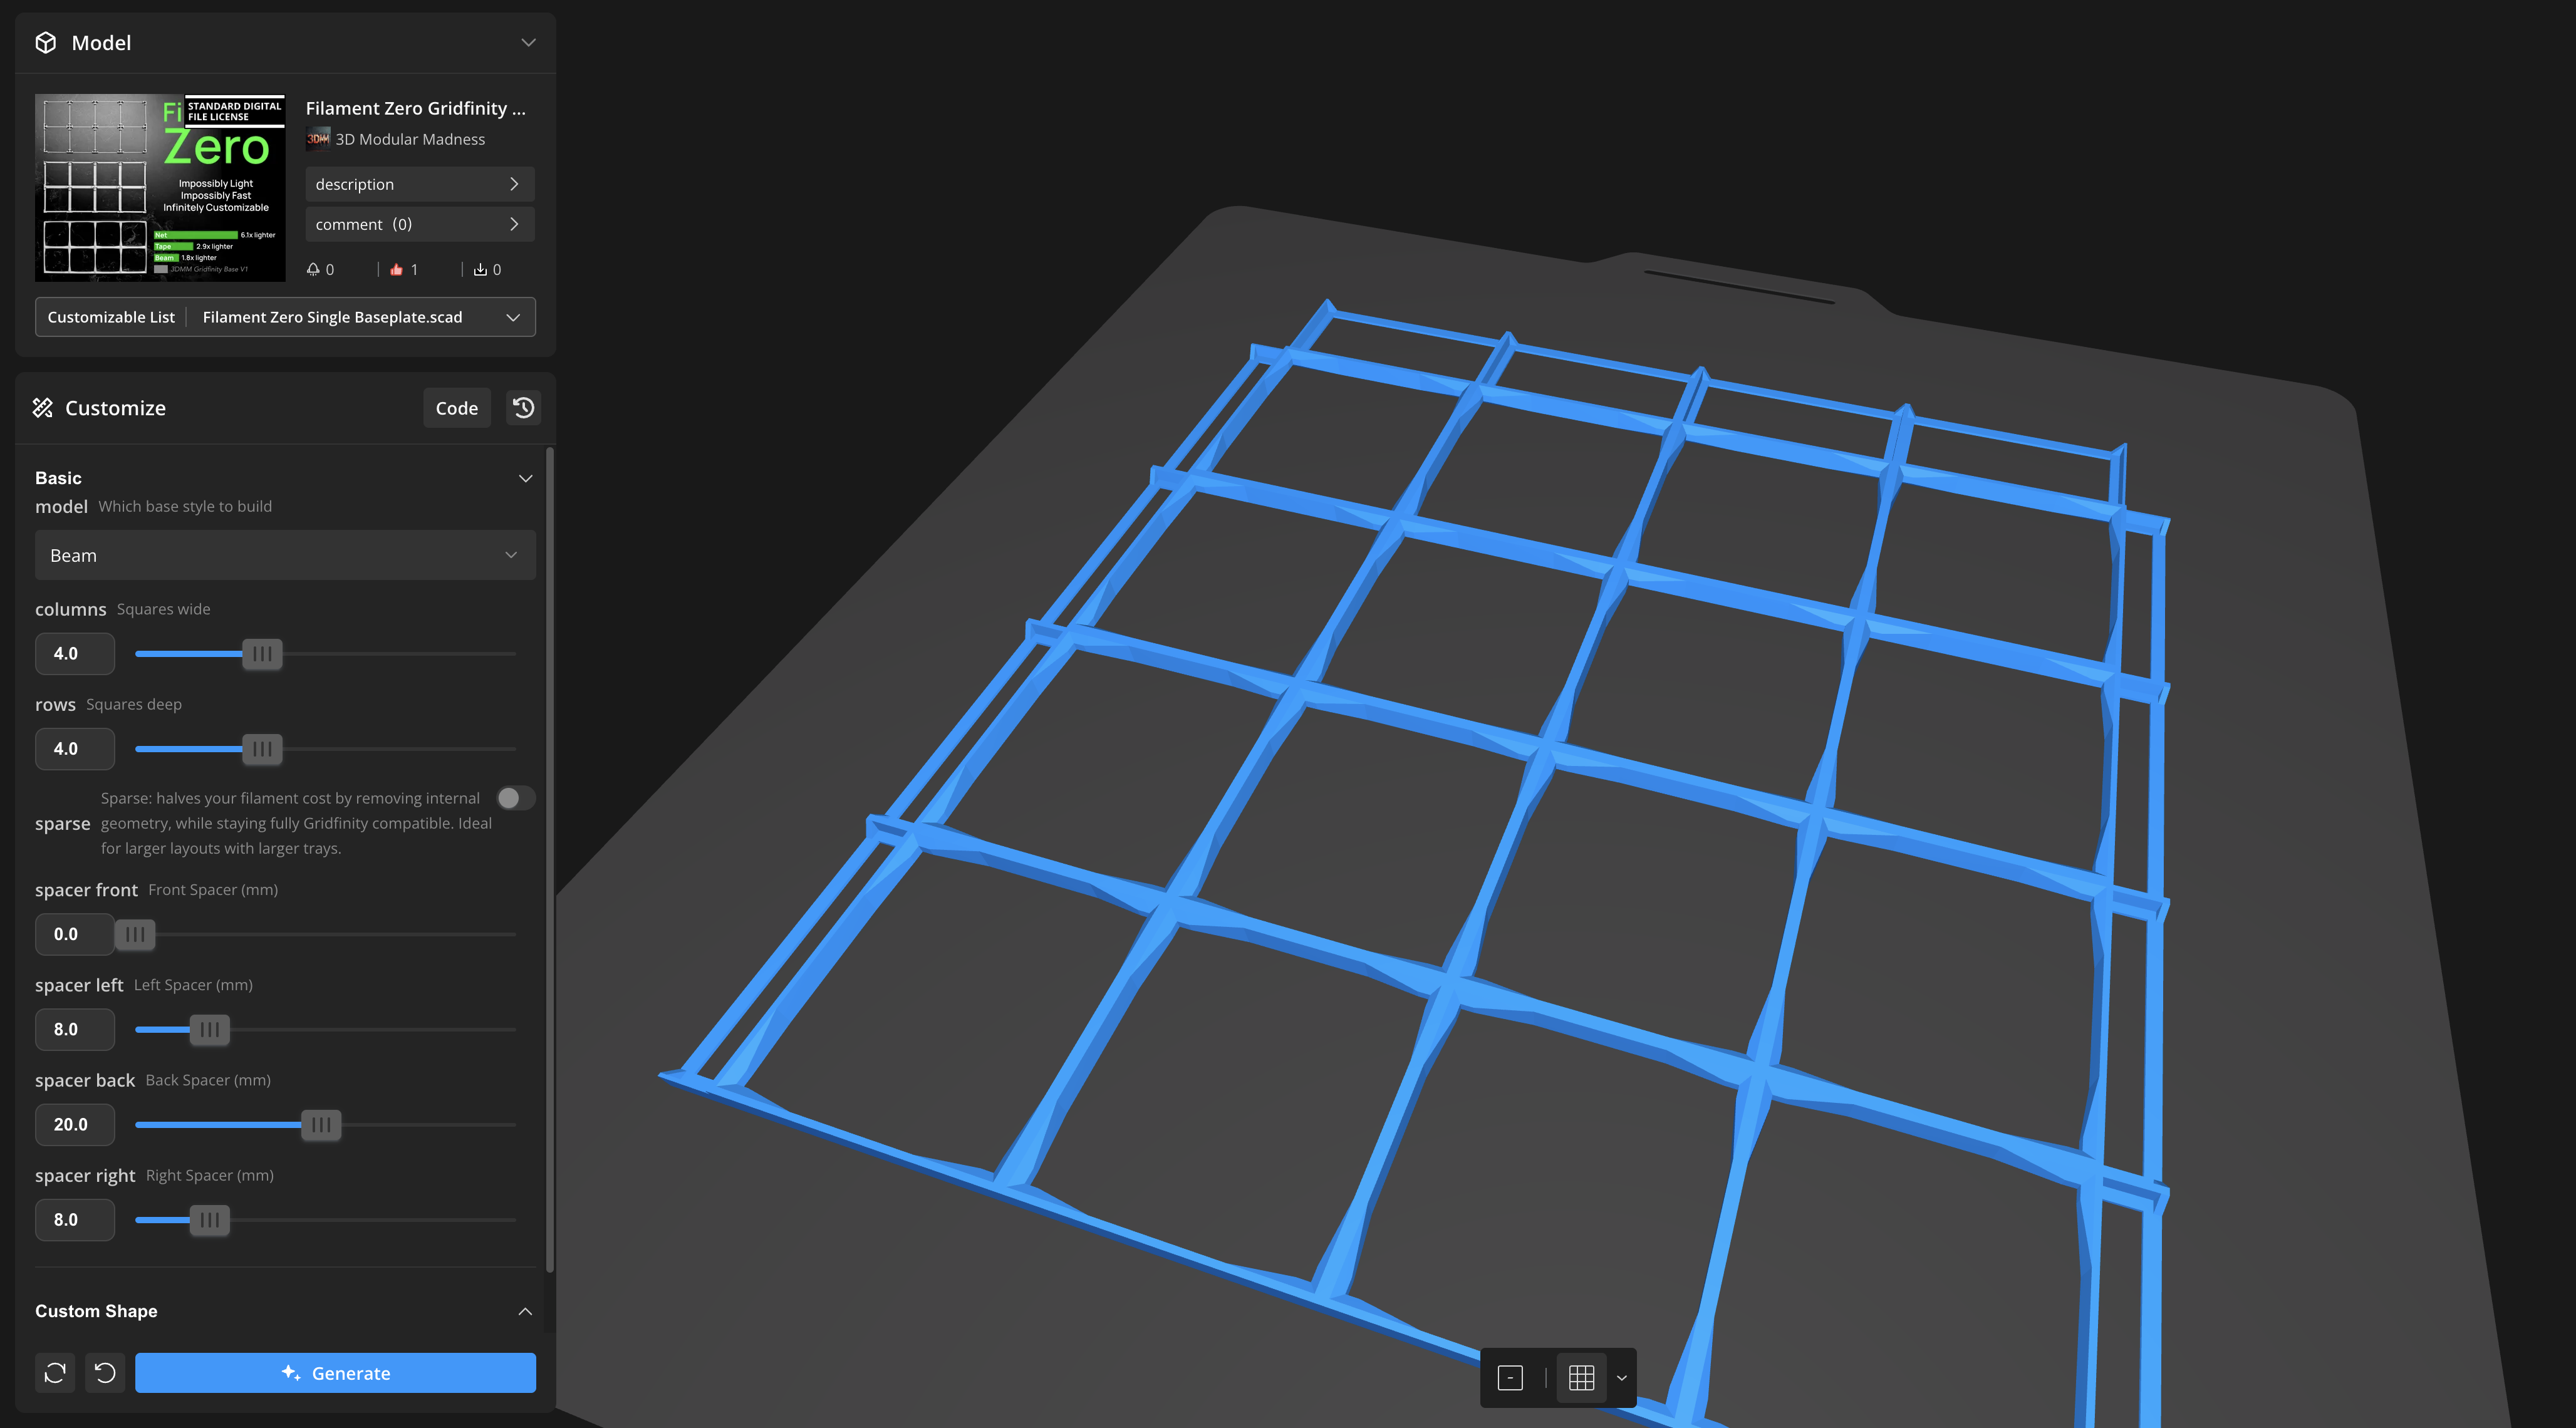
Drawer Spacers
Nobody likes a gridfinity that slides around the drawer. And nobody likes printing separate spacers that pop out, drift, and rattle either. Print your spacers as part of your baseplate: add them to any of the four sides, in 1mm increments, for a snug fit that locks your whole grid in place.
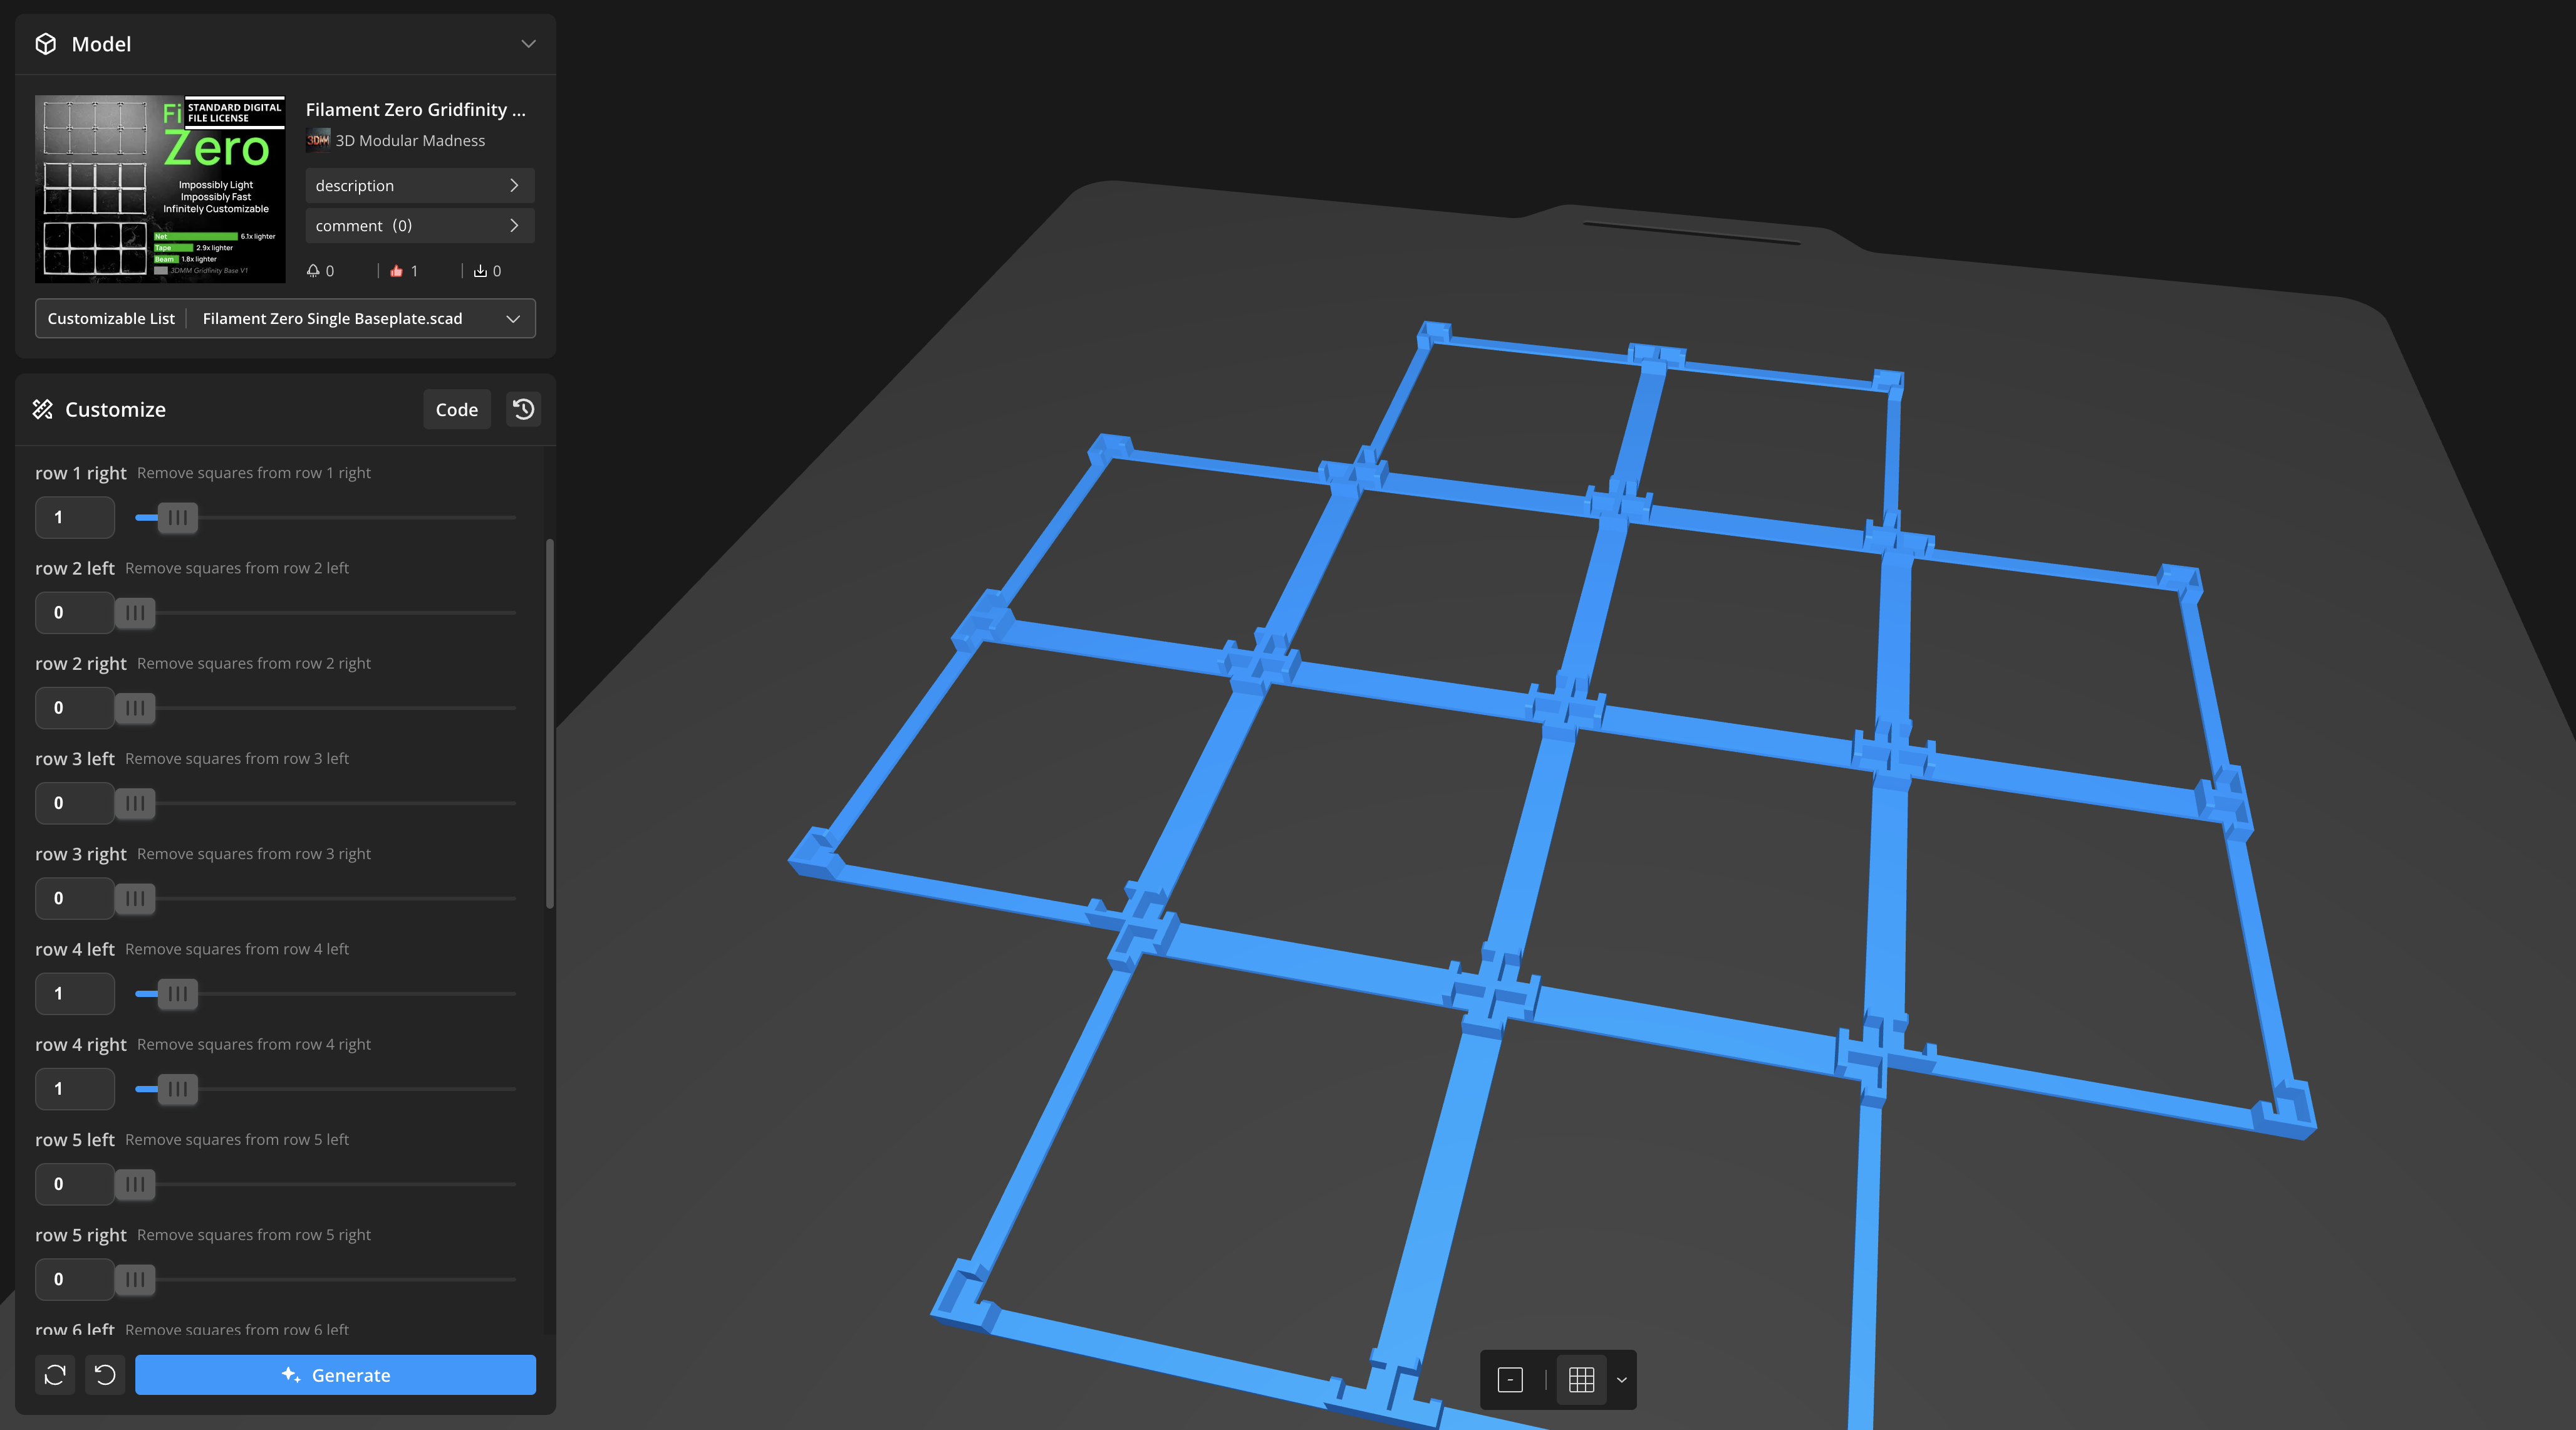
Custom Shapes
Drawers aren't always rectangles. Corners, notches, angled walls — real spaces have odd shapes, and your baseplate should fit them. Remove squares from the left and right of any row, in any configuration, to create nearly any shape you need. And if the shape configurator can't do it, split it in two: print two plates and join them with the interlock system.
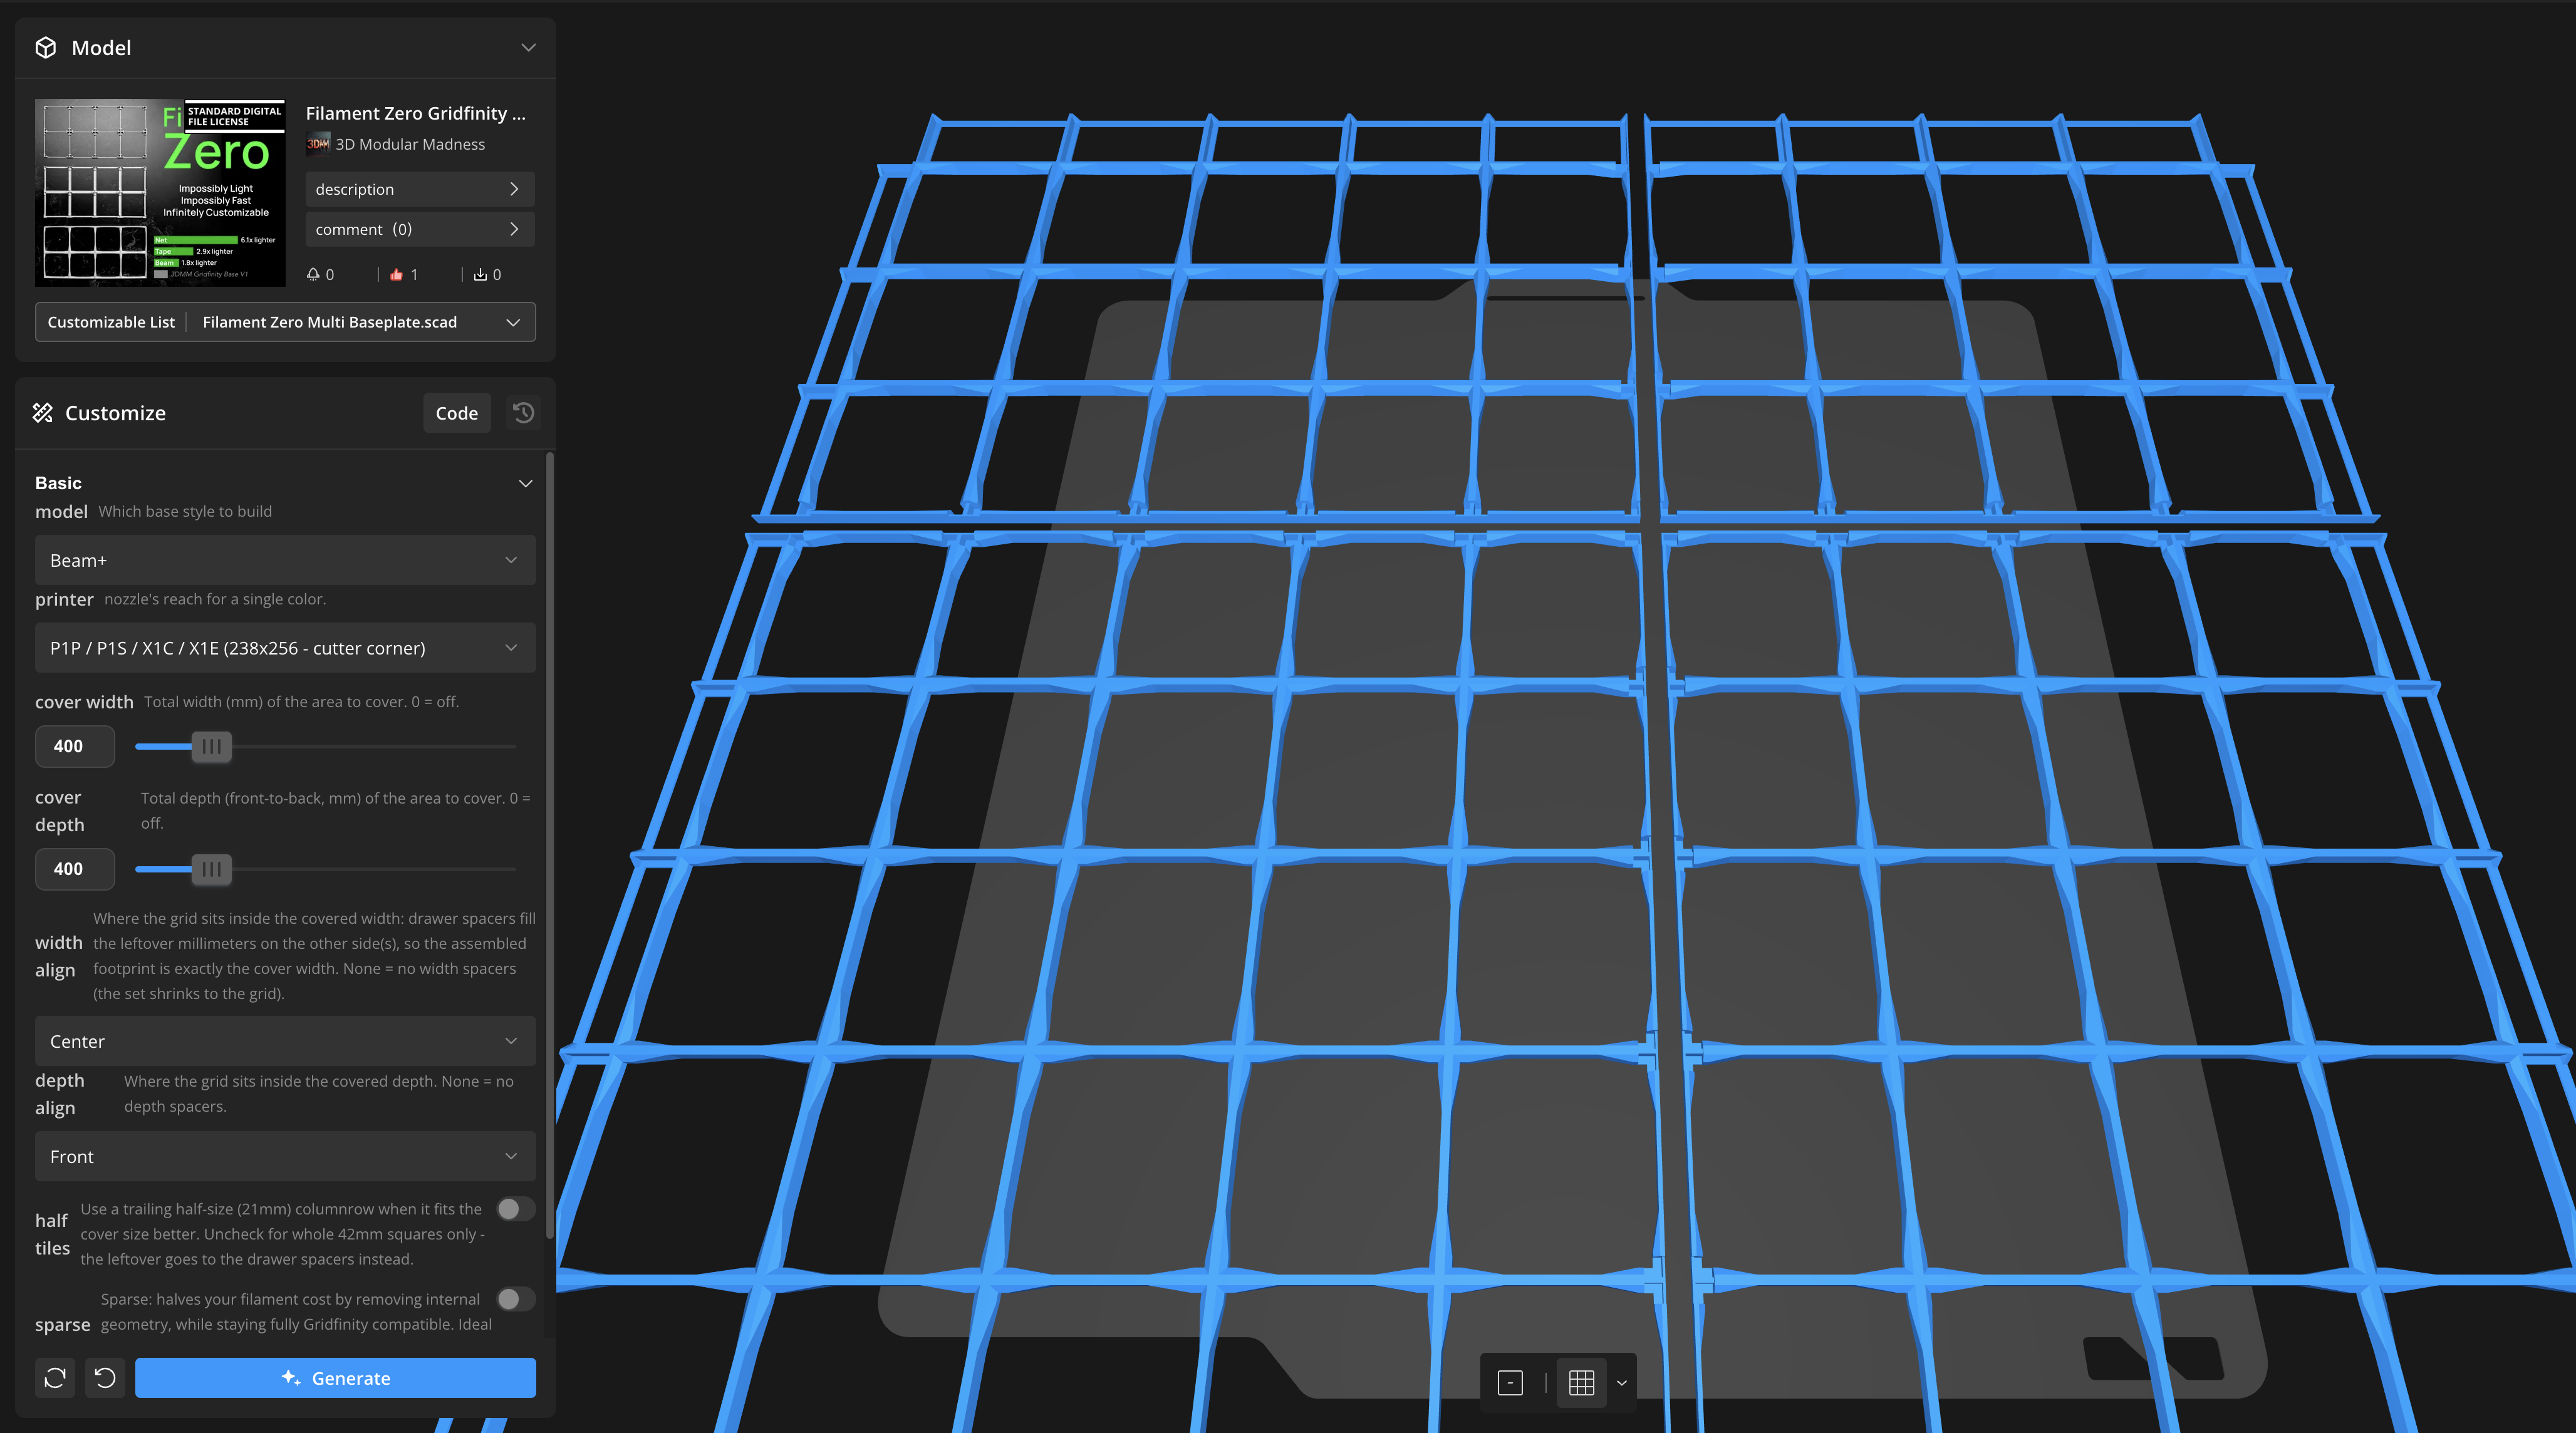
Multi Baseplate Generator
Covering a whole drawer, shelf, or workbench? Skip the math. Instead of counting gridfinity squares, just enter your layout's width and depth in millimeters and Filament Zero generates exactly the baseplates you need. Pick your printer from the list and it automatically knows your build plate size — so usually it's just: pick your printer, pick your model, set your area, go. Fine-tuning options are there when you need them. Filament Zero already saves you printer time; this saves your time too, and if you're printing a lot of gridfinity, total time saved is what actually matters.
Multi Baseplate Print Prep
After you imported your customized, multi baseplate STL into the optimized print profile, it'll look like the screenshot below. There is an icon on the top with an “O” in it. That's the “split to objects” icon. Click it:
Once you've split it into objects, press “A” and Bambu Slicer's auto-arrange will optimize your plates:
*: Times are based on the Bambu Slicer A1 “Model printing time” for 6x6 baseplates, 0,4mm nozzle.
Filament Zero Gridfinity Baseplates
Publicado em 12 de jul de 2026
Gostou deste modelo? Crie uma conta grátis para salvar seus favoritos e voltar a eles depois.
Criar conta