Você está no 3DFinder
Buscamos em Thingiverse, MakerWorld e Printables ao mesmo tempo para te dar o melhor de cada uma.
Descrição
Hi guys, this is an automatic cat toy. All you need is an RP2040 Board and a servo with the arm attachment (If you buy a new one it comes with it and the screws.
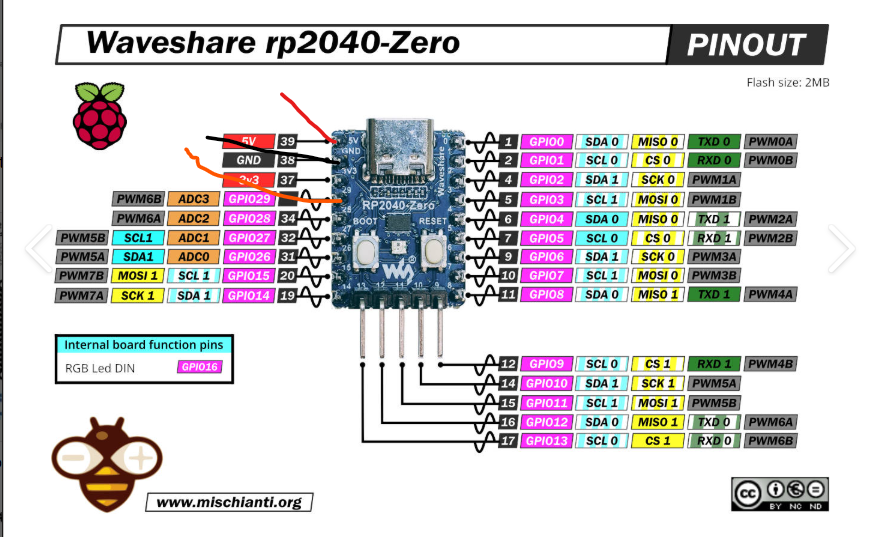
All what you need to do is cut the end of the servo wires and soldier the red one with 5v, black with GND and the orange with pin 29.
How to Add RP2040 Board Support to Arduino IDE
This guide shows how to set up Arduino IDE so you can upload code to an RP2040 board, such as Raspberry Pi Pico, Pico W, RP2040-Zero, or similar boards.
1. Open Arduino IDE
Open Arduino IDE on your computer.
2. Add the RP2040 Board URL
Go to:
File → Preferences
Find the box called:
Additional Boards Manager URLs
Paste this link into the box:
[https://github.com/earlephilhower/arduino-pico/releases/download/global/package_rp2040_index.json](https://github.com/earlephilhower/arduino-pico/releases/download/global/package_rp2040_index.json)
Click OK.
3. Install the RP2040 Board Package
Go to:
Tools → Board → Boards Manager
In the search box, type:
pico
Find:
Raspberry Pi Pico/RP2040/RP2350 by Earle F. Philhower
Click Install.
Wait until the installation is finished.
4. Select Your Board
Go to:
Tools → Board → Raspberry Pi Pico/RP2040/RP2350
Choose the board that matches your controller.
Examples:
- For Raspberry Pi Pico, choose Raspberry Pi Pico
- For Pico W, choose Raspberry Pi Pico W
- For RP2040-Zero, choose Waveshare RP2040-Zero if available
If you are not sure, Raspberry Pi Pico usually works for many basic RP2040 boards.
5. Connect the Board
Plug the RP2040 board into your computer with a USB cable.
Make sure the USB cable supports data, not only charging.
6. Select the Port
Go to:
Tools → Port
Choose the port that appears after you plug in the board.
On Windows it usually looks like COM3, COM4, etc.
On Mac it may look like /dev/cu.usbmodem...
7. Upload the Code
Open or paste your Arduino code.
Click the Upload button.
8. If Upload Does Not Work
Try to press reset before uploading or just try uploading a couple times.
Troubleshooting
If the board is not detected:
- Try another USB cable.
- Try another USB port.
- Restart Arduino IDE.
- Make sure the correct board is selected.
Okay that's it.

Gostou deste modelo? Crie uma conta grátis para salvar seus favoritos e voltar a eles depois.
Criar conta