Você está no 3DFinder
Buscamos em Thingiverse, MakerWorld e Printables ao mesmo tempo para te dar o melhor de cada uma.
Descrição
For carrying sleeping bags, mats, tents, etc. for touring/expedition/gravel bikes with a rigid fork and mounting holes.
📌Summary:📌
I made this cage based on experience with other similar products and my own earlier system. I also made sure the project is 100% printable - no drilling, melting, gluing, or buying extra parts. Of course, not counting the mounting screws (M5x16mm).
Attractive design is not everything. I focused mainly on strength with relatively low material use.
Plastic straps (not fabric) are much stiffer, but flexible enough to easily attach the item.
In the Z axis (up/down), the straps almost do not move. The attached luggage will bounce much less than with fabric straps.
The cage is for a cylindrical item with a diameter from 15 to 20 cm. It will fit most sleeping bags, small tents, and thin self-inflating mats.
The cage has height adjustment of 8 cm (every 5 mm), mainly to avoid the item hitting the frame when turning sharply.
📏Data⚖️
Height: 24-28.5 cm
Width: 20 cm
Depth without straps and load: 9.5 cm
Distance between mounting holes: 64 cm (3xM5)
3x64 cm is the most common standard.
Total weight: 160g (one side).
📑Assembly instructions:📑
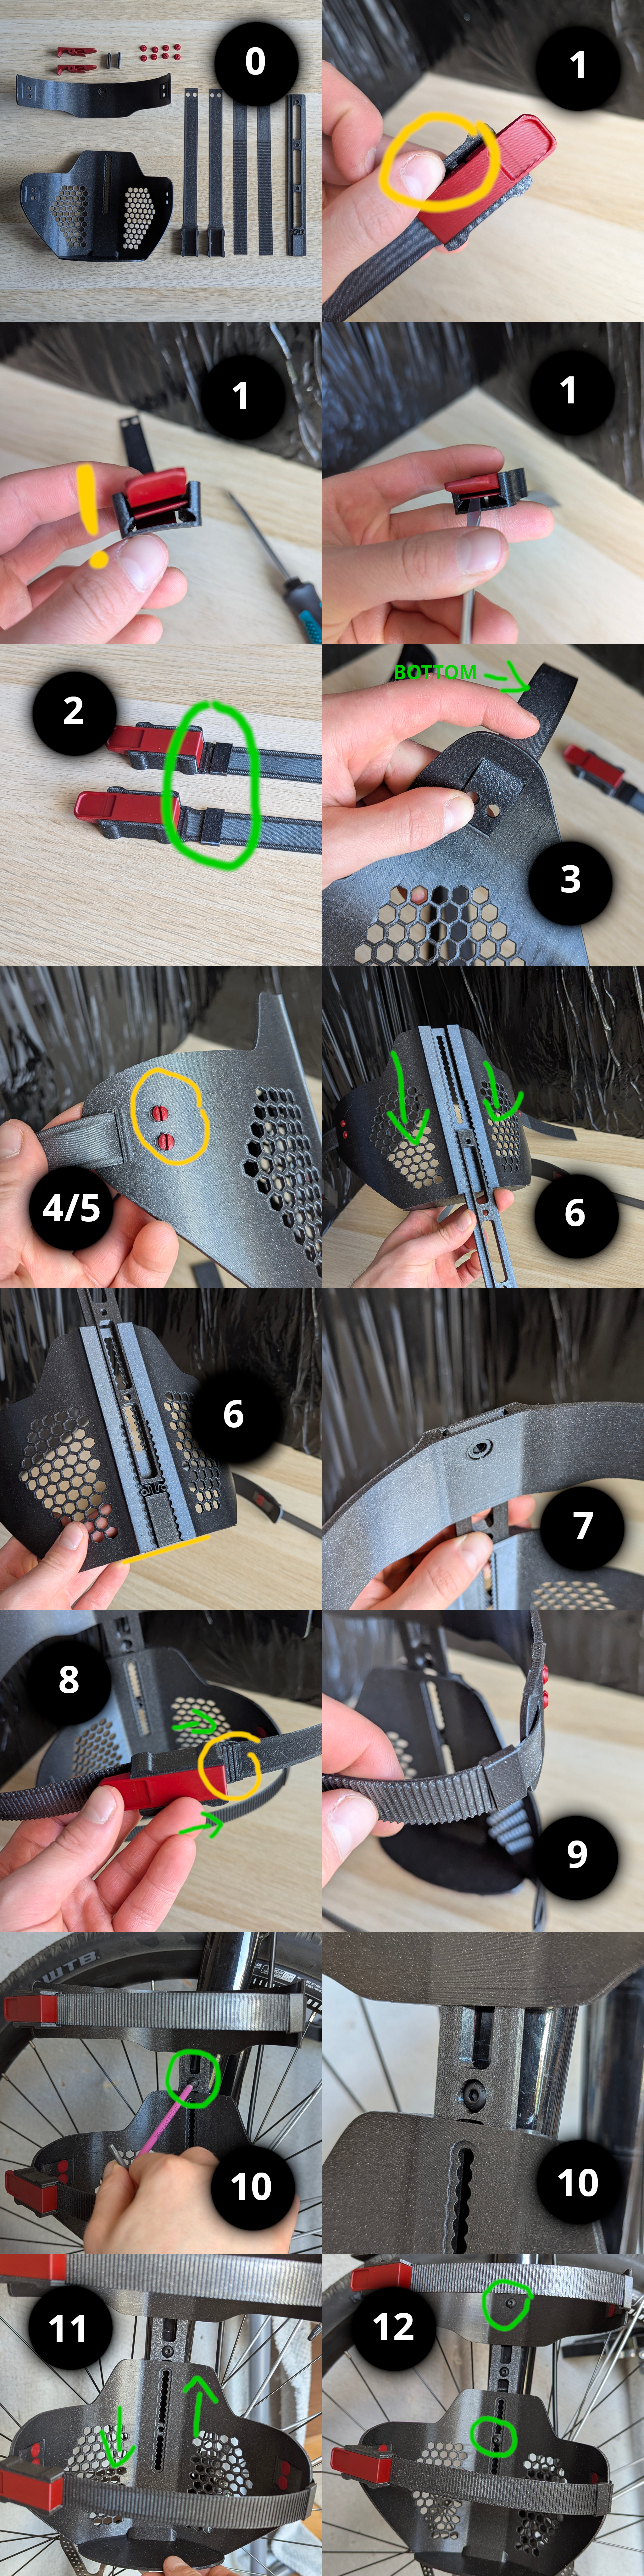
- Take out all parts. Make sure you have the same number of parts as in the picture.
- Insert "ratchet" into "strap". You need to slightly bend the socket. If the "ratchet" is inserted but you still see a gap, the spring probably fell too low. Just push it up with e.g. a flat screwdriver. Do this with both straps.
- Insert "loop" into "strap" objects.
- Put "strap" through the dedicated holes in "top" and "bottom". It doesn't matter which side. When mounting the second holder on the other side of the fork, you will do it the opposite way. Make sure the bottom of the strap is on the inside.
- Insert pins (4) into the dedicated holes. It is important that they are as parallel as possible when pushing. It is easier to insert the pins when the "line" is horizontal, but you still need to turn them to vertical later. This is because of the specifics of 3D printing and the fact that a circle printed in the Z axis will be slightly flattened at the bottom and top. I recommend turning them with a wallpaper knife.
- Repeat steps 3 and 4 with "ratchet_strap". The same way - putting straps on the other side.
- Insert "bottom" into "rail". Align both objects at their bottom. After a certain point you will hear "clicking".
- Insert "top" into "rail".
- Slightly bend "ratchet" and put "ratchet_strap" through "strap". When "strap" goes through to the other side, release "ratchet" and simply pull "strap" with your hand.
- Secure "strap" from moving using "loop".
- Mount the whole set by screwing only the middle screw of the fork for now.
- Adjust "bottom" to get the correct height.
- Screw the remaining two screws. If you have trouble reaching them, simply disconnect "strap".
3D printing settings
📋Requirements:📋
Minimum printer build area: 24 cm X/Y and 16 cm height.
Material: PETG (or *PLA)
Nozzle: 0.4
The files include a configured file for Bambu Lab A1 printer. PETG filament. For PLA, I recommend just opening the file and switching to standard profile, adding your own filament. It's good to keep the seam position (back) and a small support on the "rail" object.
💡Printing recommendations (for users of other printers - PETG filament):💡
- *Print everything with a standard 0.4mm nozzle and 0.2mm layer height
- Reduce speed if your printer has problems printing PETG
- For "bottom" and "top" objects, use BRIM. These objects have a fairly thin wall.
- *Hide the seam for the above objects by placing it at the back (only for aesthetics)
- *For the "pawl_strap" object, align the seam so it appears on one side, at the same place on the teeth (setting e.g. "back", "nearest")
- *Try to print "rail", "buckle" objects on a smooth plate. Not necessary, but it will reduce friction.
- *For "rail", add a small, sparse support at the middle hole. The slicer should probably add it automatically.
*Use these settings if you want to print in PLA. PLA is easier to print, but the whole thing will be less resistant to shocks. You can also print in mixed mode - focusing on printing "top" and "bottom" objects in PETG.
Gostou deste modelo? Crie uma conta grátis para salvar seus favoritos e voltar a eles depois.
Criar conta