Você está no 3DFinder
Buscamos em Thingiverse, MakerWorld e Printables ao mesmo tempo para te dar o melhor de cada uma.
Descrição
Cross-stitch frame
Note!
This is my first cross-stitch frame project. The goal was to create a functional frame at a low cost, on which the canvas can be easily rolled up. I assumed that the top and bottom beams, connected by a 6 mm diameter rod onto which the canvas is wound, would be very rigid; unfortunately, these components aren’t very rigid, so it’s not possible to stretch the canvas very tightly. Despite this, the entire frame is fully functional, but you must remember not to tension the canvas too tightly, as this will likely damage the top or bottom element.
I've created a new cross-stitch frame - the Ratchet Scroll Frame. Please take a look at this project.
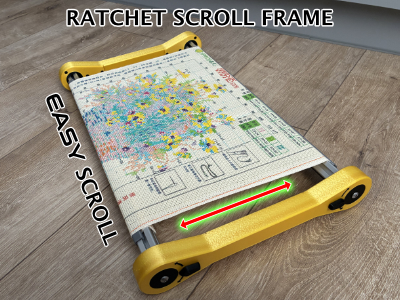
Dimensions
- Top and bottom sections, 3 sections of 20 cm each, totaling 60 cm + nuts. The length can be adjusted in Bamboo Studio by changing only the height parameter; if you have any trouble with this, let me know and I’ll help.
- Adjustable side elements - adjustment range from 250 mm to 317 mm (external dimensions). If you use a shorter M8 screw, the range will decrease.
You will need
- M6 threaded rod – length ~ 610 mm – 2 pcs.
- M6 washer (max. outer diameter 13 mm) – 4 pcs.
- M6 nut (in my case, a lock nut) – 4 pcs.
- M8 x 100 mm screw - 2 pcs.
- M8 extended nut (length 24 mm) - 2 pcs.
- Socket Head Cap Self-Tapping Screw BT2.6x8 (B-AA004) - 12 pcs.
Printing
I printed my models on an H2C printer, which uses a CoreXY configuration, so I’m not sure how tall and thin parts will behave on printers with a moving bed. In the settings, I’ve enabled printing on an A1 printer, but please be aware that the print may not turn out well.
I printed my model using Bambu PLA Tough+ filament.
Assembly
I’ve shown all the assembly steps in the pictures, so I don’t see the point in describing them in detail here, but if you have any trouble with the assembly, feel free to message me—I’ll be happy to help and will add a note to the description so it can help others.
There are holes at the ends of the side elements and on the locking pins that allow you to secure these parts together so you don’t lose the locking pins.
Installing the canvas
- Slide the canvas onto the 5mm-diameter aluminum rod, then insert it from the side into the upper and lower components, fitting it into the recesses.
- Next, attach the twisted side components.
- Then, pre-tension the canvas by turning the upper or lower component.
- Insert the locking pins to prevent the top and bottom elements from rotating.
- Turn the side elements to spread the top and bottom elements apart. Do not use excessive force to avoid damaging the top or bottom bar. Stop tightening when you see that the top and bottom bars begin to bend.
Rewinding the canvas
- Loosen the side panels by unscrewing them so that the canvas is loose.
- Remove the locking pins.
- Rewind the canvas by turning the top or bottom panel.
- Reinsert the locking pins.
- Tighten the canvas by turning the side panels.
All of the above texts have been translated from my native language, so if you spot any mistakes, please forgive me. Let me know and I’ll correct them.

Gostou deste modelo? Crie uma conta grátis para salvar seus favoritos e voltar a eles depois.
Criar conta