Você está no 3DFinder
Buscamos em Thingiverse, MakerWorld e Printables ao mesmo tempo para te dar o melhor de cada uma.
Descrição
This a re-post of the InFiDEL by Thomas Sanladerer. This model has all the parts needed to print it, it has also has links to the WinFiDEL PCB board by Sasa Karanovic. The original board of the InFiDEL is more for a 3D Printer, not for a person to read the data. The WinFiDEL is more for people as it features a web interface with live readings and Wi-Fi built in to the board. If you would like a filament diameter reader that you could read without extra hardware, choose the WinFiDEL, if you want it for your 3D Printer, choose the InFiDEL. However, the WinFiDEL board is much more expensive, and could source it from the Sasa Karanovic shop. Please take note that I did not design any of the parts or the WinFiDEL circuit board, but I am sharing it here for more people to use it. If you find any issues, please let me know. If you do not want to get the pins, you could 3D Print them, but they could break more easily. Also the grub screw can be 3D Printed as well, it is an M6, here is a link to a model of grub screws, [https://makerworld.com/en/models/2316919-set-screws-m4-m5-m6-m8-m10-like-din913-iso4026#profileId-2605847](https://makerworld.com/en/models/2316919-set-screws-m4-m5-m6-m8-m10-like-din913-iso4026#profileId-2605847) Below is the description from the original model with original video with some new links:
"The InFiDEL is a cheap (< $5) filament diameter sensor that can be calibrated to provide surprisingly precise filament diameter readings in real-time. While firmware support is currently sparse, the idea is to use the sensor to correct for filament diameter deviations while printing.
Based on this proof-of-concept: [https://www.youmagine.com/designs/filament-diameter-sensor](https://www.youmagine.com/designs/filament-diameter-sensor)
BOM
Printed parts
1 Block
1 Lever
preferably printed in PETG, ABS or ASA as PLA may creep significantly over time
Electronics
1 SMT control board (populated)
or
1 THT control board + components (see Eagle files)
Suitable programmer for ATTiny85 (eg USBtinyISP)
1 SS495A linear hall effect sensor (or comparable) eg. [http://go.toms3d.org/SS495](http://go.toms3d.org/SS495)
Fasteners
2 M3x8 screws (eg ISO 4762 M2x8) [https://jlcmc.com/product/s/E02/EDLG/fa-%E7%B4%A7%E5%9B%BA%E9%9B%B6%E4%BB%B6-%E8%9E%BA%E9%92%89?k=EDLG-S1-M3-L8&productModelNumber=EDLG-S1-M3-L8](https://jlcmc.com/product/s/E02/EDLG/fa-%E7%B4%A7%E5%9B%BA%E9%9B%B6%E4%BB%B6-%E8%9E%BA%E9%92%89?k=EDLG-S1-M3-L8&productModelNumber=EDLG-S1-M3-L8) (Pins are not exact size but work)
1 3x24mm pin (eg DIN 7 3x24mm, for mating lever to the block) [https://jlcmc.com/product/s/F02/FDWQ/fa-%E5%AE%9A%E4%BD%8D%E9%9B%B6%E4%BB%B6-%E5%AE%9A%E4%BD%8D%E9%94%80?k=FDWQ-M1-D3-L25&productModelNumber=FDWQ-M1-D3-L25](https://jlcmc.com/product/s/F02/FDWQ/fa-%E5%AE%9A%E4%BD%8D%E9%9B%B6%E4%BB%B6-%E5%AE%9A%E4%BD%8D%E9%94%80?k=FDWQ-M1-D3-L25&productModelNumber=FDWQ-M1-D3-L25) (Pins are not exact size but work)
1 3x16mm pin (eg DIN 7 3x16mm, for roller bearing in lever) [https://jlcmc.com/product/s/F02/FDWQ/fa-%E5%AE%9A%E4%BD%8D%E9%9B%B6%E4%BB%B6-%E5%AE%9A%E4%BD%8D%E9%94%80?k=FDWQ-M1-D3-L15&productModelNumber=FDWQ-M1-D3-L15](https://jlcmc.com/product/s/F02/FDWQ/fa-%E5%AE%9A%E4%BD%8D%E9%9B%B6%E4%BB%B6-%E5%AE%9A%E4%BD%8D%E9%94%80?k=FDWQ-M1-D3-L15&productModelNumber=FDWQ-M1-D3-L15) (Pins are not exact size but work)
1 3x18mm pin (eg DIN 7 3x18mm, for idler bearing in block) [https://jlcmc.com/product/s/F02/FDWQ/fa-%E5%AE%9A%E4%BD%8D%E9%9B%B6%E4%BB%B6-%E5%AE%9A%E4%BD%8D%E9%94%80?k=FDWQ-M1-D3-L20&productModelNumber=FDWQ-M1-D3-L20](https://jlcmc.com/product/s/F02/FDWQ/fa-%E5%AE%9A%E4%BD%8D%E9%9B%B6%E4%BB%B6-%E5%AE%9A%E4%BD%8D%E9%94%80?k=FDWQ-M1-D3-L20&productModelNumber=FDWQ-M1-D3-L20)
6 M3 threaded inserts
Pins may be replaced with screws or grubscrews, which may result in decreased precision
Mechanical / other
1 6x2mm magnet (eg N35) eg. [http://go.toms3d.org/6x2magnet](http://go.toms3d.org/6x2magnet)
4 623 bearings (preferably 623-2Z / 623-ZZ) eg. [http://go.toms3d.org/623ABEC](http://go.toms3d.org/623ABEC)
1 Ballpoint pen spring (or other soft 4mm spring)
Short length of PTFE tube eg. [http://go.toms3d.org/bowden](http://go.toms3d.org/bowden)
Calibration accessories
1 1.5mm drill bit
1 1.7mm or 1.8mm drill bit
1 2mm drill bit
Calipers for verifying drill bit shaft diameter
Drill bits may be replaced with similar diameters. Measured diameter is to be written to firmware lookup table.
Assembly and Calibration
Mechanical assembly
Calibration
- Flash board with infidel_calibration_release
- Connect a host via I2C (eg running Host_example)
- Insert each calibration drill bit shafts and replace the lookup table entries in infidel_release with your own measurements
- Measure the actual diameter of the shafts and fill second column
- Use the host's output *1000 to fill first column
- Finally, flash infidel_release with your values filled out
- Hub should now output exact diameter values
Analog output is currently not enabled in infidel_release (I2C and FAULT pin only)
Firmware
Daniel has uploaded the firmware to Github: [https://github.com/drspangle/infidel-sensor/](https://github.com/drspangle/infidel-sensor/)
For now, this is the recommended repo to develop against if you want to contribute to the code.
Source Files
All source files, Arduino code, Eagle files etc at [https://toms3d.org/uploads/InFiDEL_202102.zip](https://toms3d.org/uploads/InFiDEL_202102.zip)
License
The design files are published as-is, CC-0 / no rights reserved. Attribution when used would be nice, but is not required.
I do not have the time or resources to support this project to the extent it deserves. If you find the design or concept useful, you're encouraged to take it into the direction you see fit and share your results."
WinFiDEL:
The text below is from Sasa Karanovic's website.
"WInFiDEL is an DIY open-source open-hardware Wireless 3D printing filament diameter sensor.
This design is heavily inspired by the design previously published by Made with Layers.
Key features:
- Wireless (2.4GHz WiFi) and/or wired (USB) communication
- Simple API enables third party integration
- Printer, platform and filament agnostic
- Built in Web UI for monitoring and calibration"
Helpful links:
Github with all code and instructions: [https://github.com/SasaKaranovic/winfidel-sensor](https://github.com/SasaKaranovic/winfidel-sensor)
PCB from Sasa Karanovic's website: [https://shop.sasakaranovic.com/products/winfidel](https://shop.sasakaranovic.com/products/winfidel)
Instructions and info: [https://docs.sasakaranovic.com/winfidel/](https://docs.sasakaranovic.com/winfidel/)
Video from Sasa Karanovic:
How to flash the board and connect it to Wi-Fi:
Once the sensor is made and the board is added with magnet installed properly, connect the board to your computer via a USB-C to USB. Do not do the steps below if you have not made the sensor or figured out the orientation of the magnet as it will rewrite the code on the board and remove the magnet placement firmware.
1. Go to [https://docs.sasakaranovic.com/firmware/winfidel/firmware_production/](https://docs.sasakaranovic.com/firmware/winfidel/firmware_production/) via Chrome your screen should look like this:

2. Once you see this screen: go to connect. Select your board from the drop down.
3. Then download firmware where it says “Install WInFiDEL Production Firmware”
4. Then go to back
5. Then go to logs and press reset.
6. If you want to read the diameter this way, Press the S or s key on your keyboard and press enter. To end readout, press e or E.
7. To read via Wi-Fi, go to your connect Wi-Fi on your computer. Disconnect from your current Wi-Fi and connect to the board's. Once connected, a website called Wi-Fi manager should pop up in your browser. Add your Wi-Fi info into it.
8. Go back to [https://docs.sasakaranovic.com/firmware/winfidel/firmware_production/](https://docs.sasakaranovic.com/firmware/winfidel/firmware_production/) if you removed out the tab repeat steps 1, 2, and 5. If you did not, press reset again.
9. This time the logs should display an IP address along with your Wi-Fi, enter that into your browser, and the website should appear and look like this:
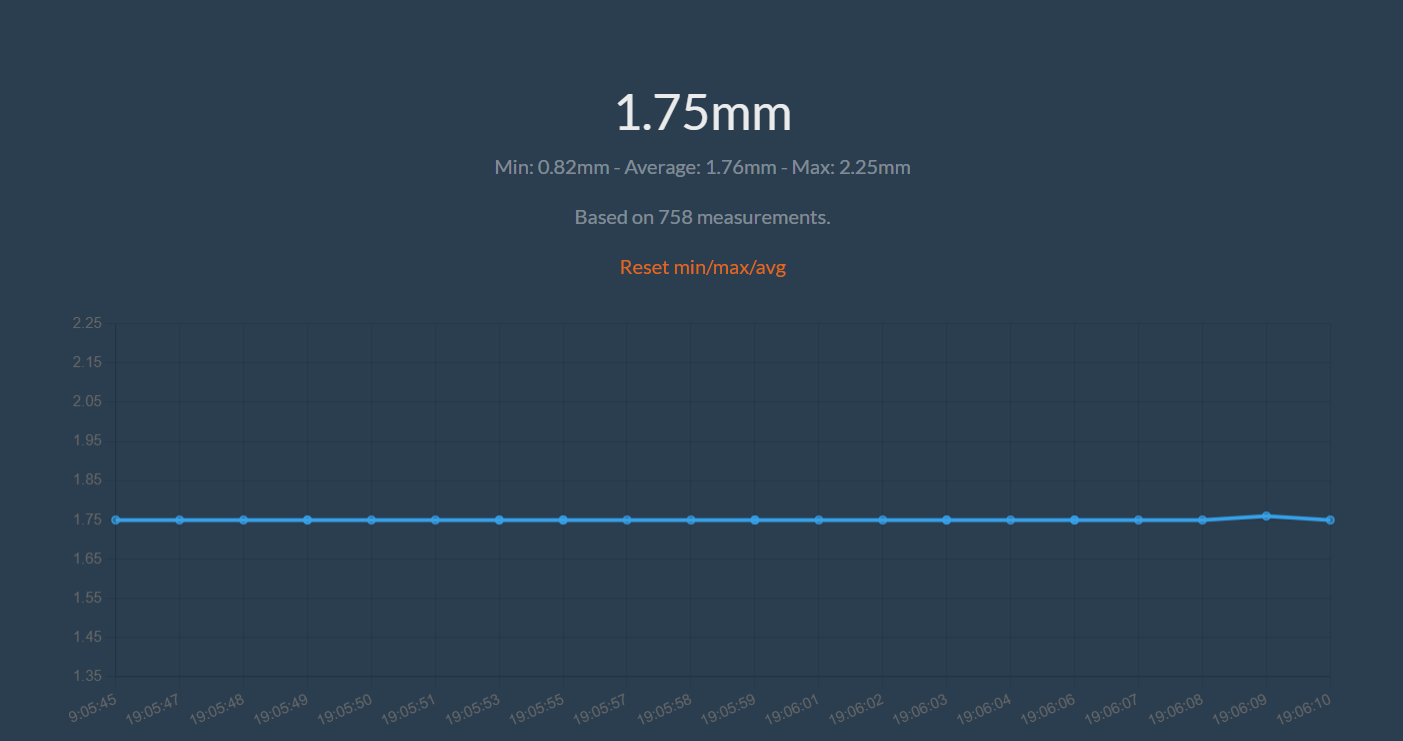
Please note that you will have to calibrate your sensor to get accurate readings.