Você está no 3DFinder
Buscamos em Thingiverse, MakerWorld e Printables ao mesmo tempo para te dar o melhor de cada uma.
Descrição
Layered Easter Egg LED Shadowbox
No Supports Required
Overview
This layered Easter egg shadowbox creates a soft illuminated spring scene using multiple depth layers and hidden COB LED lighting.
The design uses five stacked layers to form a dimensional bunny family scene with rolling hills, clouds, and sunrise sky. The lighting system is concealed behind the front bezel and rear sky layer, creating even illumination and strong depth without visible LEDs.
The model is designed for easy printing and assembly. Each layer fits inside the egg frame with spacers that create the shadowbox effect.
Perfect as a seasonal decoration, night light, or illuminated Easter display.
Print Features
- No Supports required
- Multi-layer shadowbox design
- Hidden LED lighting channels
- Clean front bezel with concealed light source
- Designed for COB LED strips
- Modular layered assembly
Print Recommendations
- Material: PLA, PLA+, PETG
- Layer Height: 0.16 mm for a finer finish)
- Walls: 4–5 perimeters
- Infill: 10% (Gyroid)
- Supports: None
Filament Colors Used
This shadow box uses multiple colors to create the layered depth of the Easter scene. The list below shows the exact filament used for each printed component.
However, you choose the colors you prefer.
Case Components
| Part | Filament |
|---|---|
| Housing | FilaCube Ivory White |
| Front Cover | FilaCube Ivory White |
| Back Cover | FilaCube Ivory White |
| COB LED Layer | FilaCube Ivory White |
| Diffuser | SUNLU Clear PETG |
| Bunny Ears & Paws (External) | Polymaker Sakura Pink |
| Bunny Ears Inner | Polymaker Pastel Watermelon |
Layer 5 (Sky Layer)
| Part | Filament |
|---|---|
| Sky | Polymaker Matte Sky Blue |
| Outer Ring | FilaCube Ivory White |
Layer 4 (Sun + Hills)
| Part | Filament |
|---|---|
| Sun | Mikka 3D Yellow |
| Clouds | Polymaker Cotton White |
| Hills | Polymaker Army Dark Green |
| Outer Ring | FilaCube Ivory White |
Layer 3 (Middle Hills)
| Part | Filament |
|---|---|
| Shrubs | eSun Pine Green |
| Hills Right | Overture Green |
| Hills Left | Polymaker Forest Green |
| Outer Ring | FilaCube Ivory White |
Layer 2 (Bunny Layer)
| Part | Filament |
|---|---|
| Grass | Overture Green |
| Flowers | Polymaker Matte Peach |
| Flower Seeds | Polymaker Wood Brown |
| Small Bunny | Polymaker Matte Candy |
| Bunny Ears Inside & Mouth | Polymaker Matte Lotus Pink |
| Nose & Eyes | Polymaker Charcoal Black |
| Large Bunny | Polymaker Cotton White |
| Outer Ring | FilaCube Ivory White |
Layer 1 (Foreground Grass)
| Part | Filament |
|---|---|
| Flowers | Polymaker Matte Peach |
| Flower Seeds | Polymaker Wood Brown |
| 1st Grass Layer | Polymaker Forest Green |
| 2nd Grass Layer | Overture Green |
| 3rd Grass Layer | Polymaker Army Dark Green |
| Outer Ring | FilaCube Ivory White |
Assembly Instructions
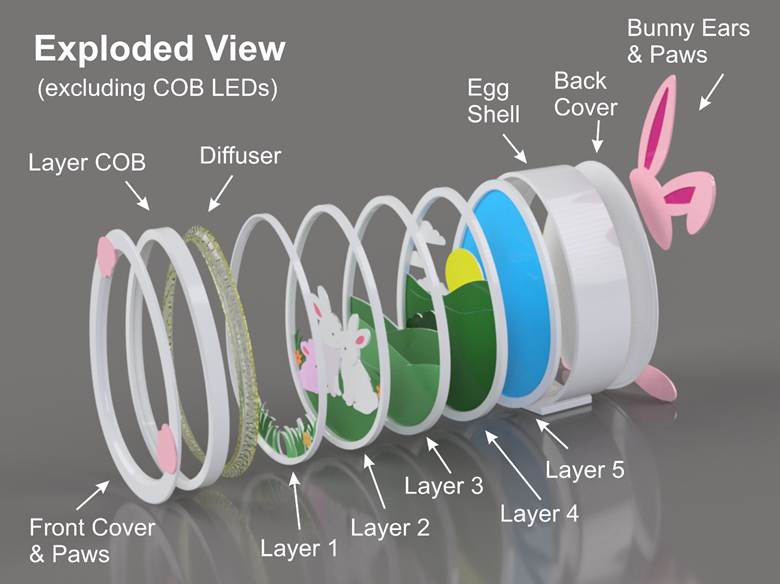
(COB LEDs not shown in exploded diagram)
Parts Overview
Printed components:
- Front Cover & Paws
- Layer COB Ring (front LED ring holder)
- Diffuser Ring
- Layer 1 – Grass / Flowers
- Layer 2 – Bunny Family
- Layer 3 – Midground Hills
- Layer 4 – Sun & Clouds
- Layer 5 – Sky Background
- Egg Shell Housing
- Back Cover
- Bunny Ears & Rear Paws (decorative)
Lighting components:
[https://www.amazon.com/dp/B0GBJ119BP?ref_=ppx_hzsearch_conn_dt_b_fed_asin_title_2&th=1](https://www.amazon.com/dp/B0GBJ119BP?ref_=ppx_hzsearch_conn_dt_b_fed_asin_title_2&th=1)
Step-by-Step Assembly
1. Install the Front COB LED

Place the COB LED strip inside the COB Layer.
Press the strip gently into the channel, following the perimeter of the egg.
2. Place the diffuser so that the COB LEDs are fully covered by the diffuser and secure with CA Glue.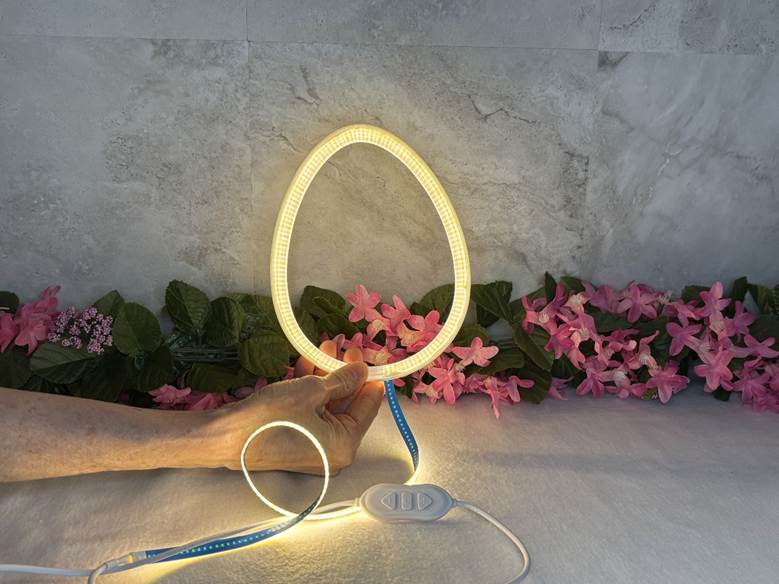
3. Route the LED Through the Bottom Channel
Feed the COB LED strip (facing downward) through the bottom internal channel of the egg housing so it travels from the front lighting area to the rear cavity.
This allows a single continuous LED strip to illuminate both the front scene and the rear sky.
4. Insert Scene Layers
Install the scene layers in order from back to front:
- Layer 5 – Sky Background
- Layer 4 – Sun & Clouds
- Layer 3 – Midground Hills
- Layer 2 – Bunny Family
- Layer 1 – Grass & Flowers
Layer 5 rests on the internal ring ledges built into the egg housing.
5. Install the Front Ring and Diffuser
Insert the Layer COB & diffuser ring into the Egg housing from the front and secure with CA Glue.
The diffuser softens the light coming from the front LED strip and prevents visible hotspots.
6. Install the Rear COB LED

- Continue routing the LED COD strip around the rear perimeter channel behind Layer 5. As shown in the image.
- Tie a knot to prevent pulling of the USB cable.
This rear lighting softly illuminates the sky background.
7. Install the Back Cover
After the final layer is installed, place the Back Cover into the rear of the Egg Housing and secure it with CA Glue.
This closes the lighting cavity and reflects light forward into the scene.
8. Attach Decorative Pieces (Optional)
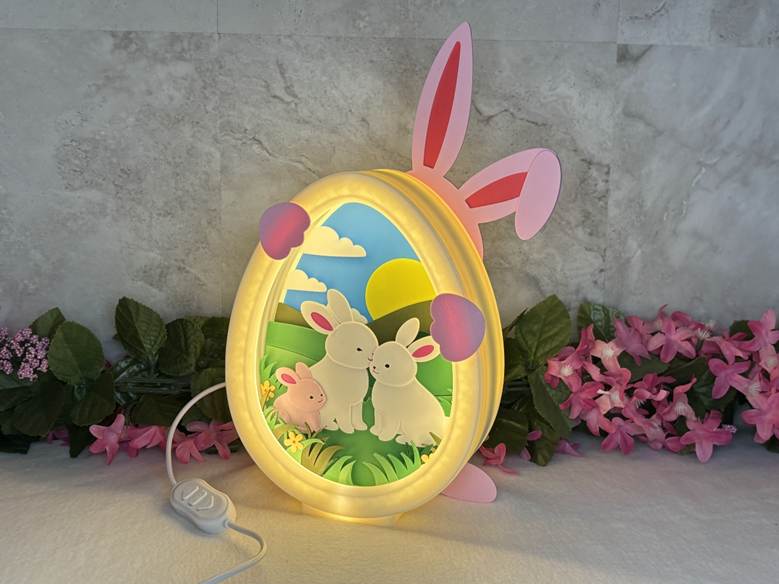
Using CA Glue, place the decorative pieces into place:
• Bunny Ears
• Rear Paws
• Front Paws
These elements are purely decorative and do not affect the lighting.
Final Setup
Connect the COB LED strip to a 5V USB power source.
When powered, the front lighting illuminates the scene layers while the rear lighting softly glows behind the sky layer.
The result is a layered illuminated diorama with strong depth and soft ambient light.
Layered Easter Egg LED Shadowbox

Publicado em 15 de mar de 2026
Gostou deste modelo? Crie uma conta grátis para salvar seus favoritos e voltar a eles depois.
Criar conta