Você está no 3DFinder
Buscamos em Thingiverse, MakerWorld e Printables ao mesmo tempo para te dar o melhor de cada uma.
Descrição
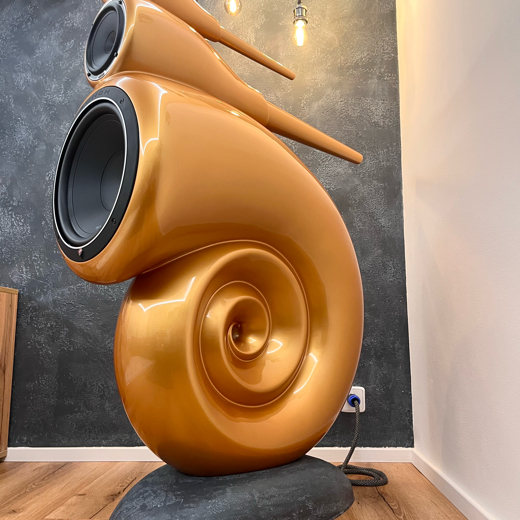
B&W Nautilus Speakers
I will appreciate any support. Thank you.
Video guides from the build can be found on my Instagram:
[https://www.instagram.com/jan.bachnak?igsh=M2pnd3N5cjhjZDM4&utm_source=qr](https://www.instagram.com/jan.bachnak?igsh=M2pnd3N5cjhjZDM4&utm_source=qr)
This is a clone of the well-known B&W speakers.
They are three-way loudspeakers.
I have loved music since childhood. I always wanted to build speakers that would sound beautiful and look amazing. After discovering 3D printing, the idea was clear — I had to make something no one had done before. And that’s how the Nautilus project began.
Modeling:
The model was created in Fusion 360. I wanted a more modern design compared to the original speakers, so the bass tube is cylindrical with a sharper edge, and there is a hole in the center of the spiral tube. Since I am a beginner in modeling, there were small inaccuracies which I later fixed with filler.
Printing:
All parts were printed on a Prusa MK3S+. The total printing time was around 153 days and the total filament used was about 84 kg for a pair of speakers. The material is PRUSAMENT PET-G Signal White.
Most parts were printed with 100% infill for sanding purposes. Only the bass section has 25% infill and 30 perimeters.
Bonding & Lamination:
I used a two-component Bison adhesive. It sands well and fills gaps between parts. The glued sections were reinforced with fiberglass. The biggest challenge was that the parts didn’t fit perfectly and required a lot of sanding and improvisation.
Filling:
I initially thought only the joints would need filling, but the surface wasn’t smooth enough. In the end, I applied filler over the entire speaker.
Spray Filler/Primer-Filler:
I used a two-component filler, applied in three layers. Total consumption was about 2 kg.
Sanding:
I sanded with 400, 800 and then 1200 grit wet sandpaper. This step took a long time because the surface had to be flawless.
Painting:
The color is a brown pearl metallic. Due to difficult access inside the curved tube, paint consumption was higher — approximately 0.6 L of paint and 0.6 L of clear coat in three layers.
Polishing & Waxing:
Paint imperfections were sanded, polished and finished with wax.
Assembly:
The speakers are mounted to a concrete base using six M16 bolts, 10 cm long.
The build is extremely demanding, so consider whether you have enough time, resources and experience. The sound is unique — unlike typical speakers.
I used the drivers I had available. If I had none, I would have chosen different ones:
- Woofer: Rockford Fosgate PUNCH P1S2-12
- Mid-bass: Hertz MP 165.3 PRO
- Tweeter: Melodavid CB25Nd (planned upgrade)
- 12 × M14/M16 bolts (22 mm wrench) for mounting to the base.
Gostou deste modelo? Crie uma conta grátis para salvar seus favoritos e voltar a eles depois.
Criar conta