Você está no 3DFinder
Buscamos em Thingiverse, MakerWorld e Printables ao mesmo tempo para te dar o melhor de cada uma.
Descrição
I am delighted to finally present the “Daylight Globe”, a globe spinning around its own axis every 24h driven by the Bambu Clock mechanism, and lit by a lamp utilizing the Bambu LED lamp. Together, this setup allows for an approximate representation of where the sun is shining on earth at each moment. Multiple options are available depending on what you want to make; from just a spinning globe to the full setup including the LED lamp representing the sun. Please read the description below before printing to fully understand the different options available and material needed.
I want to clearly point out that the model suffers from a (possibly educational) flaw. As the globe will rotate once around its axis every 24h, it is 4 minutes slower than our actual planet. This means that you need to adjust the clock mechanism/time once in a while for the “sun” to shine accurately on the globe. As the time can not be set to a higher accuracy than maybe +/-1h, adjustment of the clock might be required every second week or so.
Options
Full setup
You print all the pieces to assemble both the globe and the lamp.
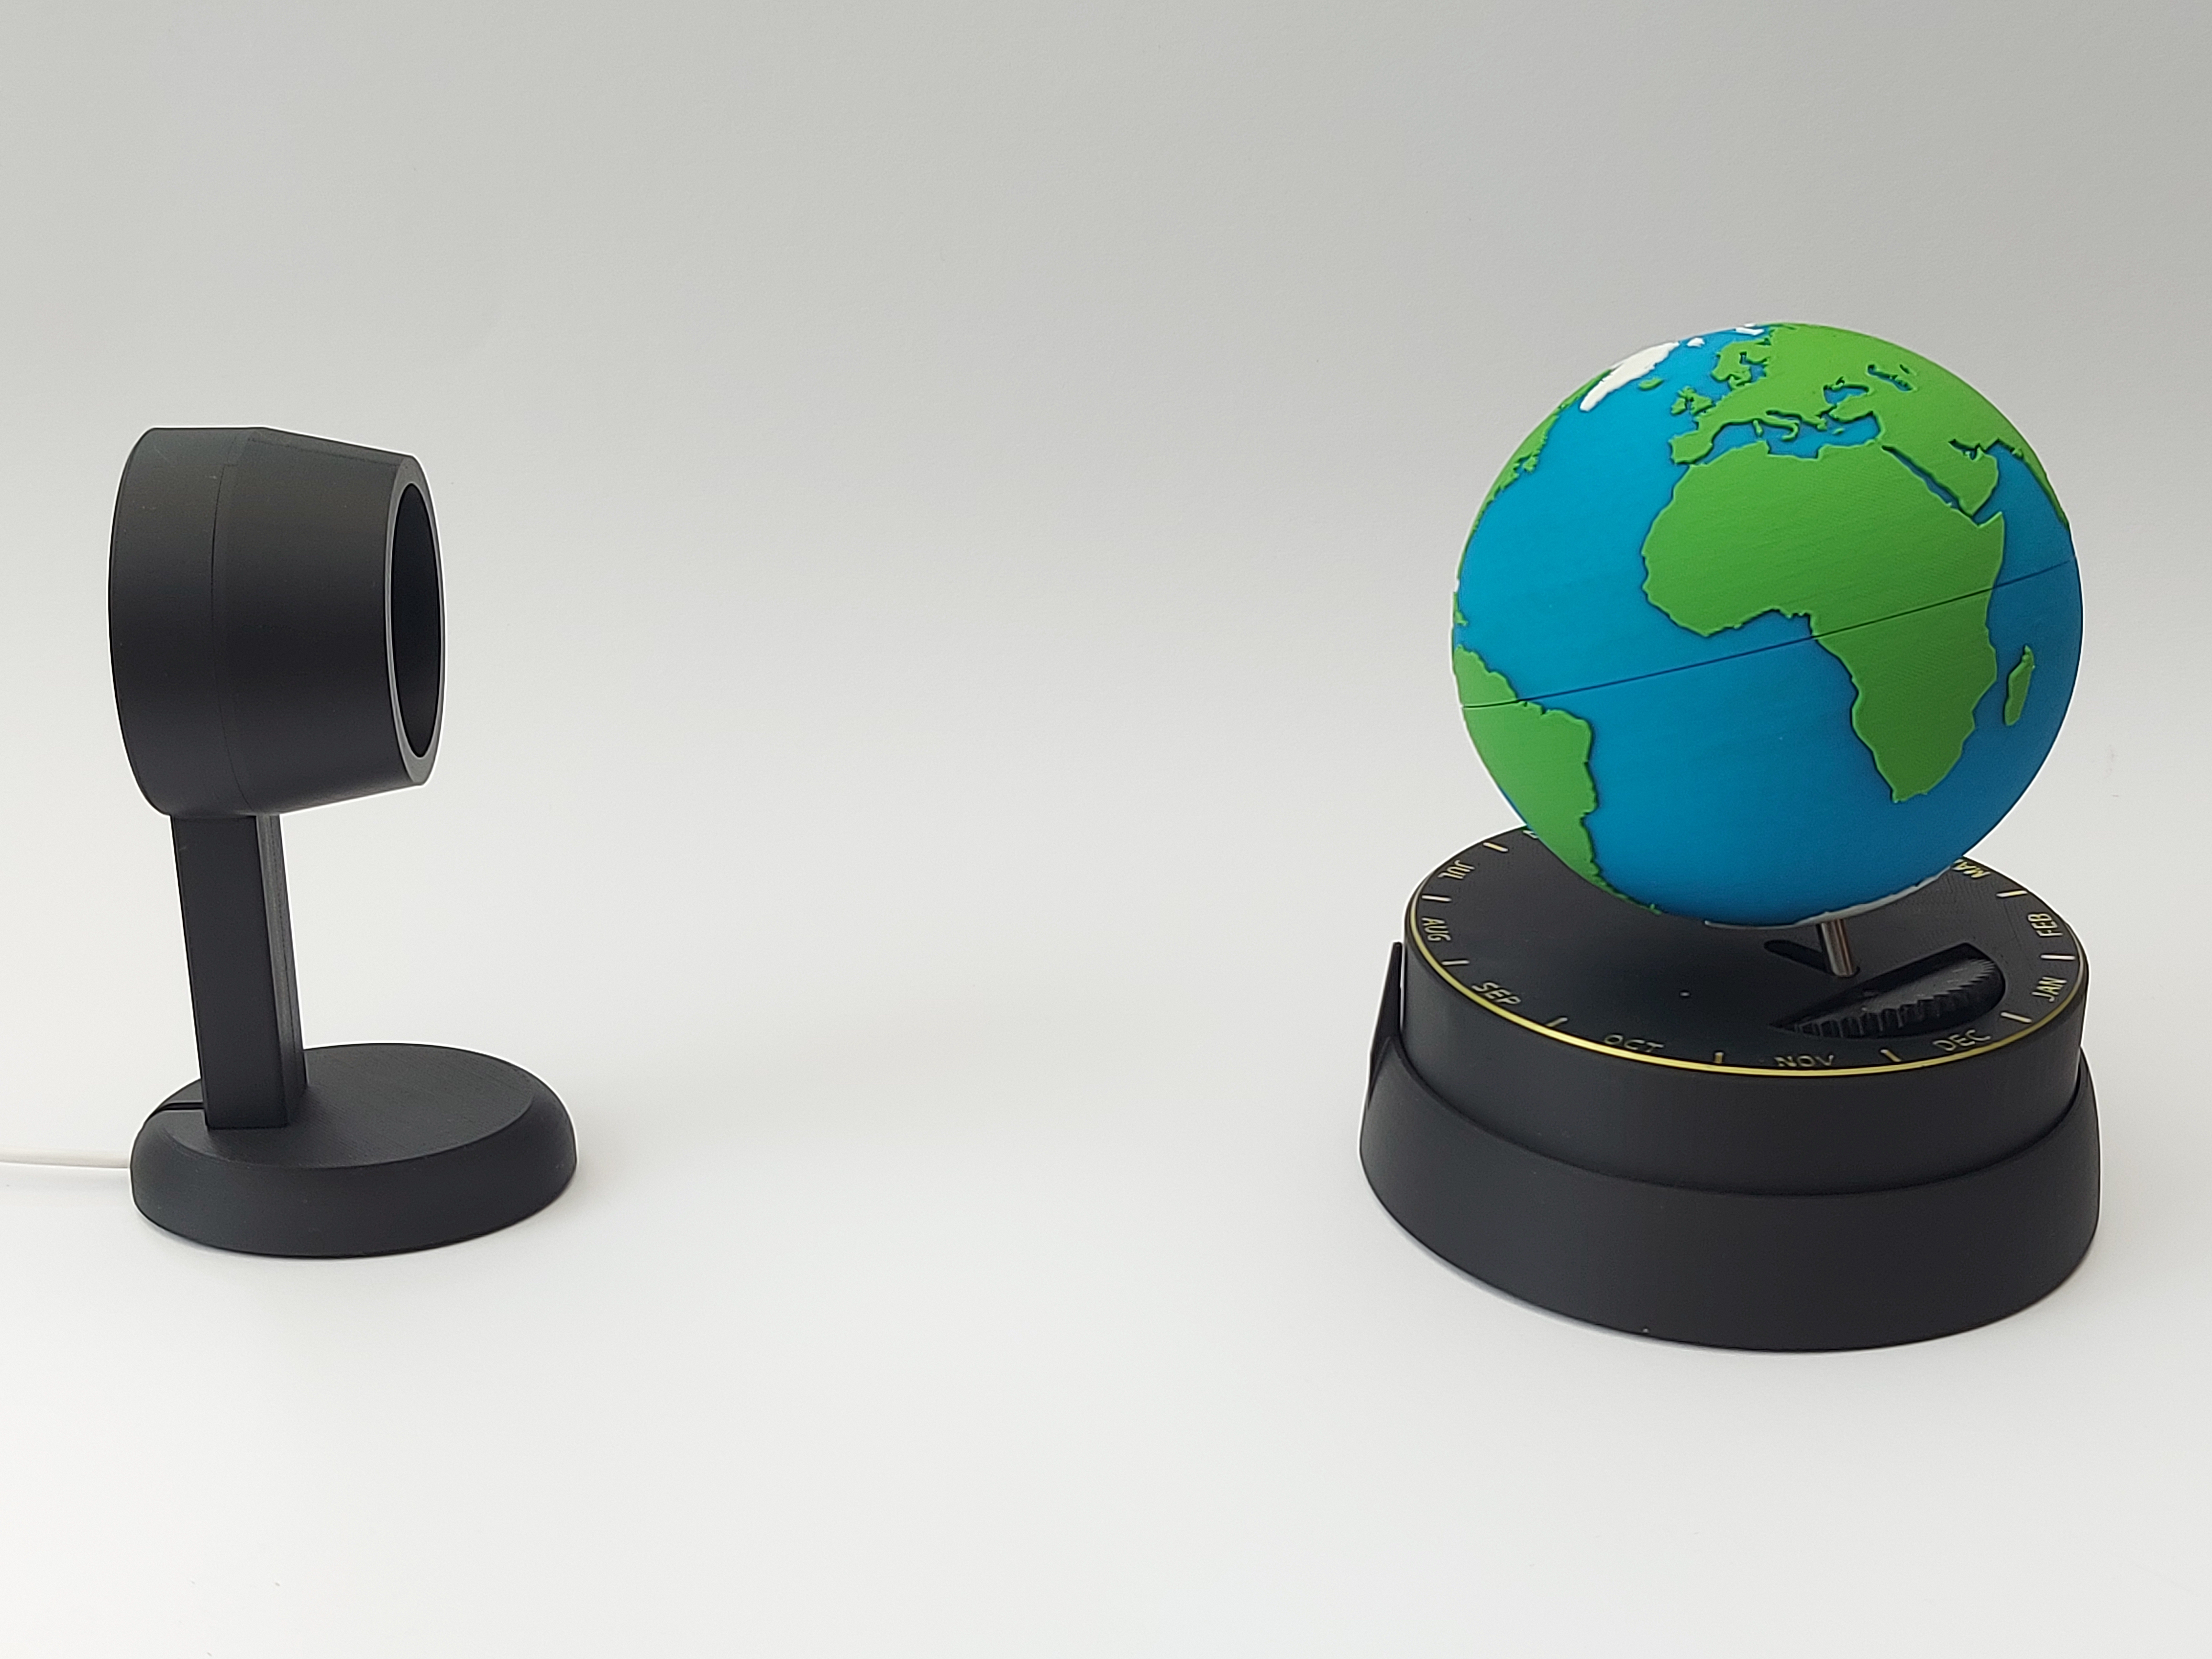
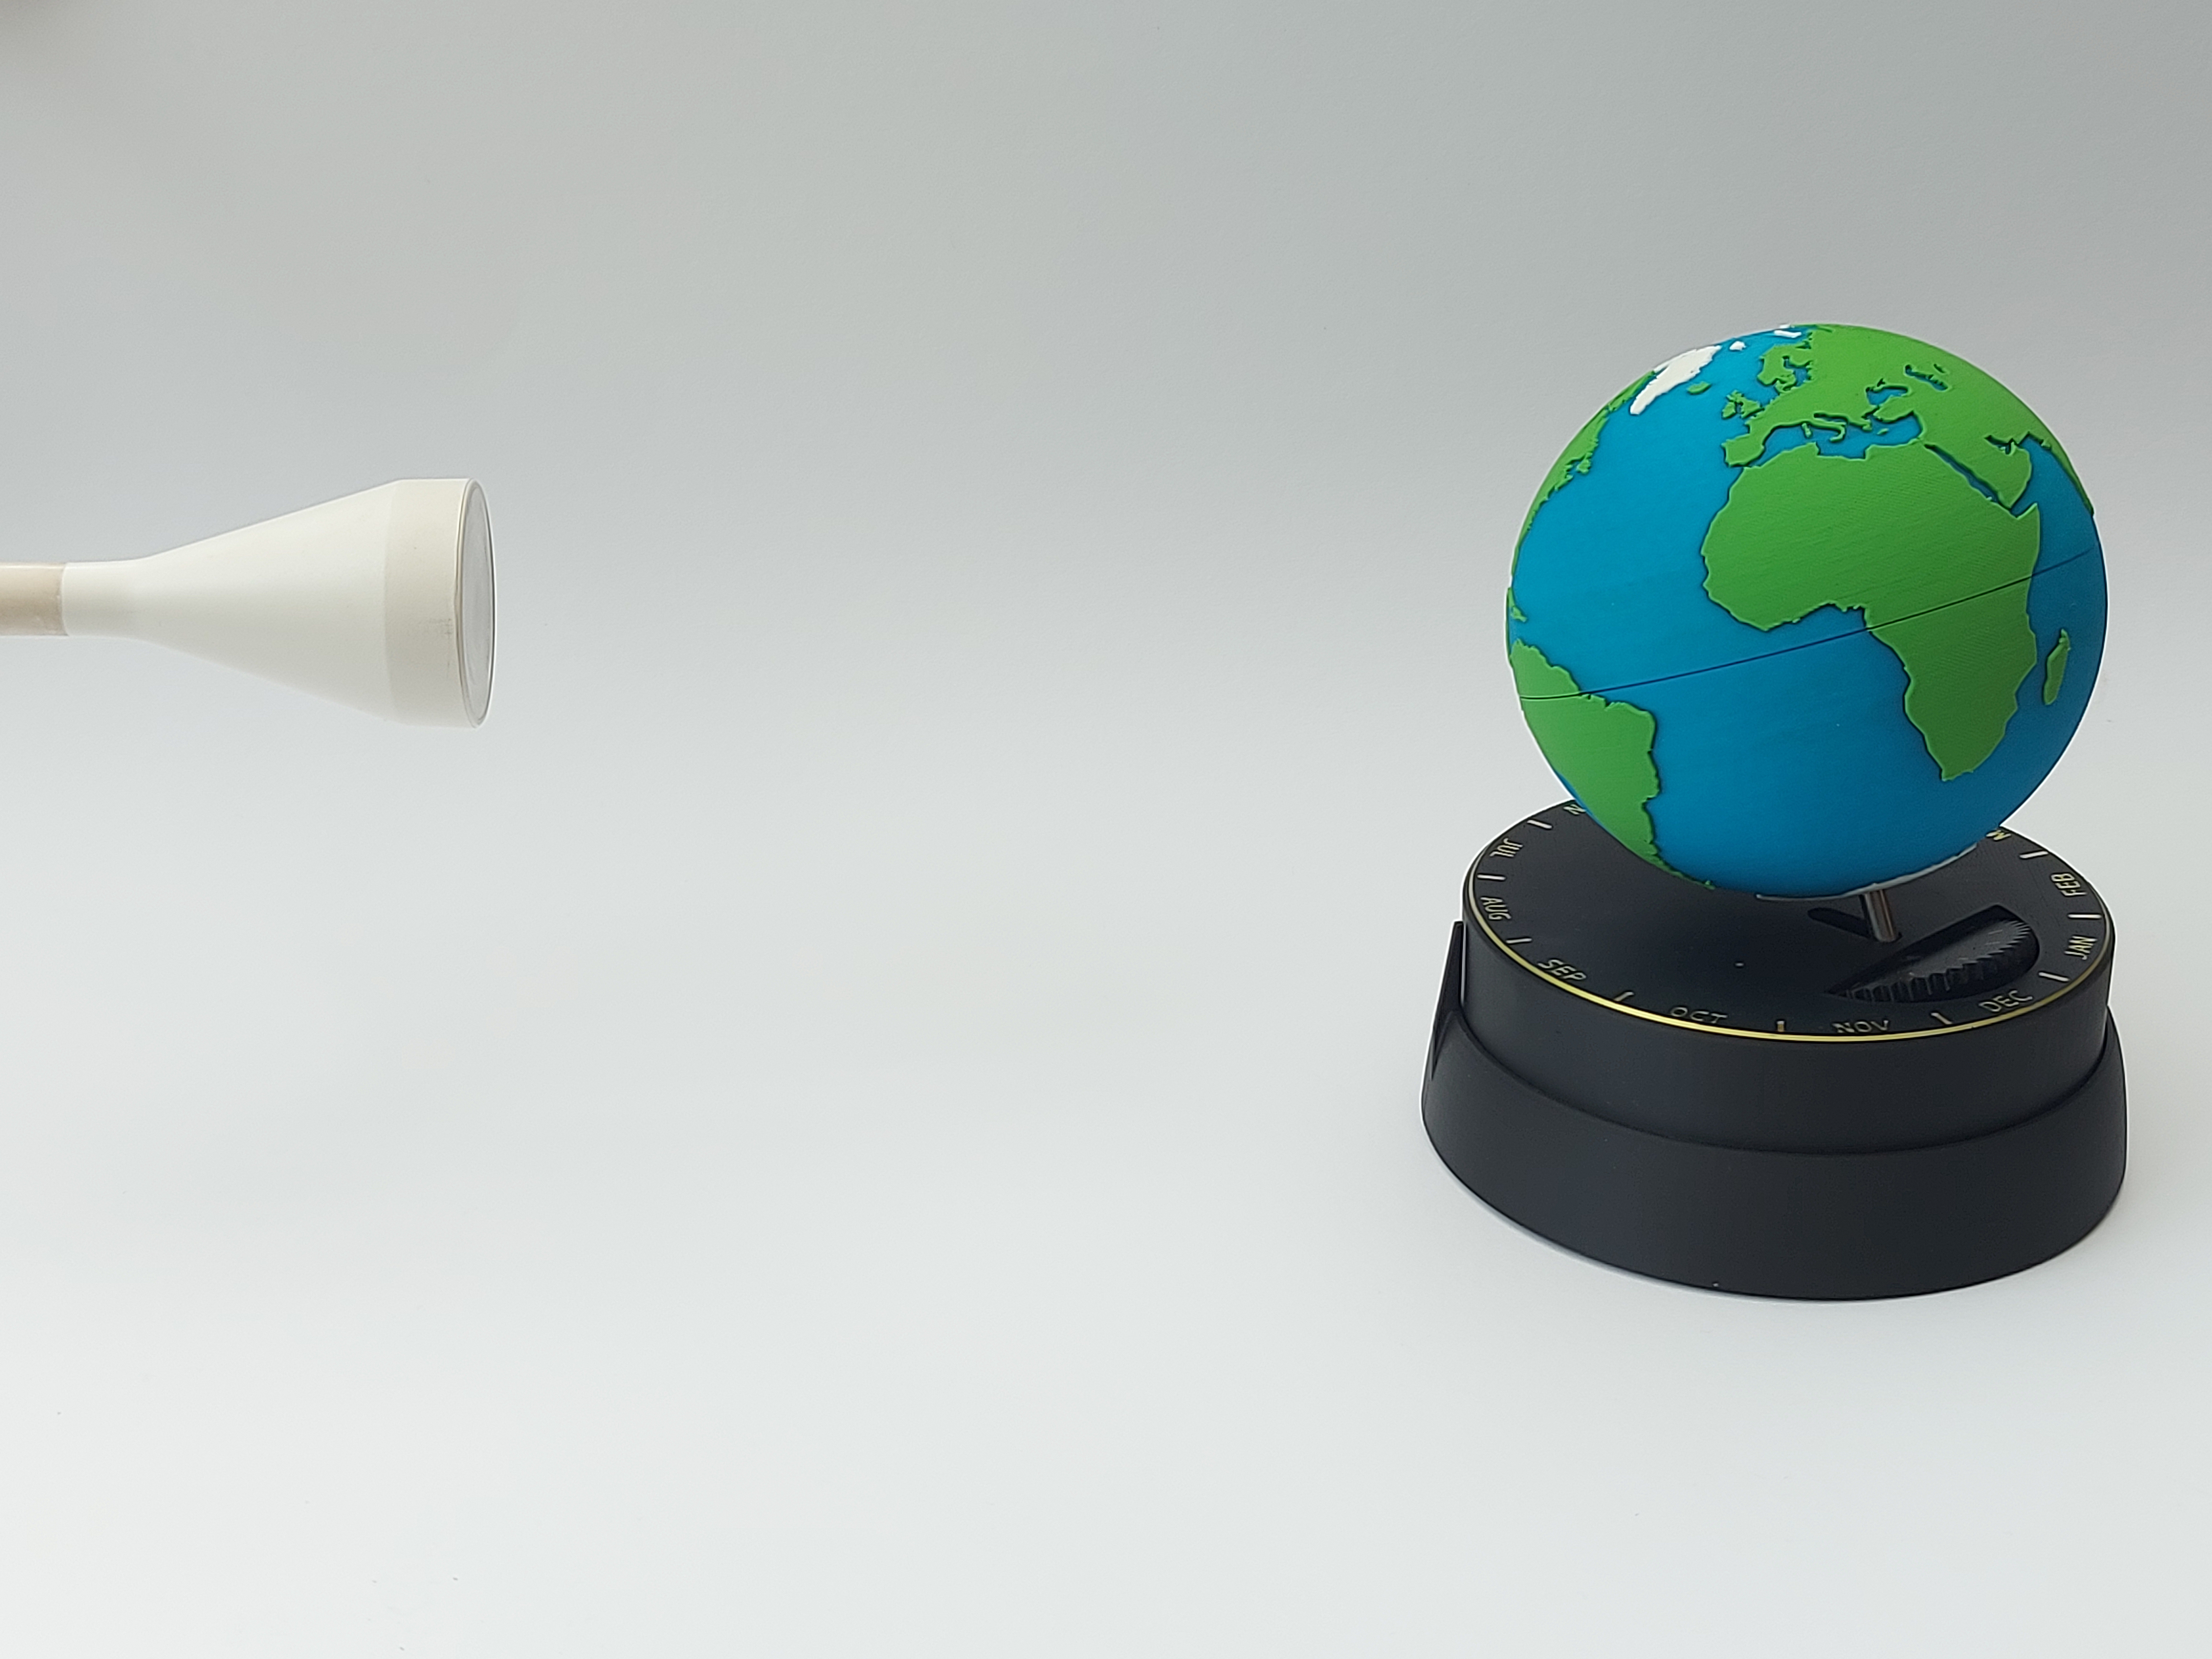
Own lamp setup
You provide your own source of light and only print the globe.
Only spinning globe (ignore setting the time/month correctly and just let it spin)
You ignore the lamp/sun feature and only print the globe (here I would advise printing the “base cover” in single colour (from the multicolour print profile) to not have the text indicating which month it is.)

Materials
This full build requires the Clock Components Kit 011, LED Lamp Kit MH001, one 5x50mm Stainless Steel Dowel Pin - DA036, two 605zz Steel Deep Groove Ball Bearings - EA013 and 5 BT3x20 SHCS Self Tapping Screw - AA111. See BOM for list of material. The LED Lamp Kit is not required if you do not want to print the lamp representing the sun.
Additionally, super glue is required as well as a file or sand paper.
It might be possible to make this build with a printed Dowel Pin, bearings and use glue instead of screws. I have not tried, but please report back how it worked out if you decide to try this.
Printing
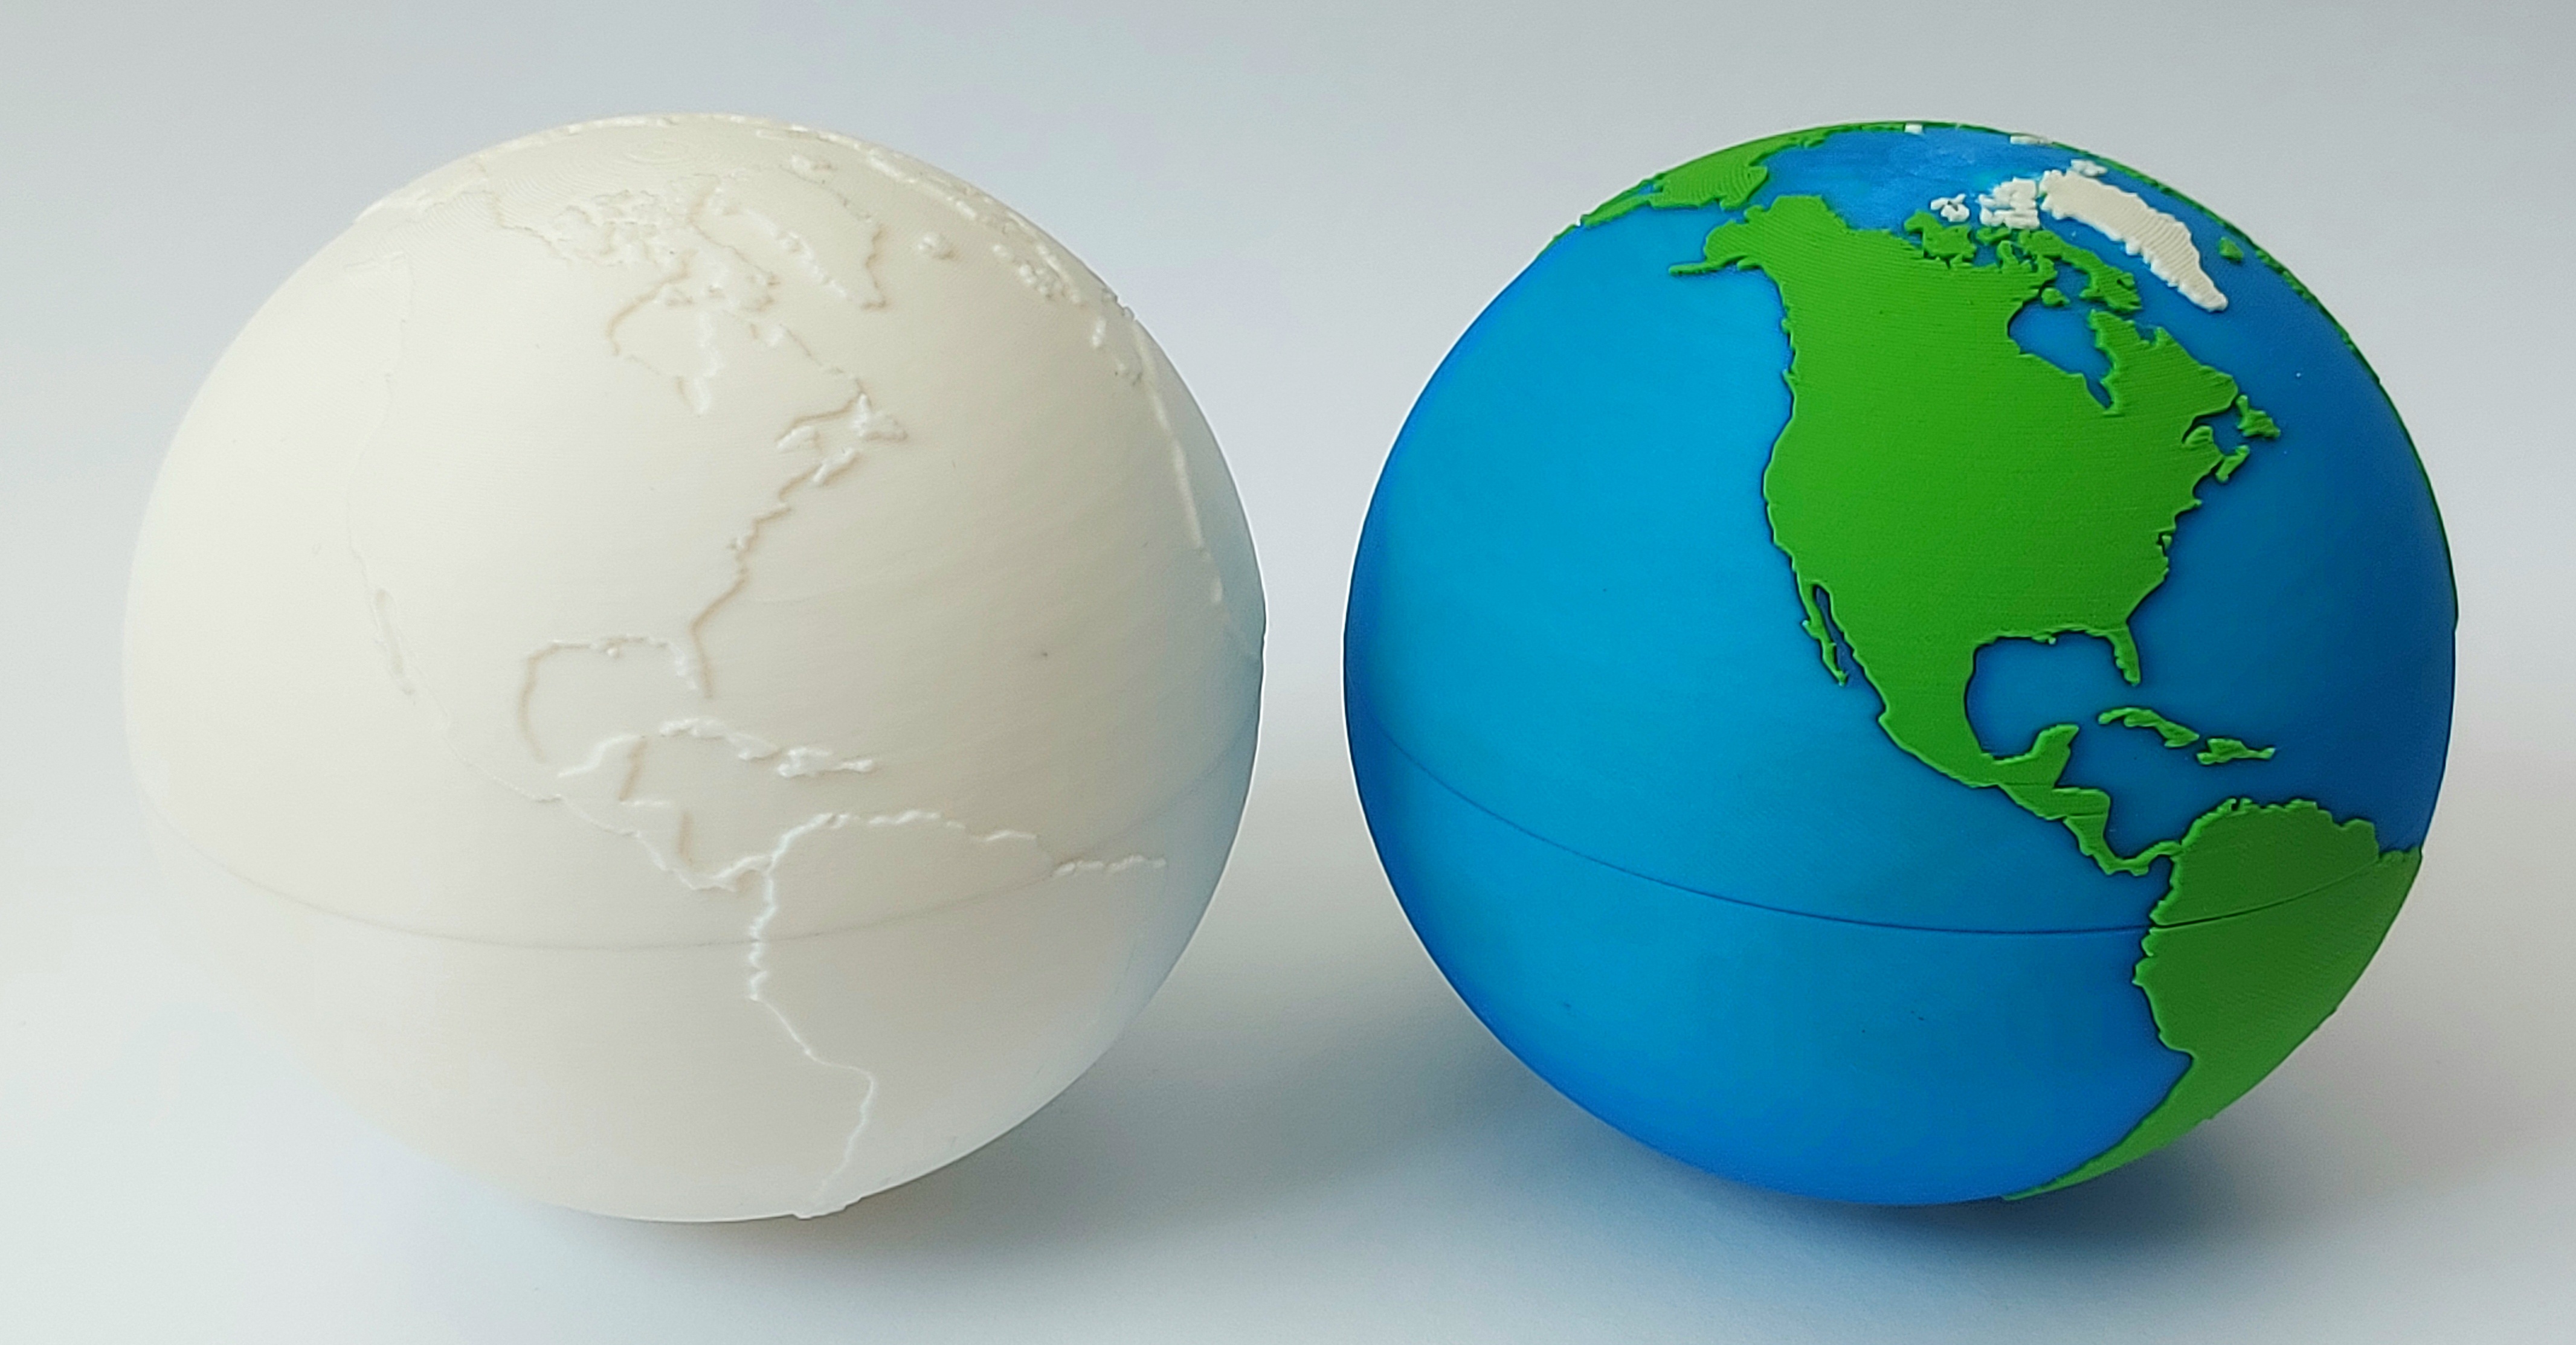
Printing the parts are straight forward. However, when deciding to print the globe in single or multicolour, I would like to highlight that the multicolour globe is heavier and with the centre of gravity…not in the centre of the globe. Both these facts makes spinning the globe more work for the clock mechanism. It still works well for me, but over extended time I'm not sure. My suggestion is to spend some time and paint the globe with acrylics and save some printing time and plastics.
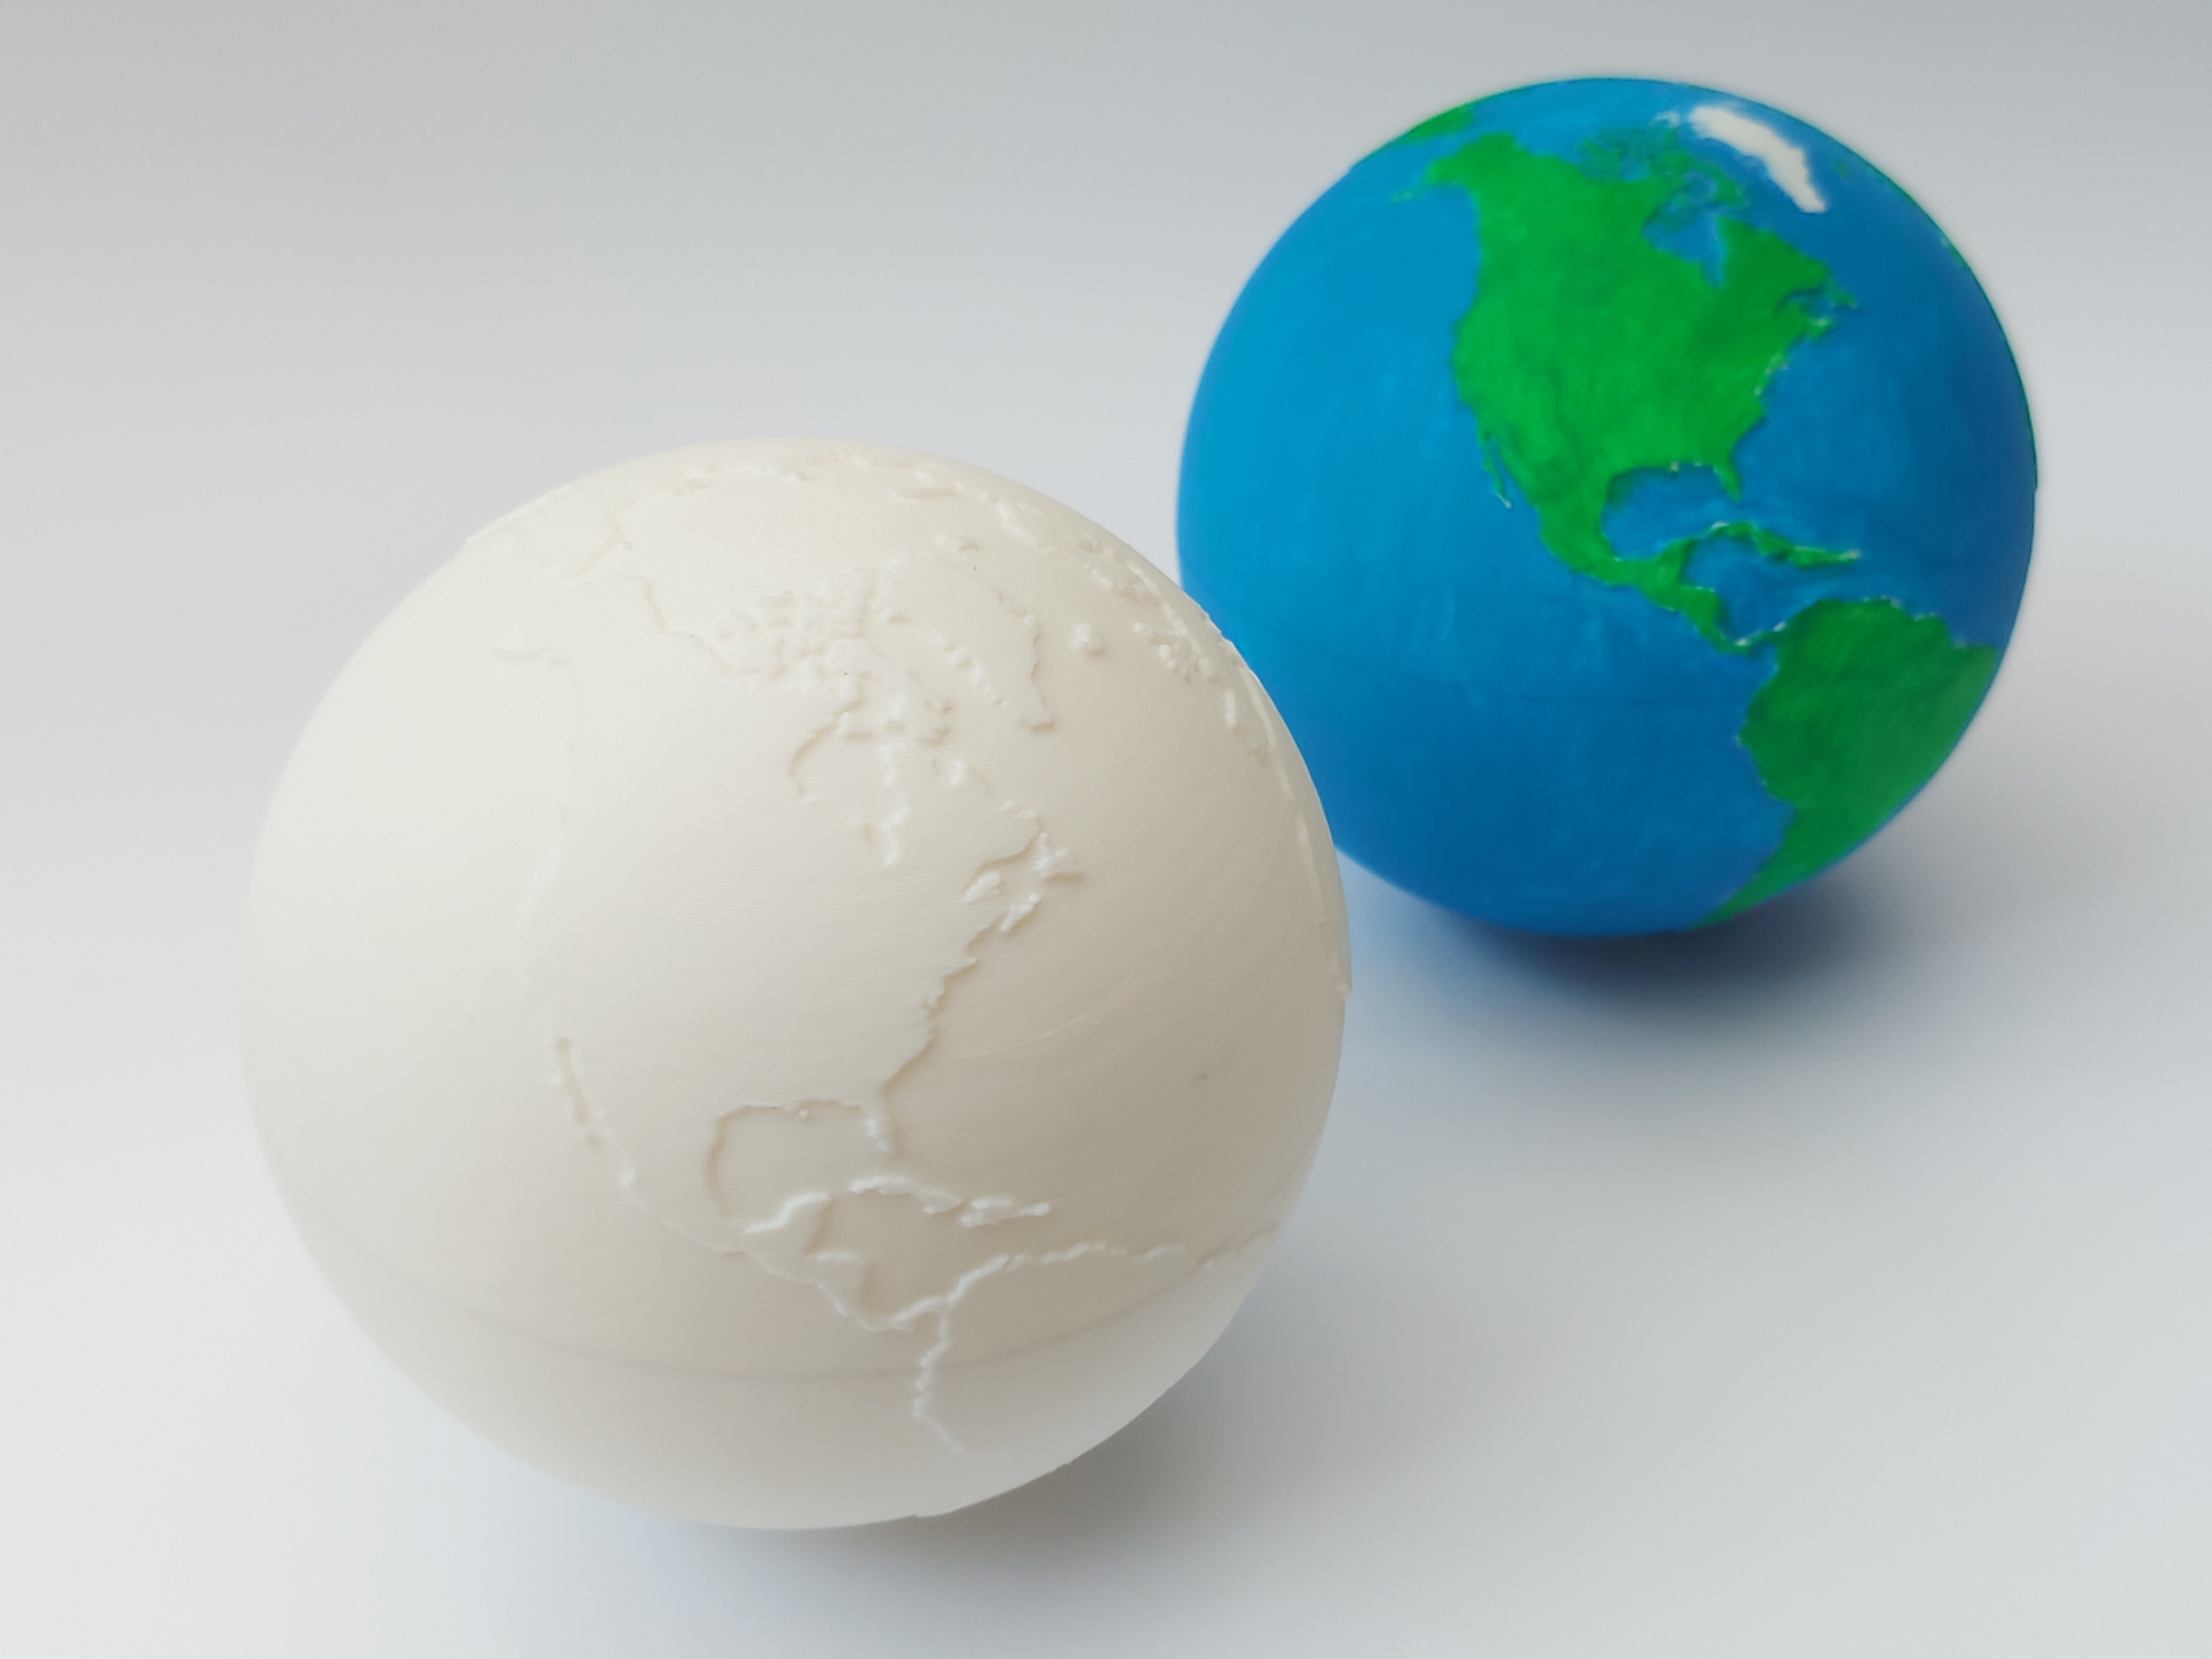
Print Profiles
Two Print profiles are available for the Globe (Normal and A1 mini) and one for the Lamp/Sun. In both Globe profiles an extra plate for a Non AMS “Base cover” has been added which includes a filament change to highlight the indented text.
Assembly
Assembly of the Globe. The two halves (Figure 1A) of the globe simply needs to be clued together taking care to line up the continents correctly. The cross-shaped guide is a tight fit and will help with this. First, press the guide into one side of the globe (Figure 1 B). Test fit the other globe part before adding glue (Figure 1C) and pressing the globe together (Figure 1D).
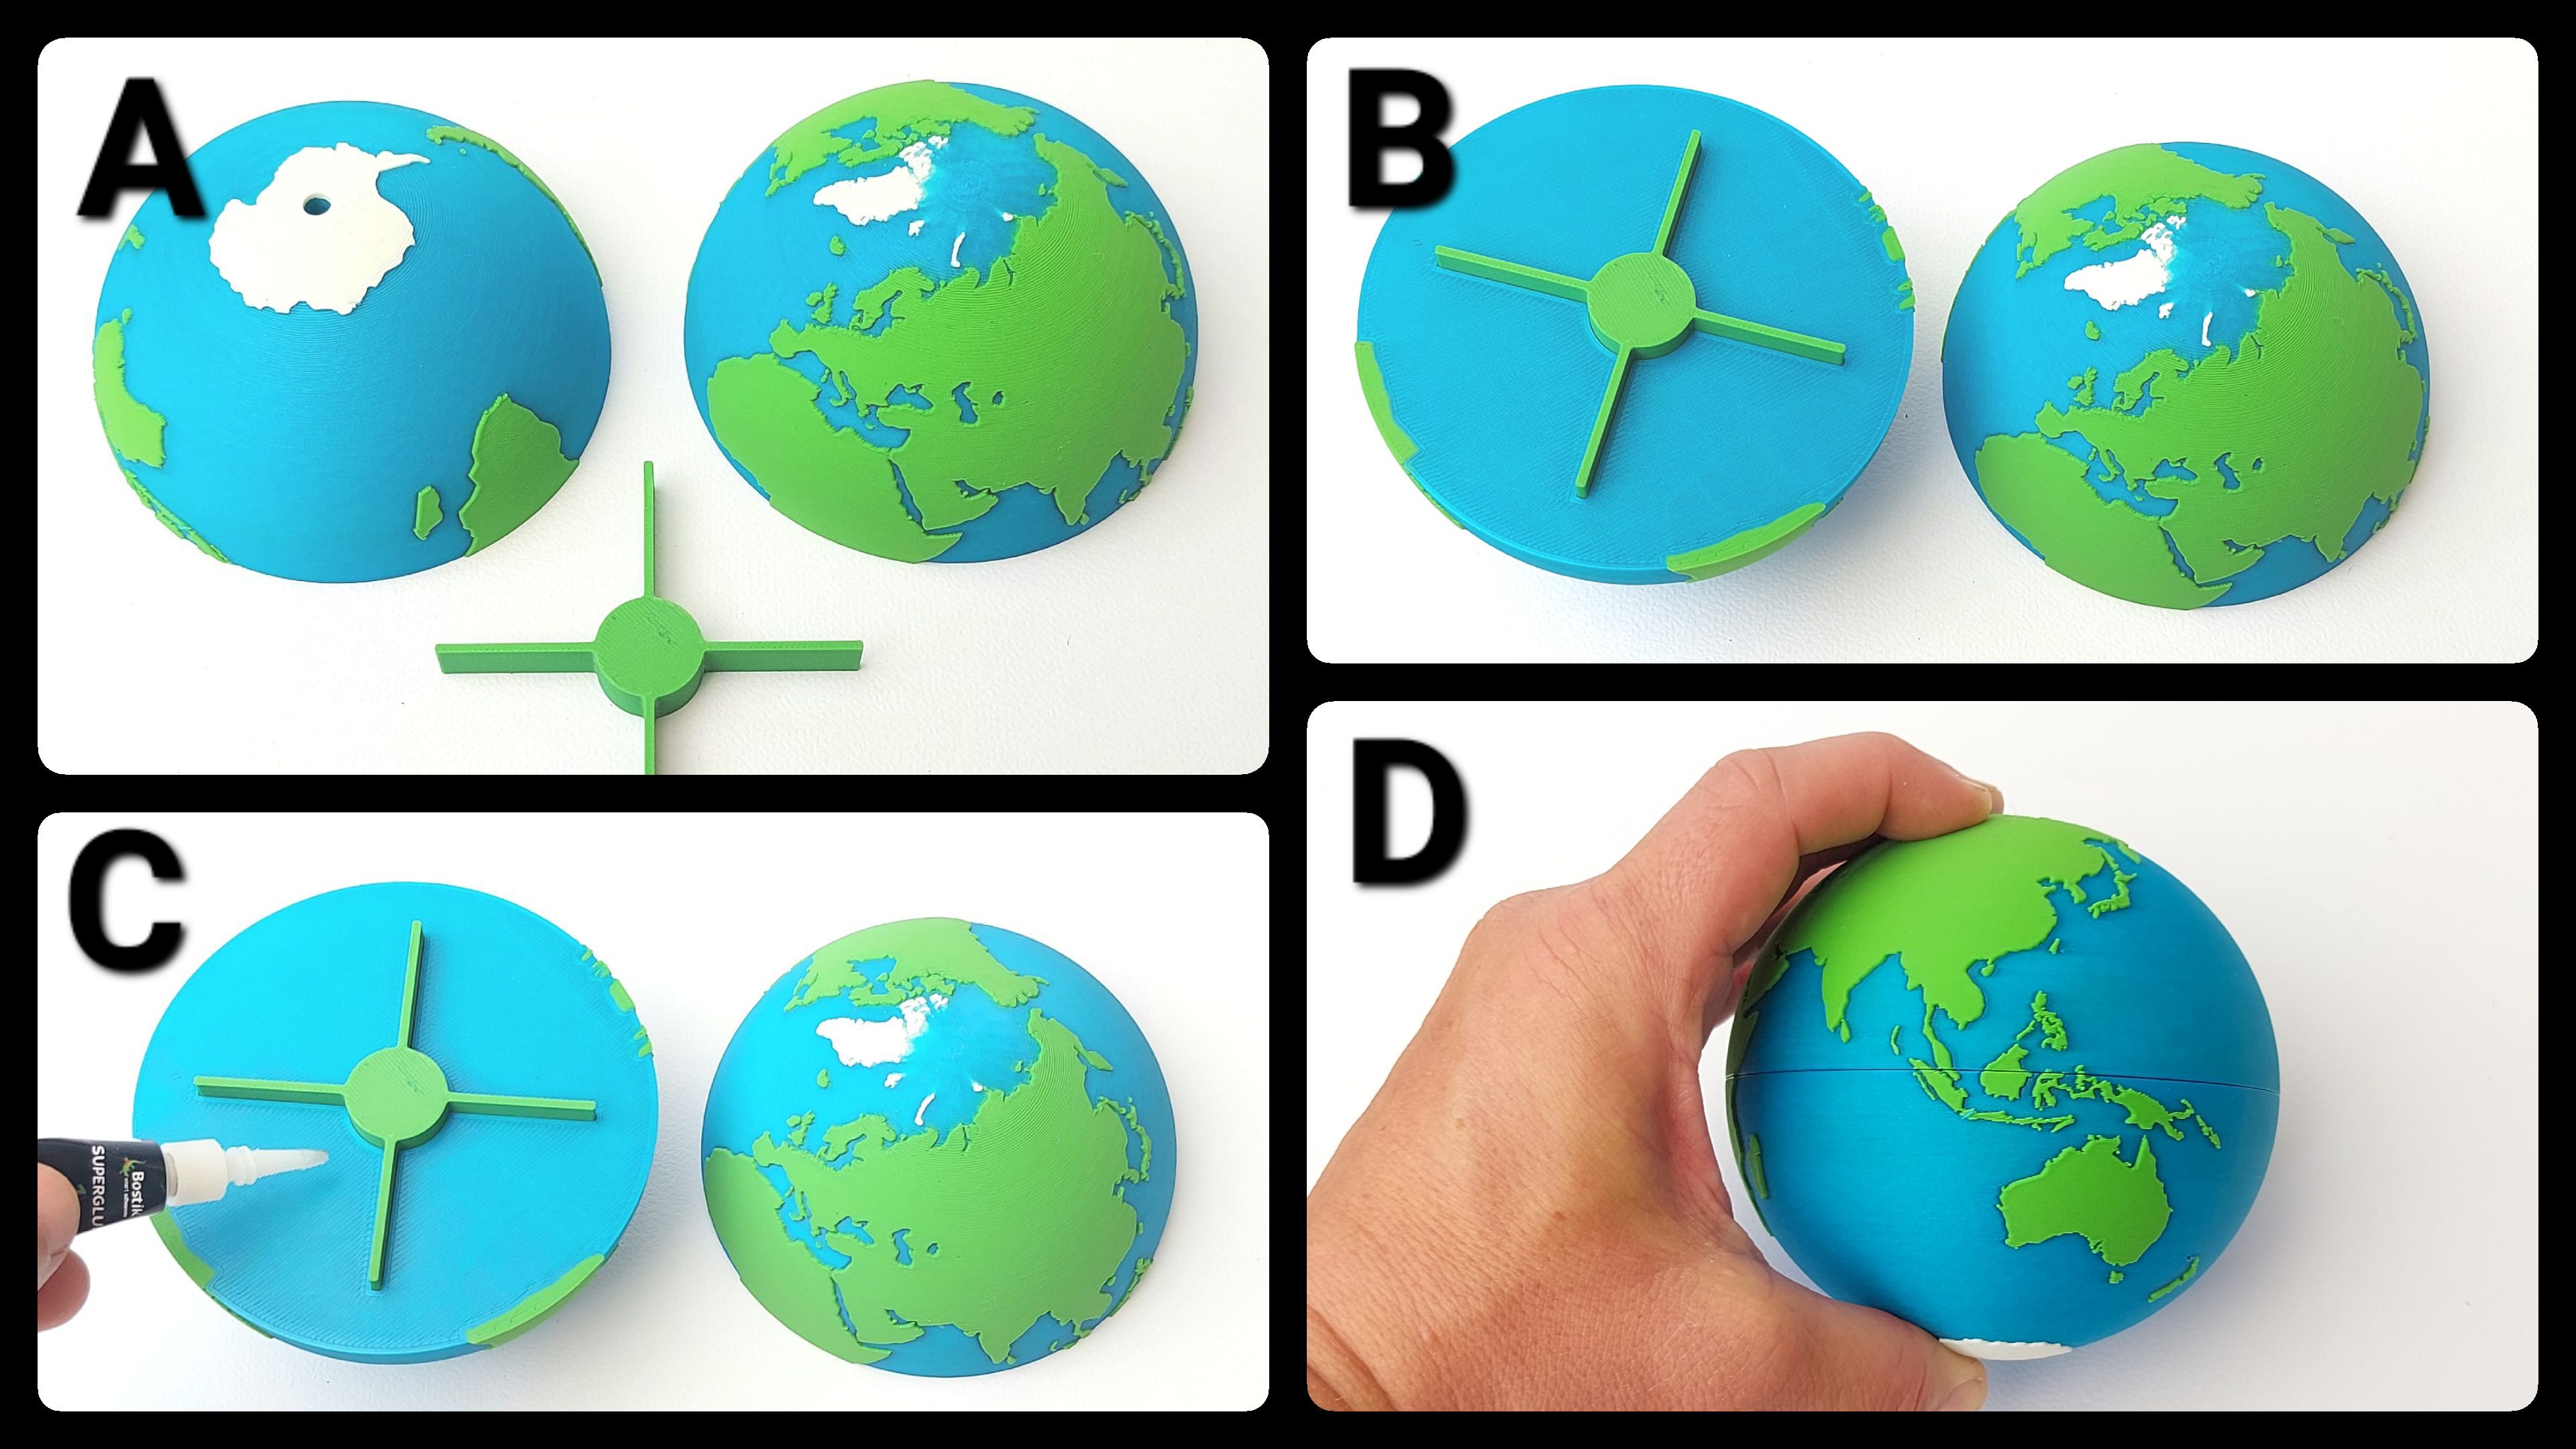
Figure 1. Attaching the Clock Mechanism.
Collect the clock components from the Makerlab Clock Components Kit 011 (Figure 2A). With a file or sandpaper, rough up the surface of the wheel on the clock driving the hour arms (Figure 2B). Have the “Clock base plate” ready (Figure 2C), put the rubber gasket on the clock (Figure 2D). Position the clock mechanism through the hole of the printed “Clock base plate” (Figure 2E) and tightly secure it with the spacer followed by the hex nut (Figure 2F).
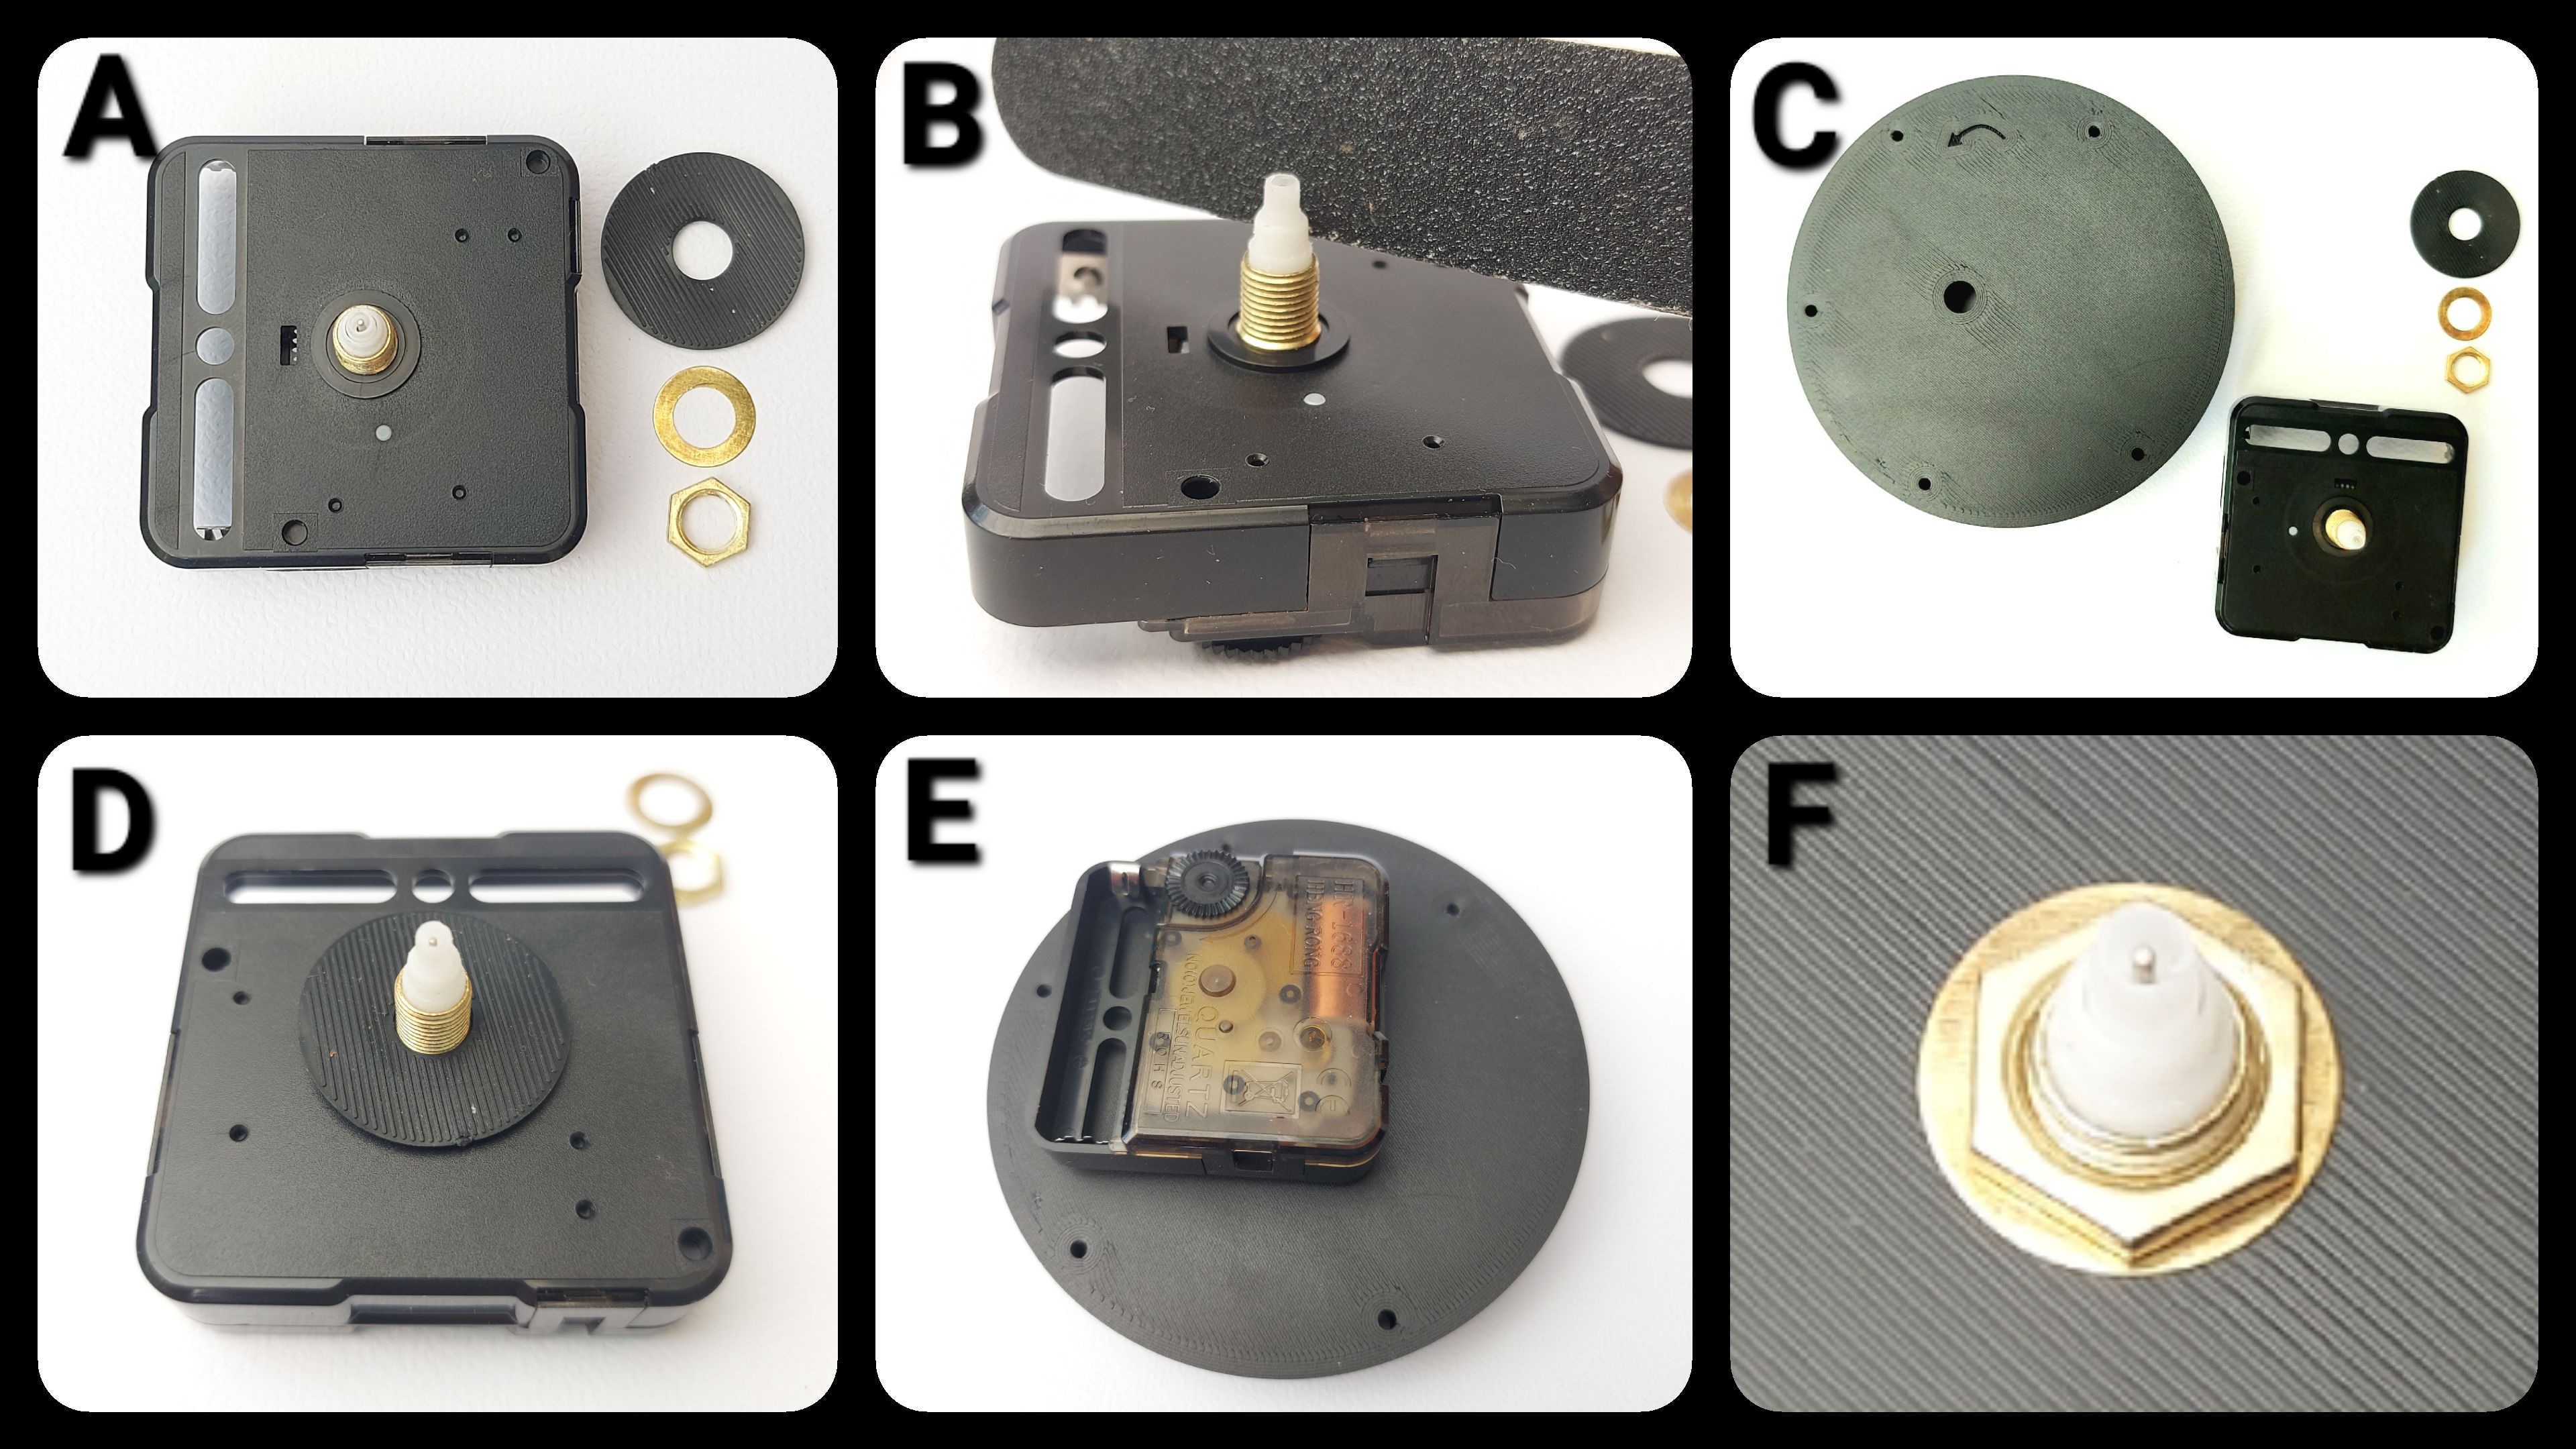
Figure 2. Preparing the “output” gear/rod.
In this step the aim is to secure the “output gear” on the right position of the metal rod with glue. First collect the printed “output gear”, metal rod and two ball bearings (Figure 3A). Place the “output gear” on to the metal rod (Figure 3B). Place two ball bearings onto the rod below the “output gear” (Figure 3C). Push down the “output gear” until it reaches the ball bearings (Figure 3D). Remove the ball bearings and the distance from the bottom of the “output gear” should be the length of the thickness of 2 ball bearings (Figure 3E). Apply glue to the “output gear” only where it interacts with the metal rod (Figure 3F).
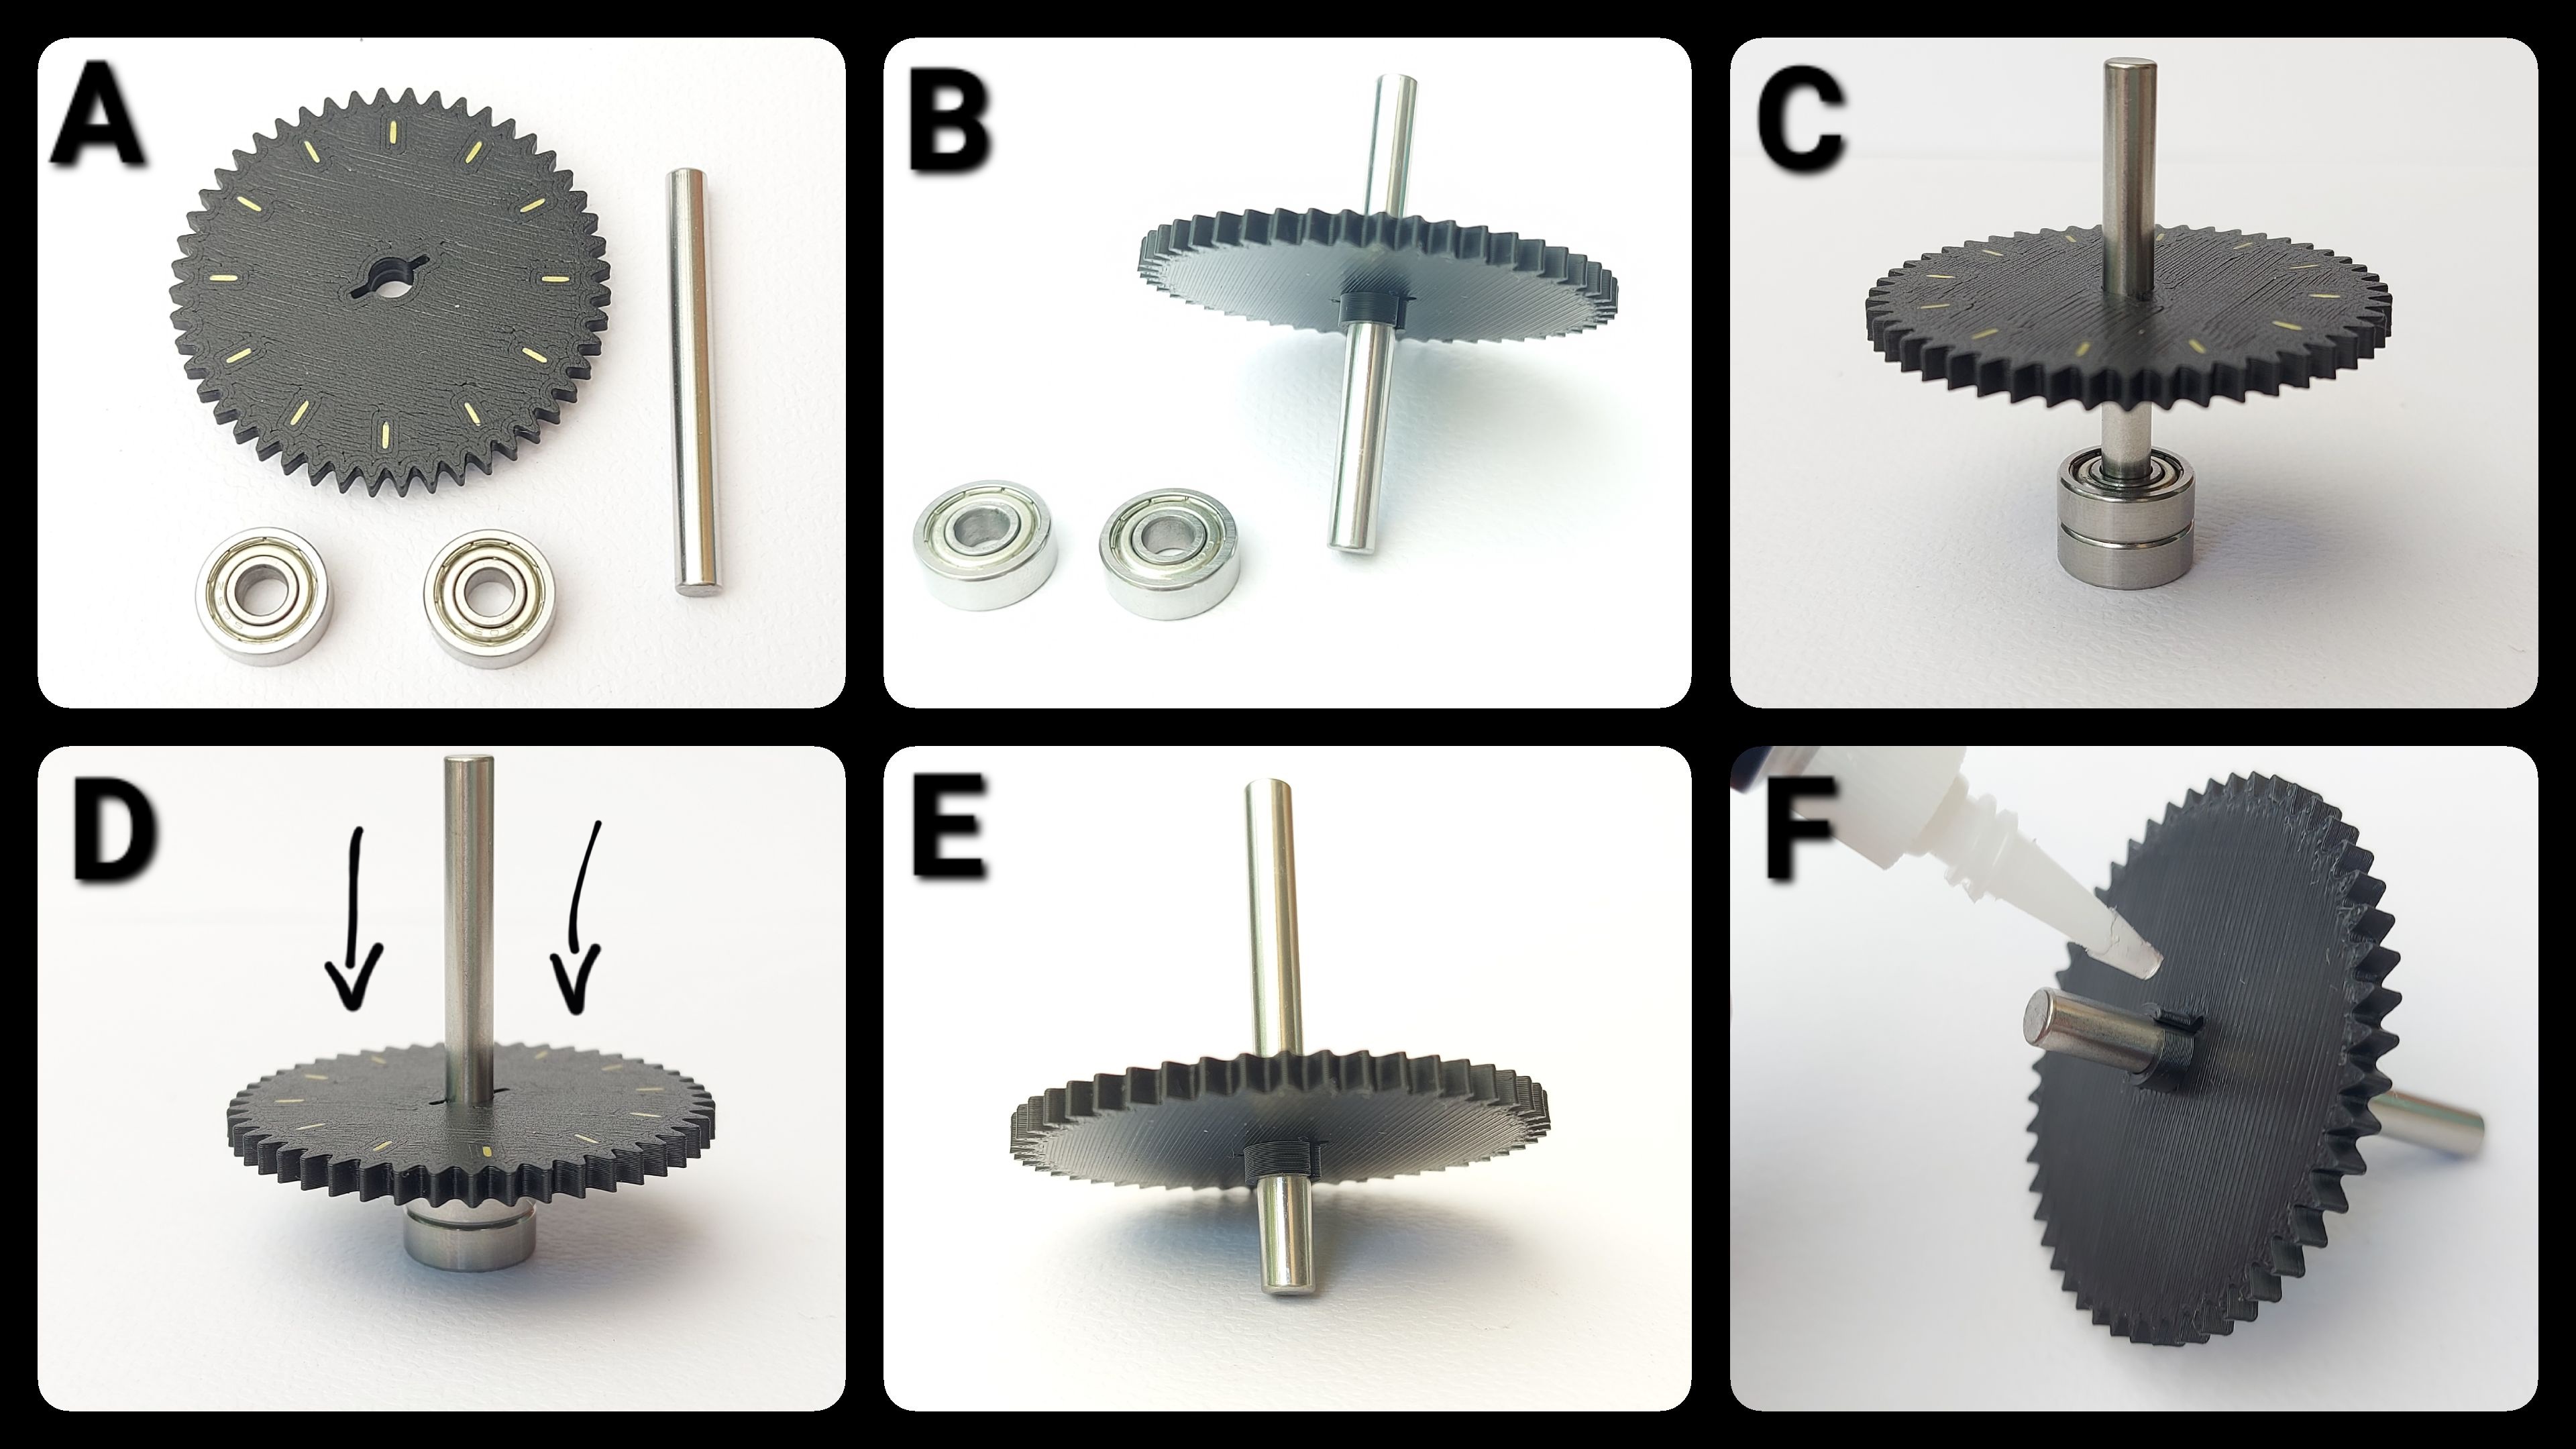
Figure 3. Preparing the Base.
Push one ball bearing after the other into the hole (Figure 4AB). This should be a tight fit and might require some force, but in the end the second ball bearing should be more or less flush with the printed “Clock base plate”. Apply a minimal amount of glue to the inside of the small cogwheel (Figure 4C). Make sure to orient it in the right direction (flat side up) (Figure 4D) and push it firmly in place on the “hour wheel” of the clock mechanism (Figure 4E). Attach the “output gear and rod” by inserting it into the ball bearing hole making sure that the cogs of the two wheels nicely fit each other (Figure 4F).
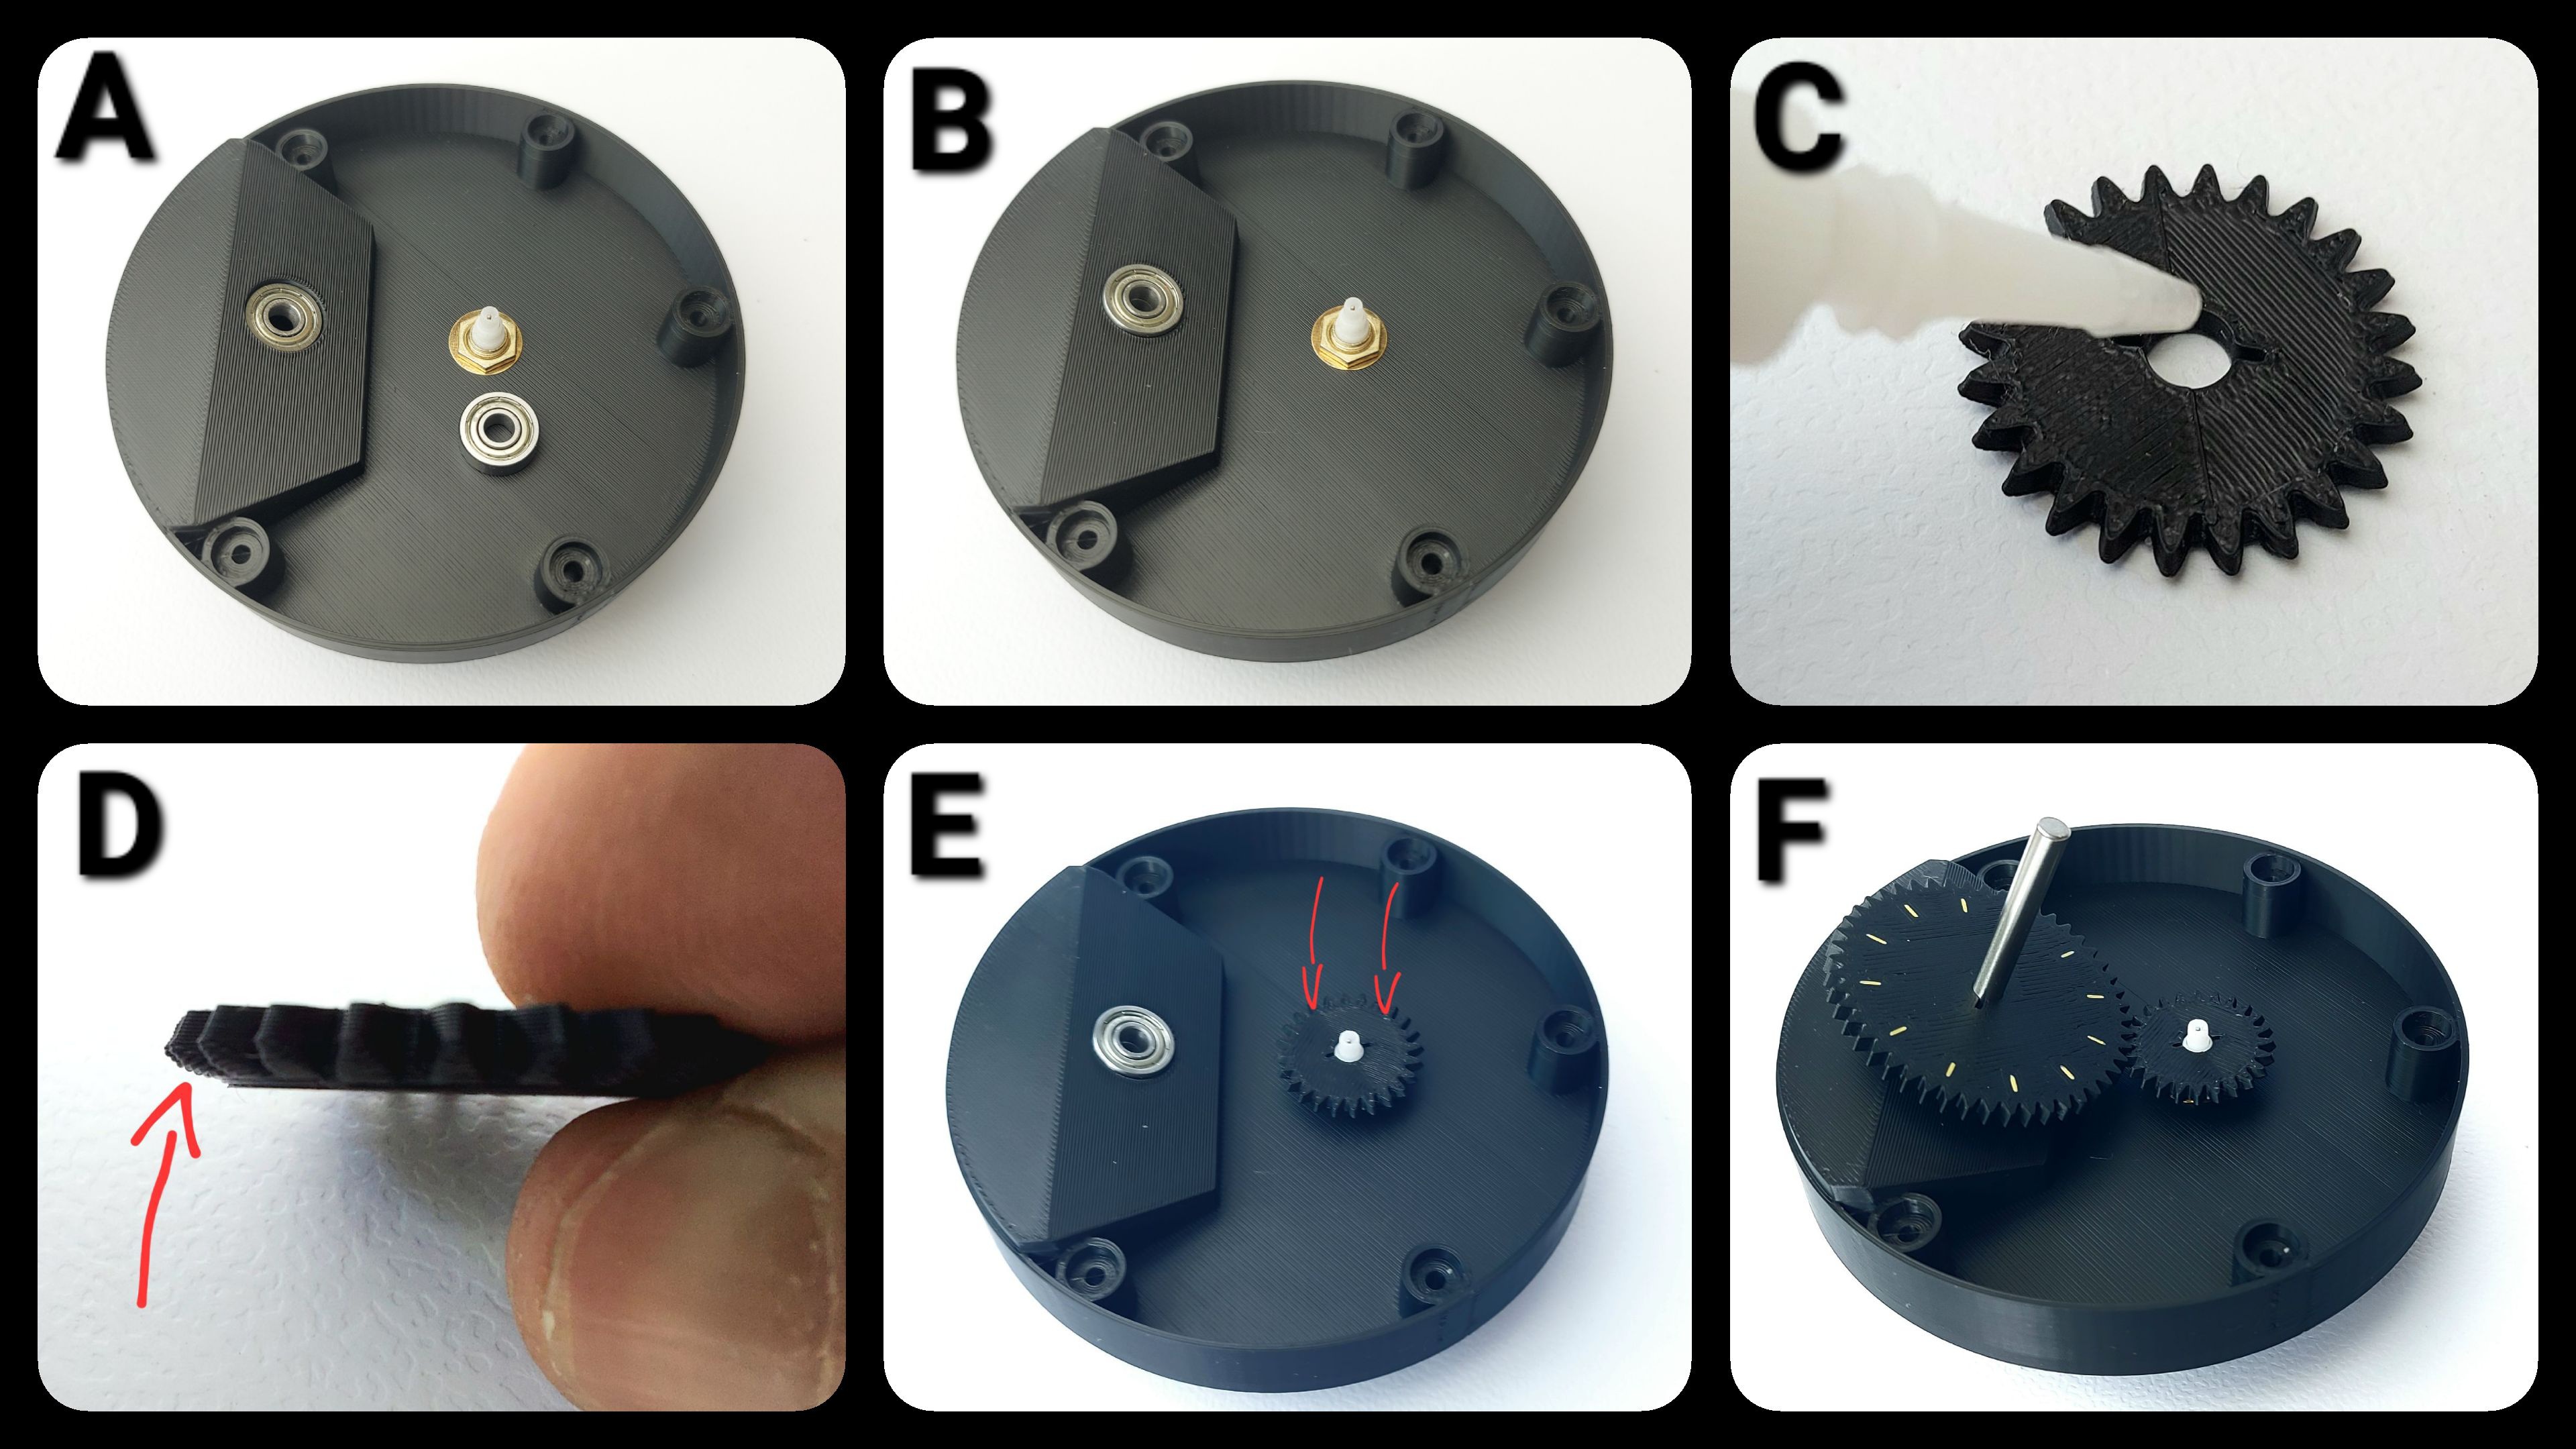
Figure 4. Final assembly.
Put the “base cover” over the clock assembly making sure that the holes for the screws align (Figure 5A). Next, secure the two pieces together using the 5 screws (Figure 5B). The base for the globe should now be done (Figure 5C). Next, add some glue to the hole in the globe (Figure 5D) and push it onto the rod as far as possible (2cm) (Figure 5E). Glue might not be needed if the fit is tight enough. Finally, Place the whole build on the “base plate” (Figure 5F).
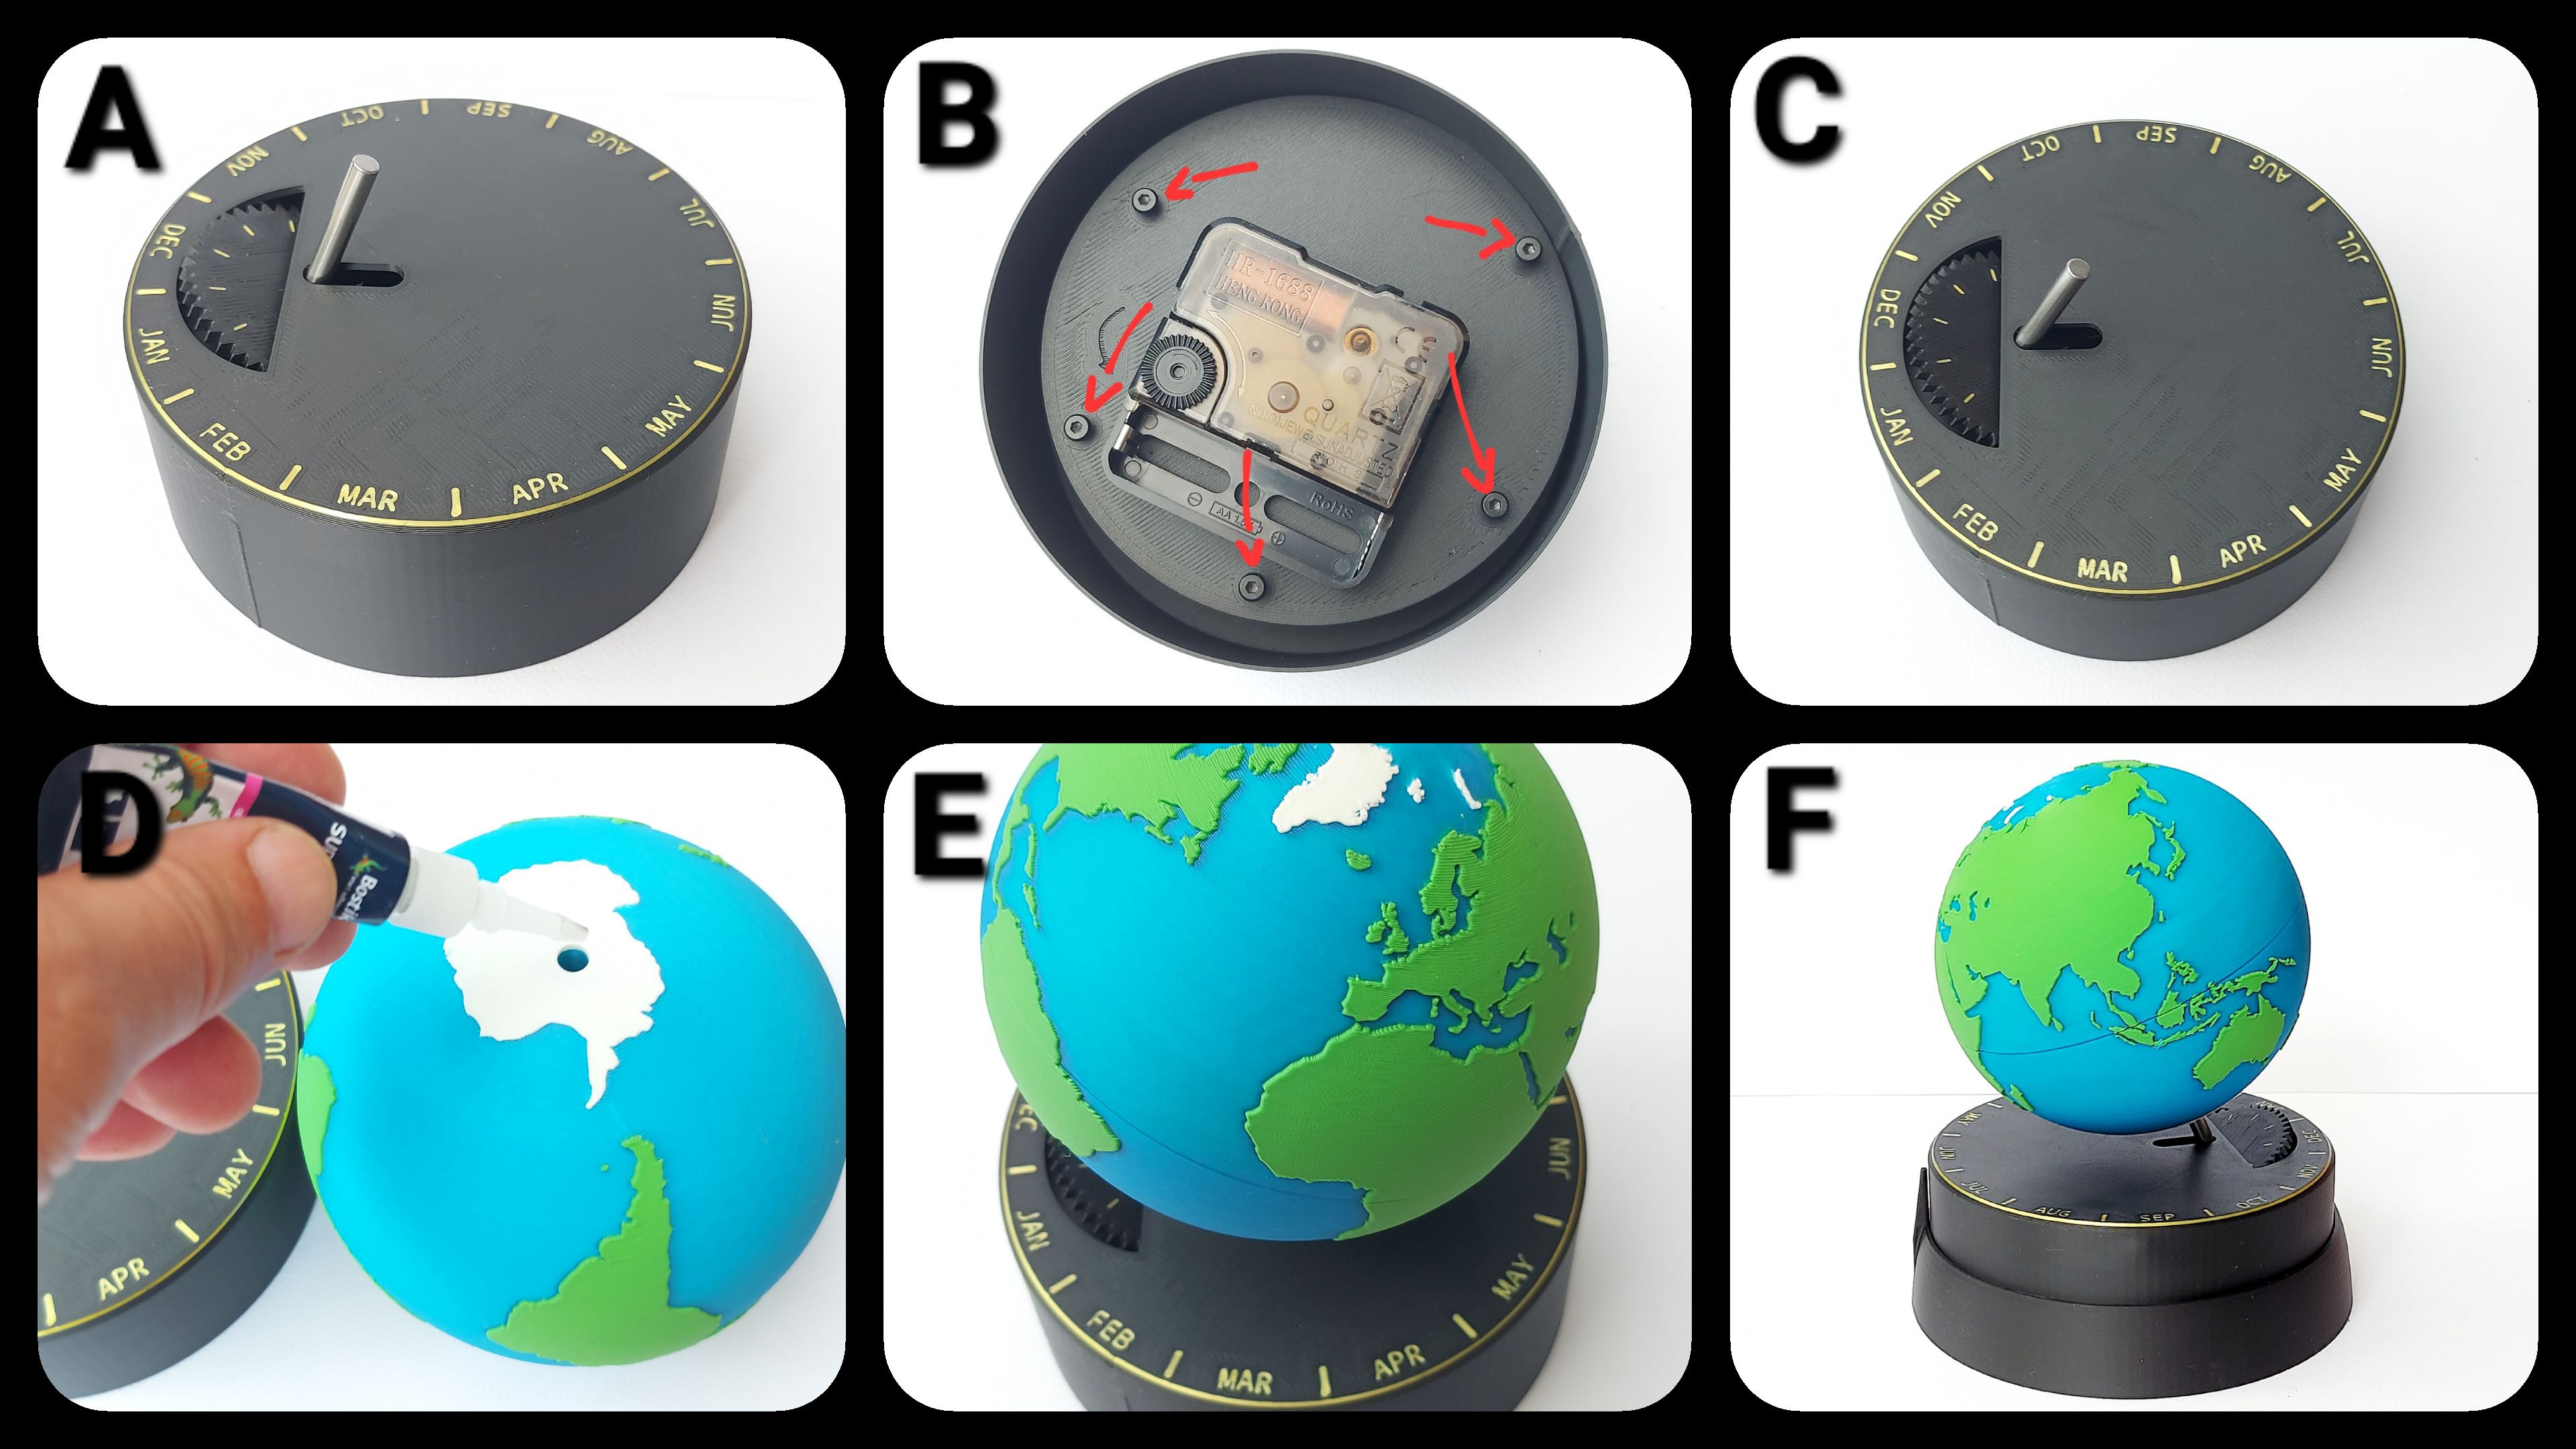
Figure 5. Building the Lamp/Sun.
Collect the 4 printed pieces and the Bambu LED lamp (Figure 6A). Place the LED lamp into the lamp holder (Figure 6B). Slide the cable cover into place taking care to orient it correctly for a flush finish (Figure 6C-D). Put the lamp shade on to the lamp holder making sure to align the notches and twist it a little clockwise to lock it in place (Figure 6E). Finally, push the assembly onto the lamp base making sure that the cable ends up in its indented place (Figure 6F).
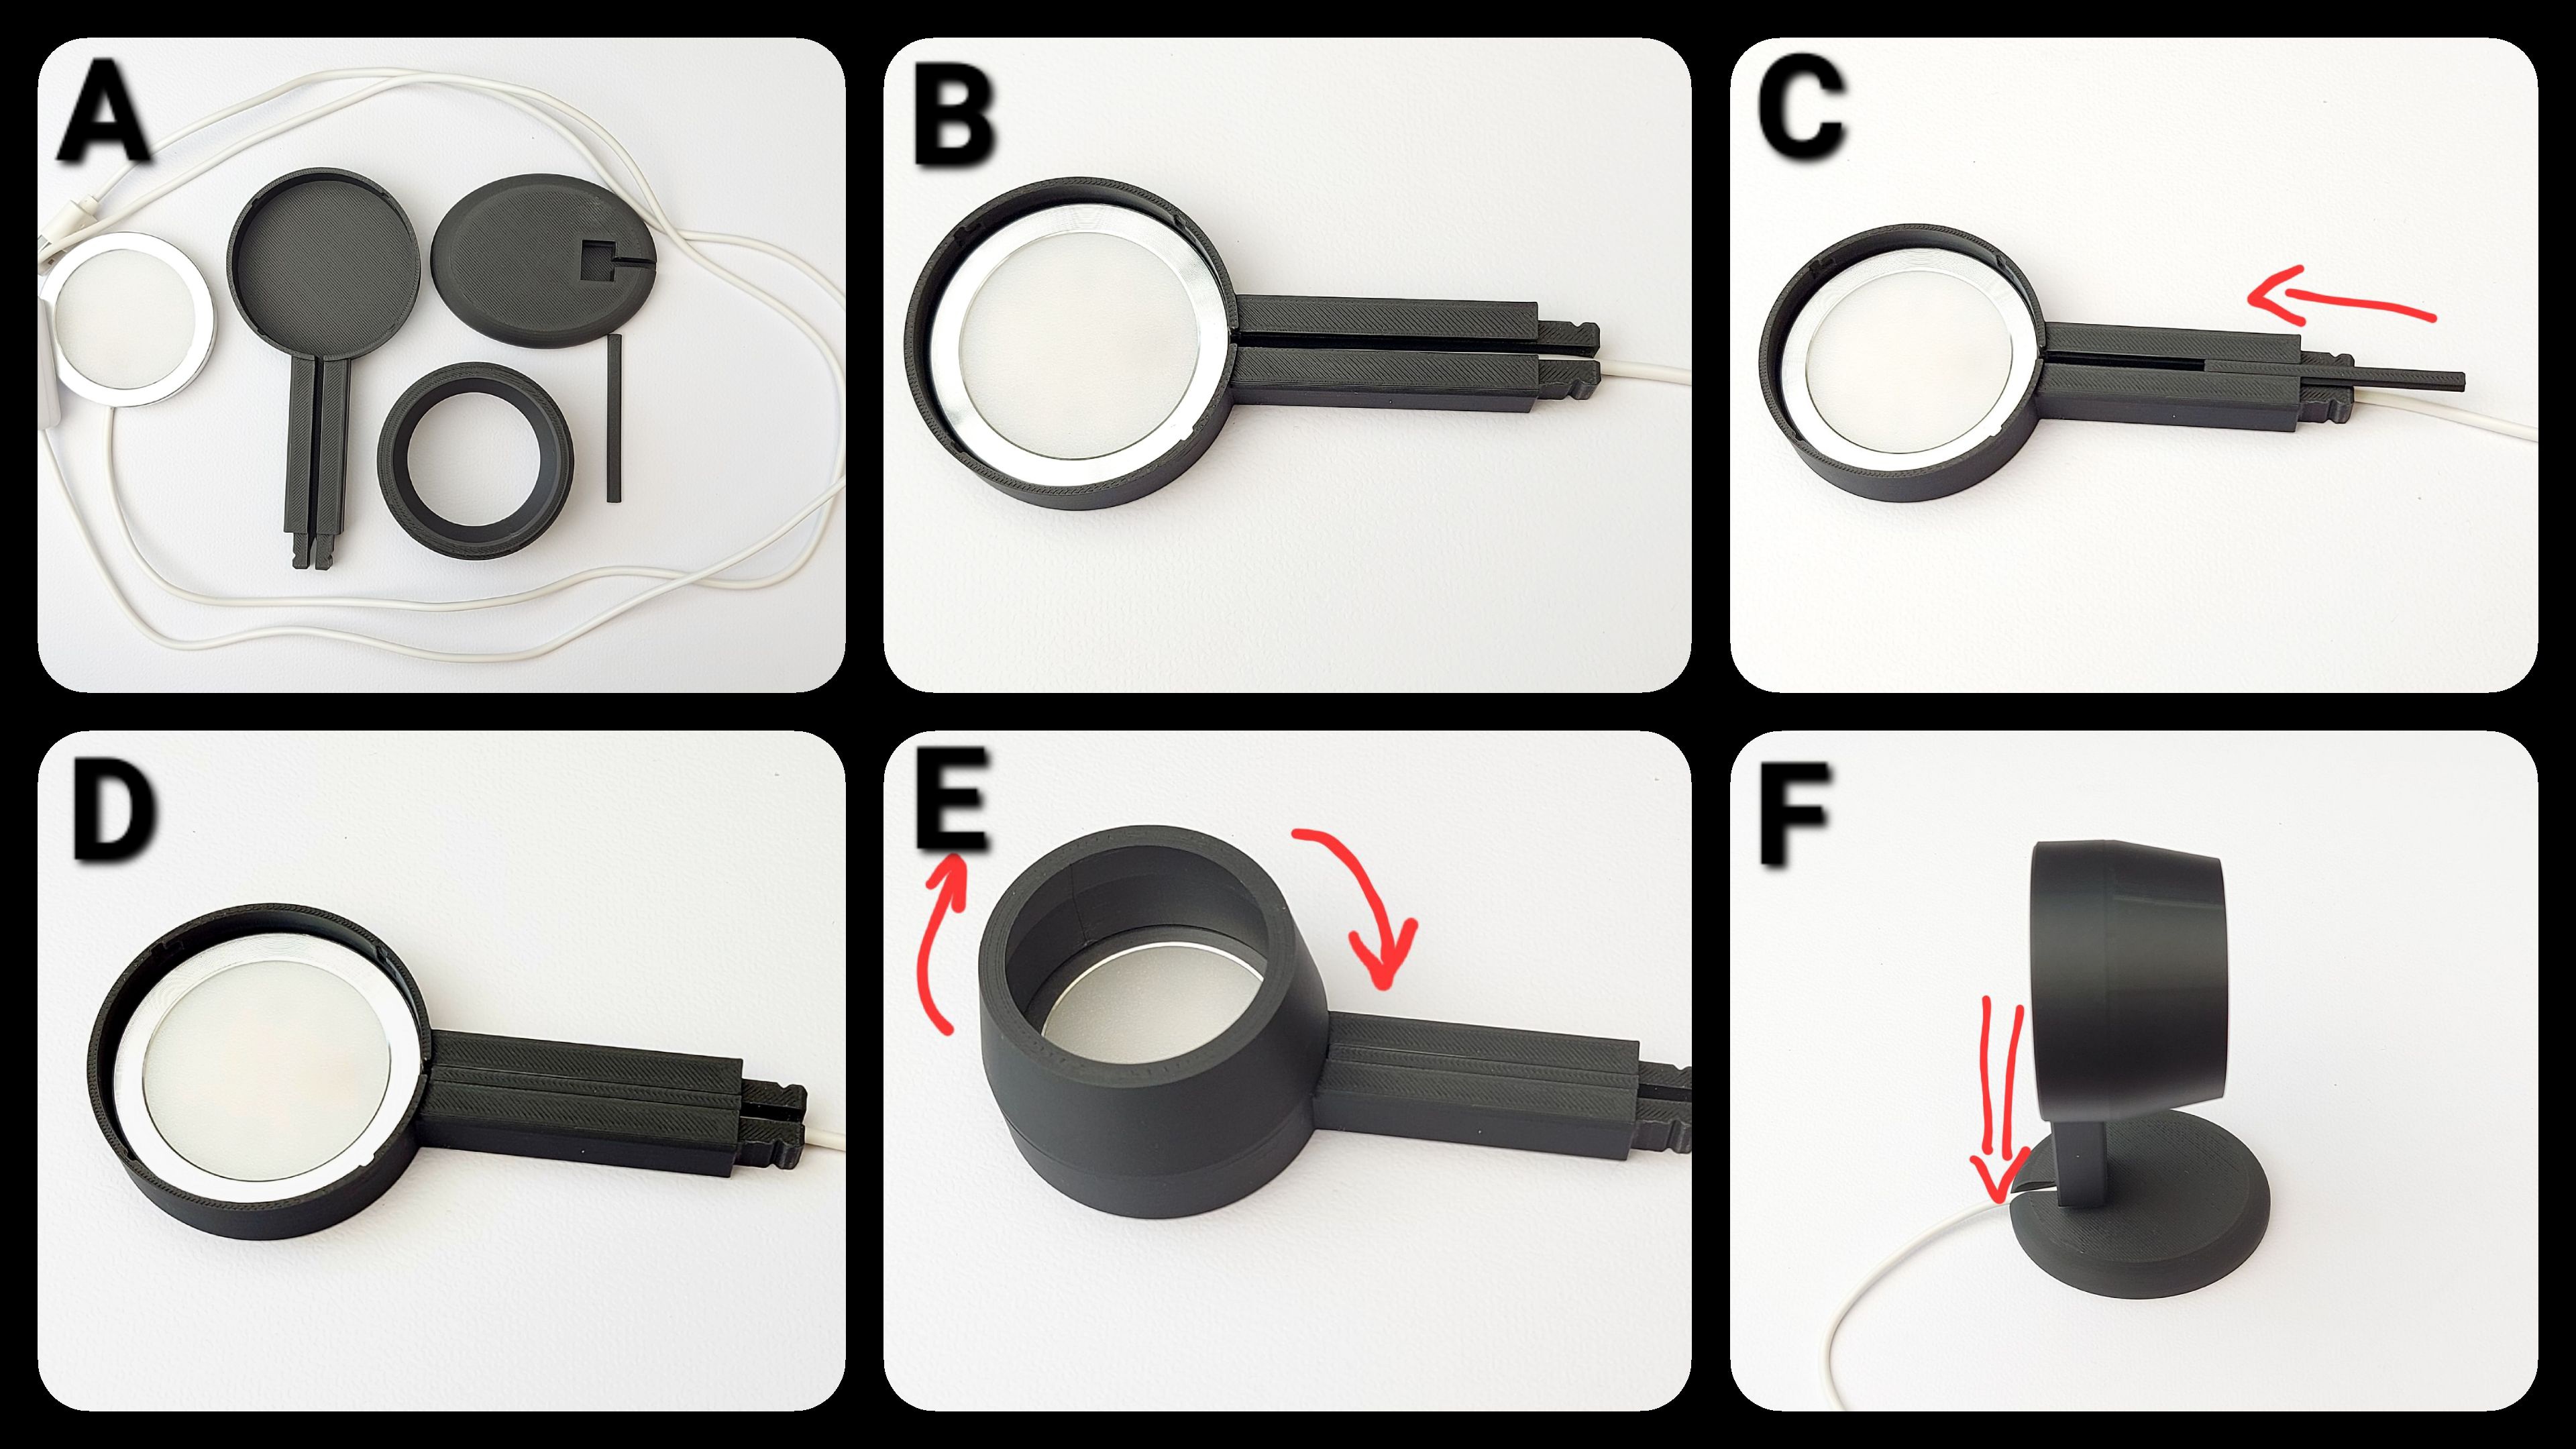
Figure 6. Setting the time and date.
For the full assembly, it is easiest to set the time and date of the model at noon (12:00) when the sun is at its highest point at your location. In the example below your location is California and the date is 15th Mars, at noon. Then simply line up the lamp followed by the globe assembly 15-20cm away, with the notch of the base plate lining up with the sun (second arrow from the left). Furthermore, set the date by rotating the base of the globe so that the middle of mars aligns with the notch of the base plate (third arrow from the left). Finally, by rotating the “wheel” on the backside of the clock mechanism, line up your current location towards the sun.
In a not fully lit room, the globe should now show, by the light from the LED lamp, where the sun shines on earth.
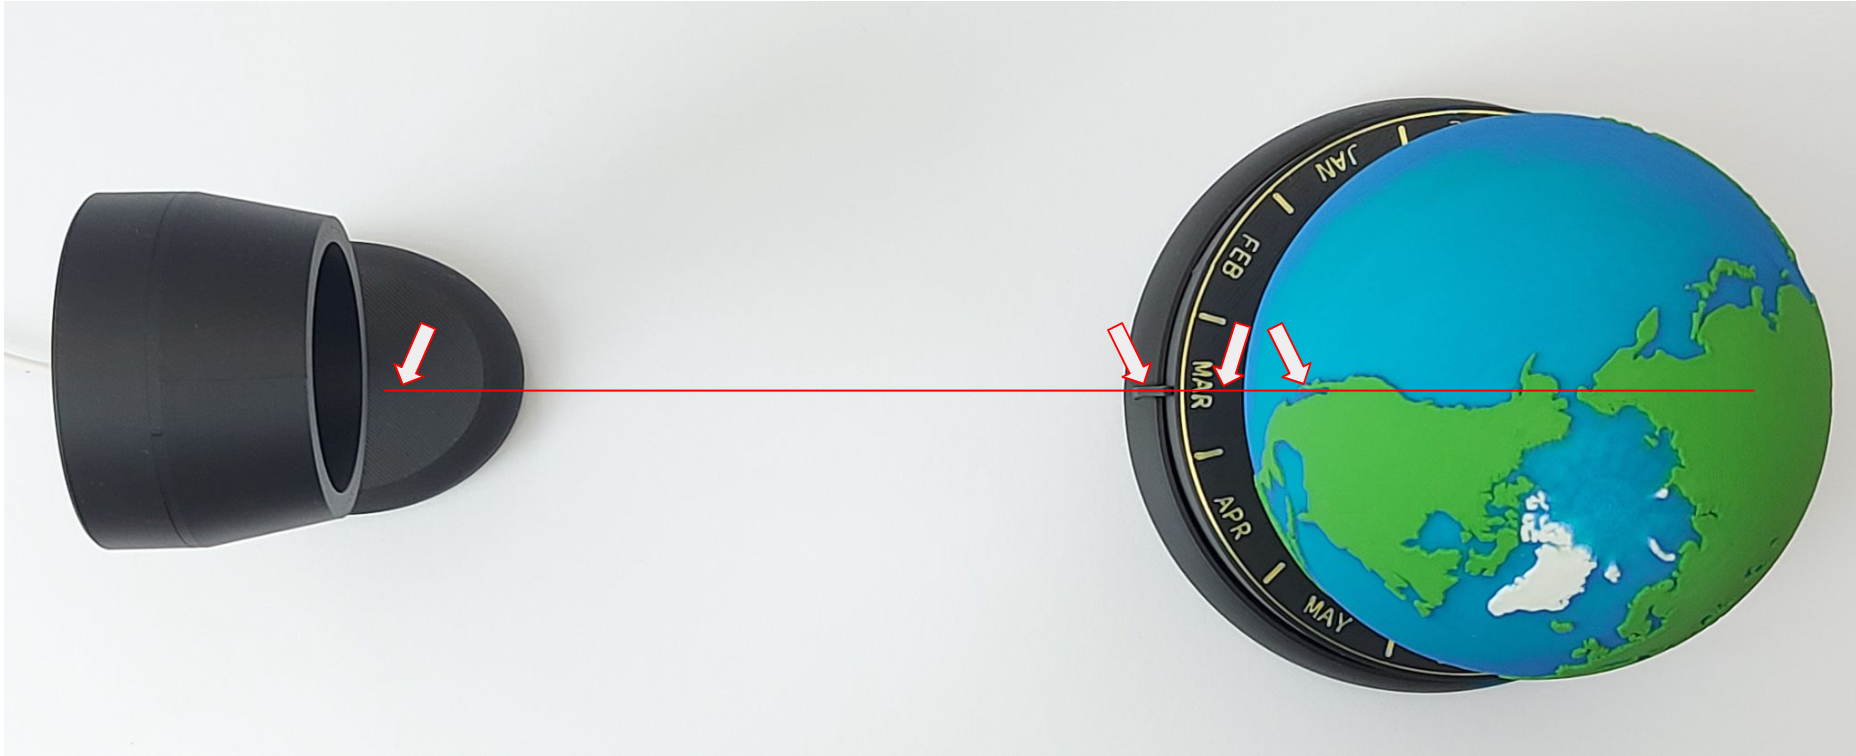
From there on, you need to rotate the Globe assembly once in a while to keep the current date.
Importantly, as mentioned above, this globe rotates around its own axis every 24 hours, which is different from our planet that spins around its own axis in 23h and 56 minutes ((4*365)/60 =~24). This means that the globe will be off with 4 minutes each day and will need to be reset once in a while. I would suggest that this is needed every second week or so, when the globe will be close to an hour wrong. Overall, this whole model will never be more than an nice approximation for a number of reasons.
Consider giving the model a boost! You should now have ended up with a fun, educational and stylish model! Please consider giving the project a boost!
Additional Notes
To make the thumbnail gif file, I changed the “source gear” to connect to the minute drive, making a full revolution of the globe to take only two hours. With the exception of a spider and a fly showing up in two attempts, this made this process much easier.
The Thumbnail GIF was filmed at night in a dark room with the LED lamp as the only source of light against a black background. In normal use it will look less impressive but still really nice.
To make the globe from scratch, I used multiple available globe models as reference when drawing the land area.
Do not leave the globe in a sunny window. I had the base warp a little once.
If the globe struggles to rotate, try a new battery first before looking for other issues.
Please enjoy this build!

Gostou deste modelo? Crie uma conta grátis para salvar seus favoritos e voltar a eles depois.
Criar conta