Você está no 3DFinder
Buscamos em Thingiverse, MakerWorld e Printables ao mesmo tempo para te dar o melhor de cada uma.
Descrição
Summary
This is a set of picture frames using the infill patterns in Bambu Studio as the internal designs. These frames are for standard 4" x 6" (10 cm x 15 cm or 102 mm x 152mm) or 5" x 7" (13 cm x 18 cm or 127 mm x 178 mm). The frames are designed to sit upright on a desk (either horizontally or vertically). You can hang the frames as is due to their “hollow” nature but if there is interest in developing a specific hanging feature on the frames I can certainly do that.
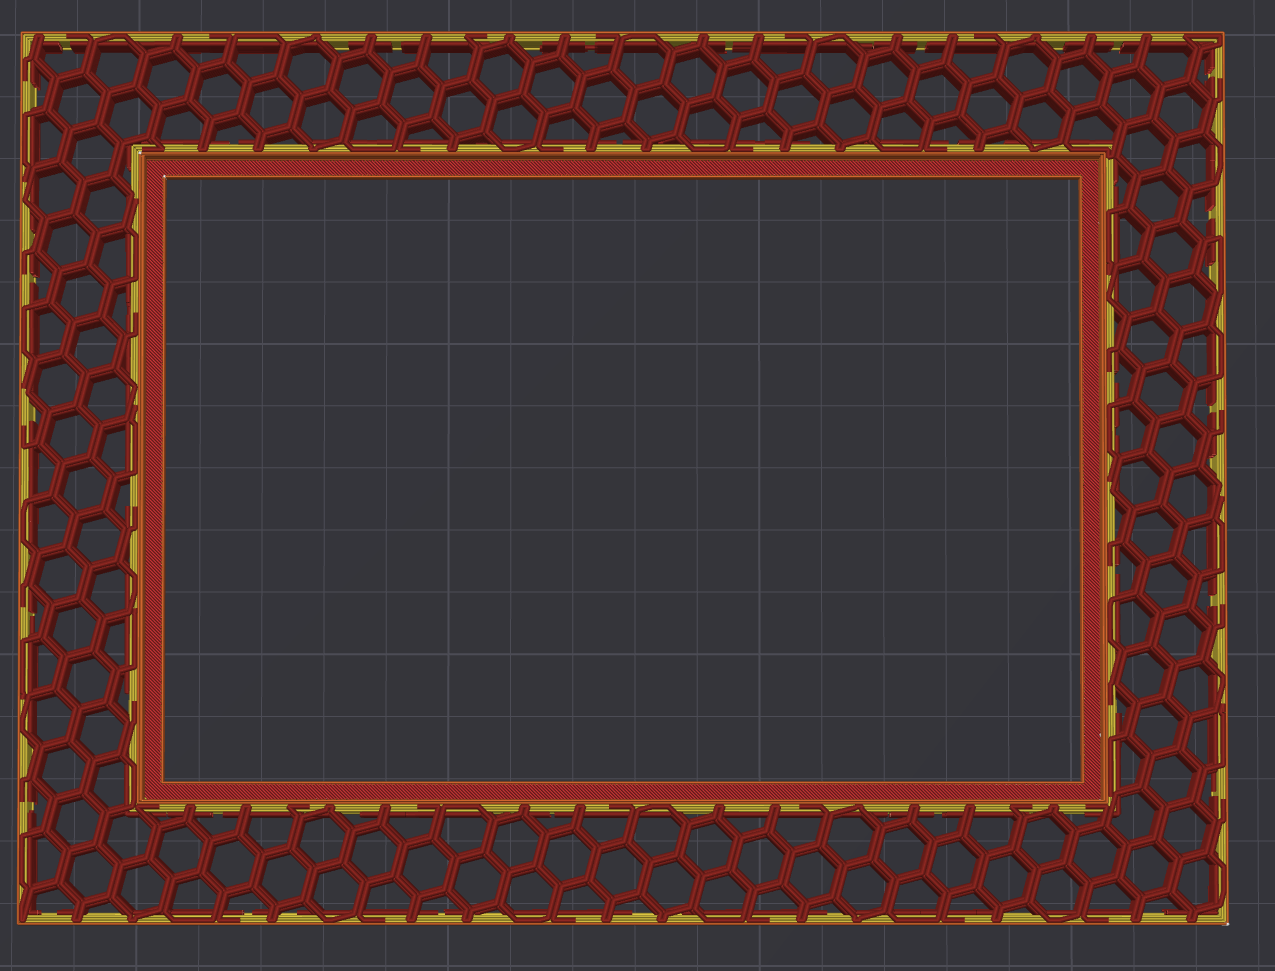
I've uploaded 3 print profile: One with 4x6 frames, One with 5x7 frames, and One for A1 Mini users with 4x6 frames. Please note the name of each profile to make sure you select the one you want. I have also added step files. Each profile has 8 plates. The first 7 plates are frames with different infill patterns. I've named the plates in Bambu Studio for easy identification but I've also listed the plate number and corresponding infill pattern below. The infill patterns are the same for each print profile. I've added photos at the bottom of the post showing an approximation of what each infill pattern looks like. The 8th plate is the "back plate" that holds the picture in place and the “kickstands” that allow the frame to sit on a desk.
- Honeycomb (NOTE there is a difference between honeycomb and 3D honeycomb). Honeycomb is the standard hexagon pattern everyone is used to seeing.
- Archimedean Chords
- Gyroid
- Hilbert Curve
- 3D Honeycomb (Again, different from honeycomb)
- Octagram Spiral
- Triangle
- Backplate and Kickstands
Assembly
- Install the kickstand before you place the back plate in the frame.
- The kickstands are specific for setting the frame vertically or horizontally. They have both a “B” marking the bottom of the kickstand that sits on the desk and either an “H” for horizontal orientation or “V” for vertical orientation. The best way to install the kickstands in the back plate is to place the backplate on a counter or desk with the back plate text facing up. Then push the appropriate kickstand through the slot in the back plate. The fit is tight to ensure it does not come apart. I'd recommend a small amount of glue but this isn't necessary.
- In order for the back plate to mate properly with the kickstands it also needs to be installed according to the writing on the back. Orient the back plate so the “Horizontal Top” or “Vertical Top” matches how you want to display the photo.
- The back plate has text written on the back of it. You install the non-text side against the picture with the text side visible from the back.
- The back plate can then be worked into place to mate its outer tabs with the indentations in the frame. This fit is somewhat tight so it does not come out. I made the back plate thin enough so it can flex. I find the best way to put it in the frame is to insert one side in the frame, bend it slightly along the vertical orientation so the other side clears the frame edge, then insert the second side.
Printing Notes
- Updated Feb. 6 2024: I have slowed down most of the printing speeds after some good community feedback. Some prints are showing unwanted artifacts in the infill. I believe this is because standard print profiles are designed to go quickly where printed material won't be seen (ie. the infill). As a result, the print speeds, retraction settings, and acceleration are not tuned for visible infill and leave unwanted material when the print head moves around. In my further testing the slower speeds along with quality, dry filament fixed this problem. I also found Bambu Filaments printed the best (not a plug for Bambu, just my experience). Feel free to speed up the prints if you would like in the Global settings but this is what I have found to work the best.
- You don't need to print both kickstands, just the one you want to use with the correct orientation. The Vertical Kickstand is slightly longer or you can look under plate 8 in Bambu Studio and see which one is marked with an “H” or a “V” and delete the one you don't want.
- I selected the infills that looked best to me and set them with densities between 10 and 20% depending on what I thought looked best. If you want to use a different infill or change the density you can certainly do that. Just select the appropriate plate, then select the Objects button in the Process tab of Bambu Studio. Scroll down to the proper plate and then select all 4 of the “generic cubes” for that plate. You can select all 4 at once using “command + click” or “control + click”. Go to the Strength tab under the printing settings and select your infill or density.
- Regarding the A1 Mini profile: I don't have a Mini so I have not tested these. If you print from this profile on an A1 Mini please let me know how it goes so I can make changes if necessary. I have printed the files on a P1S and the results were great.
- All of the my test prints were printed on a P1S in standard PLA from various manufacturers.


Infill Pattern Picture Frames

Publicado em 26 de jan de 2024