Você está no 3DFinder
Buscamos em Thingiverse, MakerWorld e Printables ao mesmo tempo para te dar o melhor de cada uma.
Descrição
MINI ARCADE 100% CUSTOMIZABLE
Here’s a project I’ve put a lot of time and love into, as I wanted it to be as perfect as possible and a unique display piece for everyone. Designed so you don’t need supports, and it prints super fast.
Its design is inspired by the arcade machines we spent hours on as kids: alone or with friends, always having fun. With so many models, colors, and themes, it’s impossible to pick just one. That’s why I created a Mini Arcade 100% CUSTOMIZABLE: combining controller types and soundbars results in over 140 different configurations.
Currently available in two sizes:
- 100% Size: 160 x 80 x 85 mm.
- 75% Size: 120 x 60 x 63.75 mm.
NOTE: Smaller sizes may affect print quality and remove details.
How are so many combinations possible?
Let me get a little mathematical—don’t worry, I won’t debate Poincaré:
- 3 controller models, switchable for left/right-handed users: 3 × 2 = 6.
- 3 speaker styles, placeable top/bottom per your design: 3 × 2 = 6.
- 2 positions for game banners/titles: 2 × 1 = 2.
- 2 options for coin slots (with or without): 2 × 1 = 2.
Total combinations: 6 × 6 × 2 × 2 = 144 possible setups.
However, adding custom side panels, titles, and screens pushes numbers toward infinity. Think about it: no two Mini Arcades will look alike; each will showcase unique colors, art, and geeky touches. At this point, arithmetic surrenders: 144 × ∞. Console result: Syntax Error… Better to accept that it trends toward infinity and keep playing!
Jokes aside, I’m designing more to expand combinations. Imagine over 1,000? We’d need 5 more controllers and speakers to hit exactly 1,024. If you have design suggestions, comment below or DM me; I’ll read all to make your Mini Arcade 100%... No... 200% CUSTOMIZED.
How to design side panels, screens, and titles?
Designing side panels is simpler than it seems:
- Open the template in Google Docs. (Downloading causes issues; edit online). [LINK]
- Click File ► Make a copy. You’ll have an editable doc in your Drive.
- Paste your best images onto the document and position them over the Mini Arcade’s bezel.
- Send images to the back. Repeat for the second panel.
- Upload your screen image, place it front-center, and scale it in the screen area. (Base size supports 16:9 or 4:3).
- Repeat for the logo/title/banner.
- Print on regular paper, cut out, and glue with stick glue. (Liquid glue + ink = disaster).
NOTE 1: Don’t stress perfection, you’ll trim later.
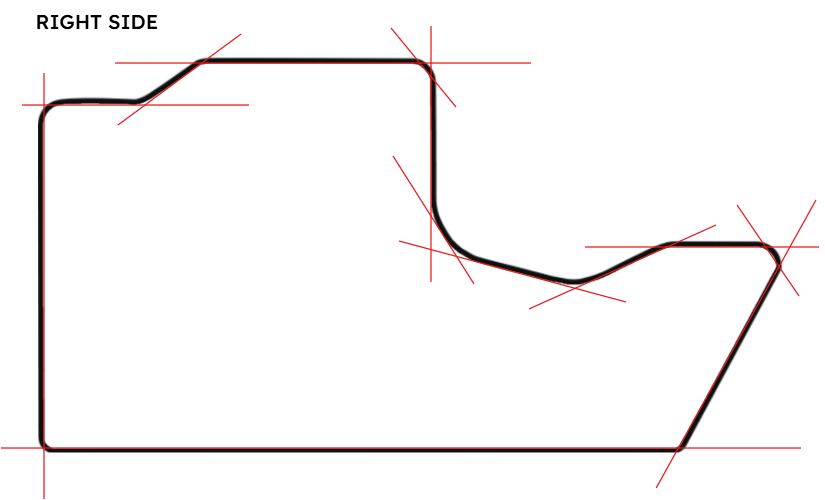
NOTE 2: Cut side images along the inner outline (see image below).
Cutting reference image:
Step-by-step tutorial: [LINK]
Potential issues and fixes:
- Parts don’t fit: Calibrate XY offset. Print the correct version. Parts of the 100% model won’t fit into the 75% model (and vice versa).
- Parts won’t stick to the bed. Clean your bed—this isn’t a model issue.
Speaker lines missing in slicer: Don’t scale below 75%, enable Arachne mode, or reduce XY offset.
Filaments used:
100% Size:
Black: Anycubic PLA Basic
Orange: Bambu Lab PLA Mate
75% Size:
Orange: Bambu Lab PLA Mate
Blue: Bambu Lab PLA Mate
Closing thoughts
Once printed, all feedback, positive or negative, is pure gold to refine future models.
Now, let me pause: THANK YOU, THANK YOU, A THOUSAND THANKS. This is my FIRST contest entry, and knowing you chose to print it fuels my creativity. Thanks for your time, filament, and patience with my layers.
HAPPY PRINTING!!
No AI was used to create this model, it was made from scratch in Fusion360. Support creators who dedicate time to original designs. Thank you.

Gostou deste modelo? Crie uma conta grátis para salvar seus favoritos e voltar a eles depois.
Criar conta