Você está no 3DFinder
Buscamos em Thingiverse, MakerWorld e Printables ao mesmo tempo para te dar o melhor de cada uma.
Descrição
This compact and efficient DIY teleprompter is powered by a Raspberry Pi 3B+, making it a fully standalone system. It features a built-in screen to display scrolling text and connects to a standard mouse for easy control. Designed for portability and simplicity, this teleprompter is perfect for content creators, educators, and remote presenters. The transparent acrylic enclosure ensures clear eye contact with the camera while reading scripts smoothly. Just power it up, load your script, and you're ready to record with confidence — no additional devices required.
It makes a webpage where you can upload your .txt files or even write them in the page directly.
Instructions are below.
If you have any questions, feel free to ask them in the comment section!
Thanks ^_^
Setting Up the DIY Teleprompter with Raspberry Pi
1. Installing the Operating System
First, you need to install the operating system called Raspberry Pi OS using an application that writes the OS image to the microSD card — this application is Raspberry Pi Imager.
In the program, you must select:
- The model of your Raspberry Pi,
- The operating system to be installed,
- And the microSD card that will be used with the Raspberry Pi.
Once you click “Continue,” enable SSH (Secure Shell). This is a remote management protocol that allows users to control and modify remote servers over the internet using a username and password.
The default username configured is “pi”, and the password is “raspberry” (these are Raspberry Pi's default credentials).
You should also configure internet connectivity via WLAN by entering the SSID (name) of the Wi-Fi network you want to connect to, along with the password for that network.
Once the loading bar completes, insert the microSD card into the Raspberry Pi and power it up. This will install all the files from the microSD onto the Raspberry Pi and start the operating system correctly.
2. Accessing the Raspberry Pi via SSH (Windows)
To access the Raspberry Pi from a Windows PC using SSH, open the Command Prompt (CMD) and enter the following command:
ssh username@ip_address
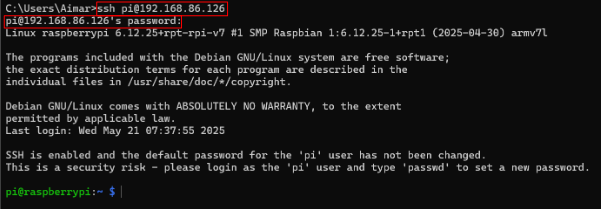
In this case, the username is “pi” (configured earlier).
It will then prompt for the password. For security reasons, nothing will appear while typing the password. After typing it, press Enter to gain remote access to the Raspberry Pi.
Programming the Teleprompter Software from Scratch
The software was developed from scratch using the Raspbian operating system, with Python and HTML as the main programming languages.
Since one of the languages used is Python, the latest version was installed using the terminal with the following commands:
sudo apt update sudo apt install python3 idle3
3. Creating the Script Files
Next, you need to create two files using the nano command with the following structure:
nano FileName.Extension
In this case, the files are named Teleprompter.py and Upload_server.py:
nano Teleprompter.py
This command will open a text editor window where you can enter the code shown later in the documentation. Once you're done, press Ctrl+O to save the file, then Enter, and press Ctrl+X to exit.
Repeat the process for the second file:
nano Upload_server.py
Again, use Ctrl+O to save and Ctrl+X to exit.
You can reopen any of these files at any time using the same nano command.
Programming the files of the Raspberry
1. Teleprompter.py
You have to paste on this document everything that contains the next link
2. Upload_server.py
You have to paste on this document everything that contains the next link
Assembly instructions and more → There are 2 PDF files uploaded (Spannish and English version)
There is also a Fusion 360 file for the ones who love customizing things, thanks in advance!

Gostou deste modelo? Crie uma conta grátis para salvar seus favoritos e voltar a eles depois.
Criar conta