Você está no 3DFinder
Buscamos em Thingiverse, MakerWorld e Printables ao mesmo tempo para te dar o melhor de cada uma.
Descrição
Disclaimer: The design is not the best (supports are not so sturdy) and I'm convinced that it can be so much better than this, so except some flaws. I'll be happy to read your feedback about it! And assure you read the entire guide before.
Would be cool to have your Minecraft nametag in real life? Now you can! I present to you:
A fully modular minecraft nametag!
I through it would be cool to have my nametag on my head like a real MC player, so I just did a simple one. It was almost perfect, the only problem was that the name it had would remain that for forever.
This version resolve this problem, with completely swappable letters, symbols and numbers in every order you want! You can even choose to have the name to only one side (use case: hang it on the wall) or two side (use case: put it in your head).
But for obtaining the best result, you need to have some requirement and do some little math calculations. So let's get started!
- Make sure that your printer is doing well in printing, mostly on bed adhesion and correct dimensions.
- Make sure that your filament is doing OK too! (Good quality PLA is reccomended)
For the first requirement, I'll put a plate on the main profile for test if your printer is able to do so. If not, try these solutions:
- For bed adhesion:
- clean your bed plate properly, and do it accordingly to the bambulab wiki (cause there are so many types out here)
- If this doesn't resolve the problem, try to enable brim. However, This solution is not the best and can cause other minimal problems, like little residue of brim completely attached to the finished print for example.
- For tolerance problems:
- Try to do all the recommended calibrations for these types of problems, cause that can happen for more reasons than one.
- If this doesn't resolve the problem, reduce the dimension of the supports (the tiny bars that connect every character). Click on them, and instead of 100%, put 99% of the size and retry until you are able to insert the support on the characters. Remember that it is the best when there is some friction (not too much) when doing so, because if it's totally free when inserting it, it will cause every character fall apart when the nametag would be moved. That is, however, not a problem if you plan to put it in a place where it will be standing here and nothing more.
Now you should be ready for making your first name! (or phrase, maybe)
Now, if you have AMS, ensure that you select the “AMS profile”, otherwise select the “manual color change” that will pause the printer at a specific layer for changing filament.
If you have an A1 mini, select the corresponding profile you need, AMS or manual color swap.
For H2D there is a generic profile that got everything set up except for color swap, cause it's different from the others. Feel free to publish a better profile.
I talked before about some math to do. Nothing too complicated, but this ensure to get the perfect length for the supports based on what you want to write.
Let's explain this with an example. Bob want to make a nametag with his Minecraft name BobLikesMC!
This name has 4 uppercase letters, 6 lowercase letters and a symbol. With that information, you observe this table i just made:
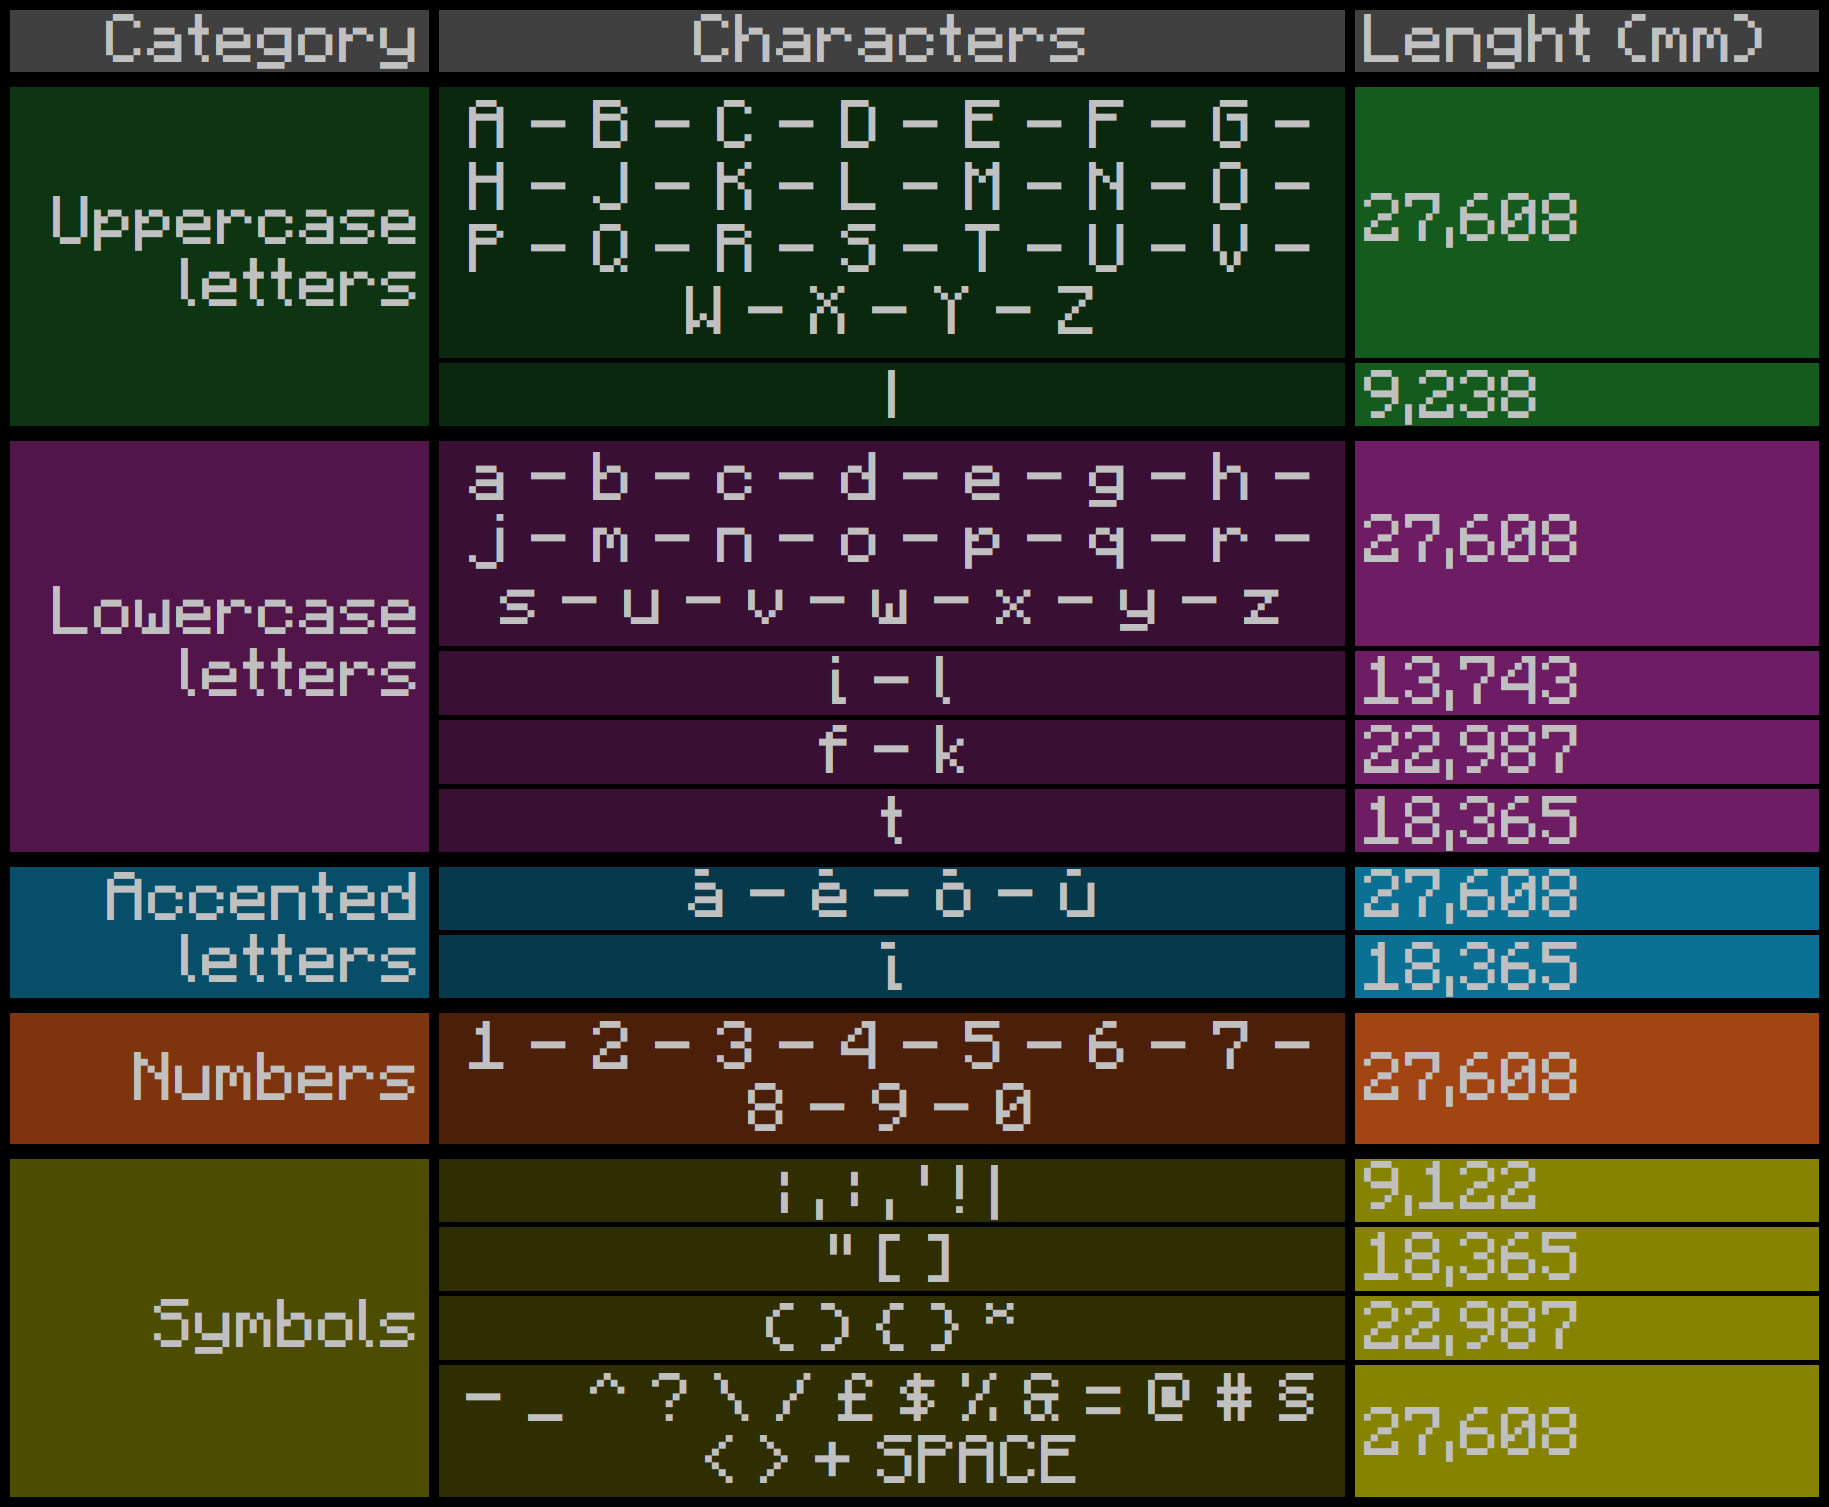
This table contains all the length of every single tile. This is needed for making the supports with the right dimensions. Now let's check how much every character of the name measure:
- B → 27,608 mm;
- o → 27,608 mm;
- b → 27,608 mm;
- L → 27,608 mm;
- i → 13,743 mm;
- k → 22,987 mm;
- e → 27,608 mm;
- s → 27,608 mm;
- M → 27,608 mm;
- C → 27,608 mm;
- ! → 9,122 mm.
That's a lot of numbers! But you just need to sum every one of them, which in this case it result in 266,716 mm.
Now if you have a 256 x 256 x 256 bed you can just put it diagonal, but if you have the a1 mini you can do more than one support (instead of two of 266,716 mm, you'll do four of 133,358 mm).
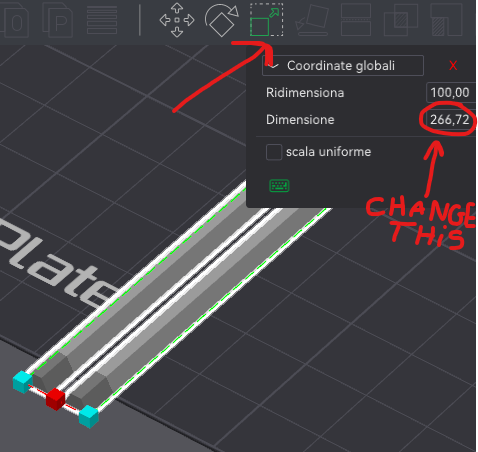
Now take the support you need, for a name on two sides, pick up the double side supports, otherwise the single side are the choice. After that, resize the supports, uncheck the “Uniform scale” check box, and change the x value to the result you got before (in this case, Bob will put 266,716 mm)
I strongly suggest to you to print the supports alone before everything else, because there are more complex to print and if they fail while printing, you don't lose the tiles too.
After that, Pick up all the tiles you need by copying and pasting them on the main plate (if there isn't space for every tile, just do more than one print).
The settings are already set up automatically, but just in case here they are:
- For the tiles, 15% infill gyroid, 2 walls, 0.2 mm height, no support, brim only external if warping problems persist;
- For the supports of the tiles, 100% infill, 2 walls, 0.2 mm height, no support, brim only external if warping problems persist.
After that, you should be ready to finally print! Again, the system is not so nice and it can be improved surely, I'll listen to all of your feedback for making it better and for seeing your creations.
The font is F77 Minecraft by 123467 in case you want it for some other things.
Thank you for taking your time into this design! I hope that your output result will be as excepted!

Gostou deste modelo? Crie uma conta grátis para salvar seus favoritos e voltar a eles depois.
Criar conta