Description

If you want to sell prints of this model, as well as all of my models - future and past
Subscribe to My Patreon:

Or Subscribe for a commercial License Directly in Maker World:

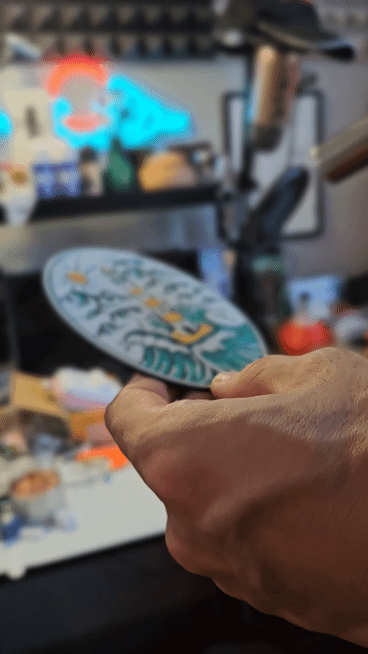
Eeveelution Coaster Set ⚡🔥✨
Level up your tabletop with this vibrant Eeveelution Coaster Set! This collection features three iconic, stylized designs inspired by Jolteon, Sylveon, and Flareon—each one bursting with personality and color. Whether you’re a fan of electric, fairy, or fire types, these coasters bring a playful yet functional touch to any space.
This set marks my second attempt at creating a themed coaster collection, and I’m thrilled with how much better it turned out compared to my first try (which only saw one model released). The most notable upgrade: the borders now stand about 1mm higher than the image surface, offering improved spill protection and a more premium feel—definitely a step up from my previous coaster designs.
Each coaster captures the essence of a beloved Eeveelution:
- The sharp, energetic patterns and bright yellow tones channel Jolteon’s electric spark ⚡
- Soft pastels and swirling ribbons evoke Sylveon’s magical fairy charm ✨
- Bold reds and fiery accents bring out Flareon’s warm, blazing personality 🔥
Perfect for trainers, collectors, or anyone who wants to add a dash of nostalgia and style to their home. Gotta catch ‘em all—before your drinks leave a mark!
USE A LIGHTER! - a quick pass with a torch on the printed parts will get rid of the inevitable stringing that comes with this type of models.
Print at 100% infill with a layer height of 0.08mm with a base layer of 0.16mm
Color Pallete for the full set:
Print at 100% infill with a layer height of 0.08mm with a base layer of 0.16mm
Filaments Used Jolteon:
PLA KINGROON Yellow Transmission Distance: 6 / Amazon
PLA KINGROON Black Transmission Distance: 0.4 / Amazon
PLA Anycubic Pantone Interstellar Violet Transmission Distance: 1.9 / Amazon
PLA Anycubic Bright White Transmission Distance: 2.3 / Amazon
Swap Instructions Jolteon:
Start with Yellow
At layer #10 (0.89mm) swap to Black
At layer #12 (1.05mm) swap to Interstellar Violet
At layer #17 (1.45mm) swap to Yellow
At layer #23 (1.93mm) swap to Bright White for the rest.
Filaments Used Sylveon:
PLA Jayo Pink HS Transmission Distance: 4.8 / Amazon
PLA KINGROON Black Transmission Distance: 0.4 / Amazon
PLA Anycubic Pantone Interstellar Violet Transmission Distance: 1.9 / Amazon
PLA+ Jayo Mint Green Transmission Distance: 4.5 / Amazon
PLA Anycubic Bright White Transmission Distance: 2.3 / Amazon
Swap Instructions Sylveon:
Start with Pink HS
At layer #10 (0.89mm) swap to Black
At layer #13 (1.13mm) swap to Interstellar Violet
At layer #15 (1.29mm) swap to Mint Green
At layer #18 (1.53mm) swap to Pink HS
At layer #24 (2.01mm) swap to Bright White for the rest. (ASSIGN TO SLOT 2 (Black) SINCE 1 WILL BE USED TWICE)
Filaments Used Flareon:
PLA BambuLab Basic Orange Transmission Distance: 5
PLA KINGROON Black Transmission Distance: 0.4 / Amazon
PLA Bambu Basic Cocoa Brown Transmission Distance: 0.4
PLA KINGROON Yellow Transmission Distance: 6 / Amazon
PLA Anycubic Bright White Transmission Distance: 2.3 / Amazon
Swap Instructions Flareon:
Start with Orange
At layer #10 (0.89mm) swap to Black
At layer #13 (1.13mm) swap to Cocoa Brown
At layer #15 (1.29mm) swap to Orange
At layer #19 (1.61mm) swap to Yellow
At layer #28 (2.33mm) swap to Bright White for the rest. (ASSIGN TO SLOT 2 (Black) SINCE 1 WILL BE USED TWICE)
How to do more than 4 colors on a single AMS?
To use more than 4 colors with a single AMS is pretty simple when it comes to my models.
Always start the print from either Bambu Studio or Bambu Handy App - This will allow you to map the rolls of filaments to a certain slot in the AMS:
Now map the first 4 colors (which should already be inserted in the AMS to Slots 1 - 2 - 3 - 4
Once thats done move to maping colors 5 - 6 - 7 - 8 to respectively AMS Slots 1 - 2 - 3 - 4 again!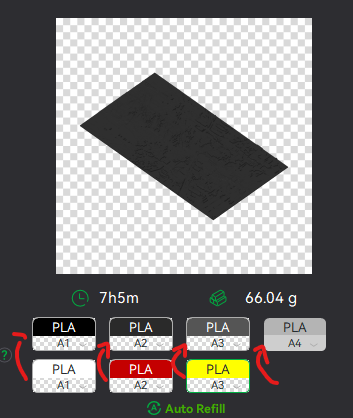
This will allow you to Change the rolls of filament once the printer is done with that color.
For example, in the picture above once we are done with the Black color (Which is usually first) we are going to remove the black roll (you can do that while printing) with White, then once Charcoal Black is done we are going to change that to Red, Dark Gray to Yellow and we are done. ~ You can do that with as many colors as you need!
YOU CAN PLACE A PAUSE ON THE LAST LAYER OF COLOR 4 TO AVOID HAVING TO BABYSIT THE PRINTER. ONCE PAUSED CHANGE 1-2-3 WITH 5-6-7 AND RESUME. IF YOU NEED MULTIPLE PAUSES YOU CAN DO THAT TOO
Drop me a follow!🤜🤛
