Você está no 3DFinder
Buscamos em Thingiverse, MakerWorld e Printables ao mesmo tempo para te dar o melhor de cada uma.
Descrição
I wanted to make a word clock but the models I could find were too big for my printer and I had trouble finding a 72 leds/meter ledstrip for a reasonable price so I designed my own.
The front should be printed in a light filament that lets through the led light. There is a pause after 2 layers to swap to a darker filament. (I'm not sure how much light gets blocked if you print the whole thing in a light filament)
Everything is sliced for a .4mm nozzle, the letters in the front may benefit from the higher resolution of a .2mm nozzle though.
Parts
- 1m of 144 leds/m WS2812 led strip (eg [https://aliexpress.com/item/1005005824150092.html](https://aliexpress.com/item/1005005824150092.html))
- a wemos d1 mini microcontroller
- Some thin wire (I used 30awg) + tools for soldering
- 6 m3 screws, any short length will do (I used 8mm)
- Optionally 2 m2 (4mm length) screws for fastening the wemos but you can probably also use m3 or tape for this
- Optionally dupont wires to connect the leds and the microcontroller
This should total to about 10 euros or less
Software
- Download or clone this repository [https://github.com/lorgan3/Multilayout-ESP-Wordclock/tree/en-11-12](https://github.com/lorgan3/Multilayout-ESP-Wordclock/tree/en-11-12).
- You need vscode with the platformio extension. Connect the microcontroller to your pc and flash the firmware using platformio.
- Once powered on, a word clock network should appear. Connect to it and connect it to your local network.
- Now connect to its ip address using a browser (use http) and change the following settings in view options:
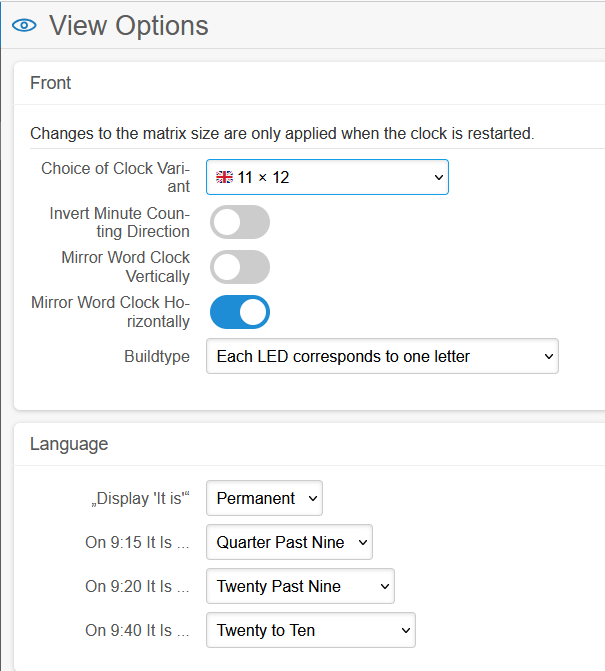
Building instructions
- Cut the led strip in sections of 12 leds and attach them to the frame like in the picture (You'll have 1 section of 12 leds left over).
- Solder all the ends together in series like in the picture. (This is difficult, I struggled with some shorts here. Consider using a multimeter while soldering to make sure the connections are ok).
- (Make sure it works by flashing the software and connecting the microcontroller, see step 6)
- Glue the mesh either to the back of the top or on top of the leds.
- Screw the top to the bottom and the frame.
- Connect the leds to the microcontroller: 5v to + on the leds, ground to - on the leds and RX to data on the leds.
- Screw/glue the microcontroller to the lid and snap it onto the box.
Compact word clock (a1mini compatible)

Publicado em 11 de mai de 2025
Gostou deste modelo? Crie uma conta grátis para salvar seus favoritos e voltar a eles depois.
Criar conta