Você está no 3DFinder
Buscamos em Thingiverse, MakerWorld e Printables ao mesmo tempo para te dar o melhor de cada uma.
Descrição
Addons (There are 30+ Remixes that add new functions to the Riser. Here are some listed, including third-party ones.)
 |  |  |  |
 |  |  |  |
It's done!!! All Parts printed and assembled! I started the Riser V2 early December and changed the last Parts yesterday. There's a lot of work in this design, so many small and big changes. Today i will start to Release the first completed picture of the Riser V2 and the Profiles of the Mainbodies. As you later can see i've seperated some Parts so that you can play around with Step Files for your own Design Fronts.
Should I print the Riser V1 or V2? Here are the differences.
- There are 2 Versions of the V1. The Standard is for 8mm Lightstrips and the 12mm Edition for 12mm Lightstrip and additionaly you can fix the Lightstrip with Cable ties.
V2 combines the Features of both V1 Riser in this Case.
I received a lot questions: Will 12mm Lightstrips fit? It can but that is not sure. It not depends only on the width. The stiffness is one big issue for the curves. Try it i cannot guarantee! There are different lightstrips on the market. - V2 is tuned more for function than design. There are additionaly Connectors for Accessories like Tools.
- Early December i began to work on V2. My intention was the big change in the Anti Glare Feature and the Connectors.
But meanwhile there where some critics on the V1. Some Makers reported a bad fitting of their Top Glas. To much loose in the Spoolholder fitting and so on. So the logical consequence was to rework many things on V2. - The Modders. I had so many Mails and Msg… can you please add Hexagons insted of Holes and so on. Because of this i reworked the Covers and seperated them for the Modders. You can now easily create your own designs on the most seen Parts of the Riser.
- The printability. Puh i don´t know how to begin exactly. Makerworld makes a lot very easy. But a project like this is not easy. It´s big, it can fail as any other Print… it can fail! But you can do a lot that the chance that it will fail is very small. You have to know your printer, your Filament, your Buildplate… The condition is not the same as i have. But it´s quite easy to begin if you have a predefined Profile.
But it´s not a Microwave, it´s a 3D-Printer, a popular and wonderfull Printer. It makes a lot easier and it´s the by far best for consumer on the marked… and nevertheless you have to know what you do. Please keep in mind!
I reworked a lot to make it even easier. Less Supports (less filament usage is everytime the best optimization!)
Tuned Overhangs especially on the back which is on the Print surface while printing Part 3 and 4. and many more changes
happy printing
Features Description
Accessories Port
New second Accessories Connector Port. The Port is redesigned an optimized. Accessories fits tighter. The Spoolholder on V1 was a bit to loose.

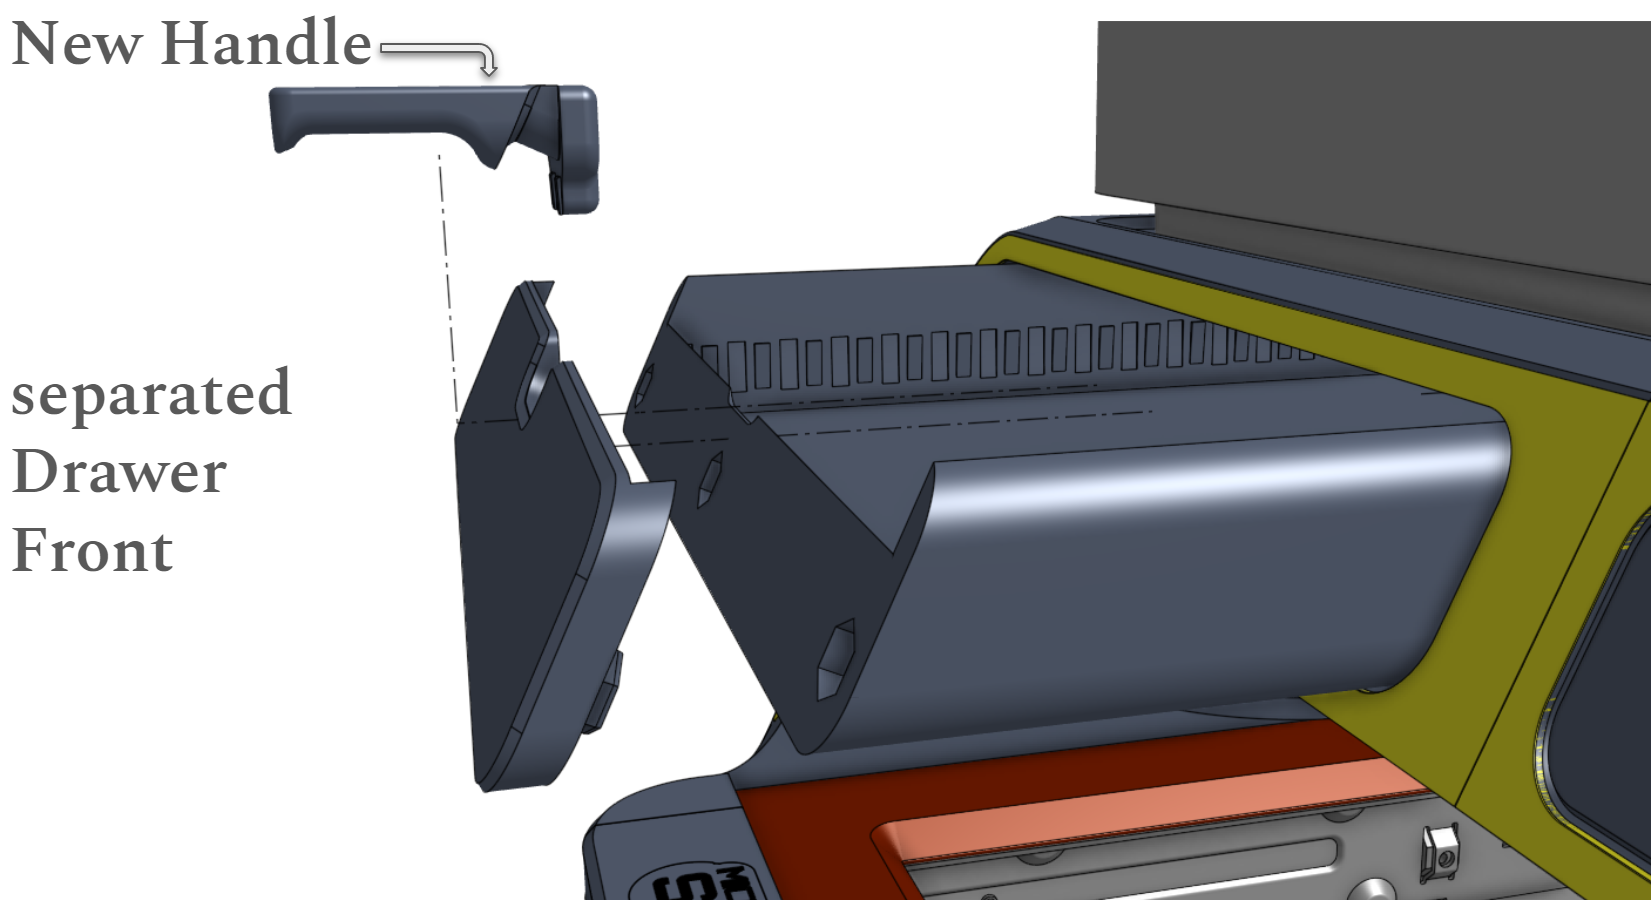
New seperated Drawer Front Cover and Handle
With the new separated Drawer Front you can create easily your own Designs and Text on it and print it upside down for best looking Surface. (STEP File of the Cover included)
The new Handle locks both Parts (Drawer and Cover) together. No Glue needed!
Compatible Inserts for the Drawer
Original Inserts & Dividers by tomtom5893
CHT Nozzle Holder by kylecasey4
New P1S Front Dash Parts with separated Cover for leave Blank or your own Design
In the Standard V2 you have a dummy for the Slot where you can mod different things like a light Switch.
The Slot for the MicroSD Card is now protected with a Cover. If you press on the lower Part of the Cover it opens. Yes it´s tricky to get the Card out, but how often you want to get it out… i recommend to use a tweezer or something else.
The Covers of Part 5 & 6 is now separated too. You can add your own designs and print it upside down. (STEP Files of the Covers included)

Light Strip integration and Anti Glare
The Lightstrip integration is fully redesigned and now combines “V1 Standard” and “V1 12mm Edition” in one sleak Design.
You now have a lot of cable tie position to safe your Printer from falling Lightstrip!
- I strongly recommend COB LED Light Strip with 8mm width. Length 2m and cutable.
- Yes you can also use 10mm or 12mm BUT beware. Most 12mm LED Strip are so stiff that it´s a mess to integrate them.
The Anti Glare Feature moved from the Mainbodies to the TPU Gasket Parts because of collisions with the PTFE Tube while printing big Parts.
Why more Light? Do i need more Light? YES i think so!
The Toolholder Connector
With this Connector you can add whatever you want to the Riser. In the First step i added the Connector for my P1S Tools Model (Get it here on Makerworld).
The Toolholder Connector is provided as a Step File as well. With this the Modding Community is able to connect whatever they want.
There are 6 Connector Ports 4 of this. 2 on the Left Side and 2 on the Right Side. There are 2 more Connector Ports on the Back in a different design. (STEP File of the Toolholder Connector included)

You can also attach a Spoolholder. Get my Version with Bearings here

The “Back Connector” is finally released. Unleash your modding ideas, perhaps for an ESP32 case that can be attached to the back?
Use one, two or even all 4 connectors for your modding idea.
(STEP File of the Back Connector included)

Where to find the "RAW Files" on Makerworld? e.g. Back Connector …
So there are 2 Options. One you can see in the folowing picture as provided by the designer you can find the Parts under “Download STL” else

Asssembling Guide
- Push Part 2 on Part 1

- Push carefully Part 3 on Part 4

- Then push carefully both Parts 3 & 4 together from the Top to the Bottom in Part 1 & 2

Assemble the Front Dash Parts

Slide the assembled front dash into the main body parts as shown in the picture.

Install the Sidepanels on both sides.

Install the light strip and secure it with cable ties.

Install the TPU Gasket

- After placing the riser on the printer, the remaining parts, such as the microSD cover or the drawer, can now be installed.
Well Done!