Você está no 3DFinder
Buscamos em Thingiverse, MakerWorld e Printables ao mesmo tempo para te dar o melhor de cada uma.
Descrição
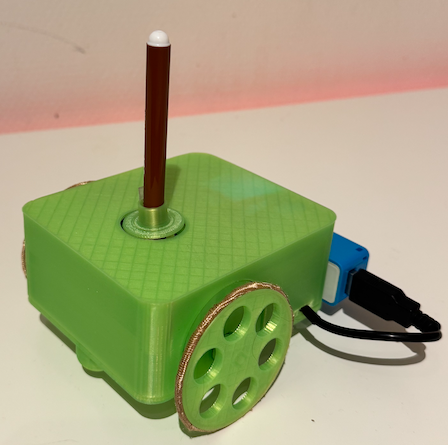
Drawing Turtlebot
*** I tried it on my floor, with a pen that washes away with water – works great! :-)
Part 1: Hardware Setup
Required Components:
- 2 × 28BYJ-48 Stepper Motors (each controlled via a ULN2003 driver)
- 1 × Hobby Servo
- 1 × ESP32-C3 Mini (with development board)
- 1 × O-Ring (~60 mm) – improves wheel traction
- 6 × M3 screws with nuts
- Jumper wires (female-female)
- Small amount of superglue (for mounting standoffs)
- Power supply (e.g., USB power bank)
- USB cable (for programming the ESP32)
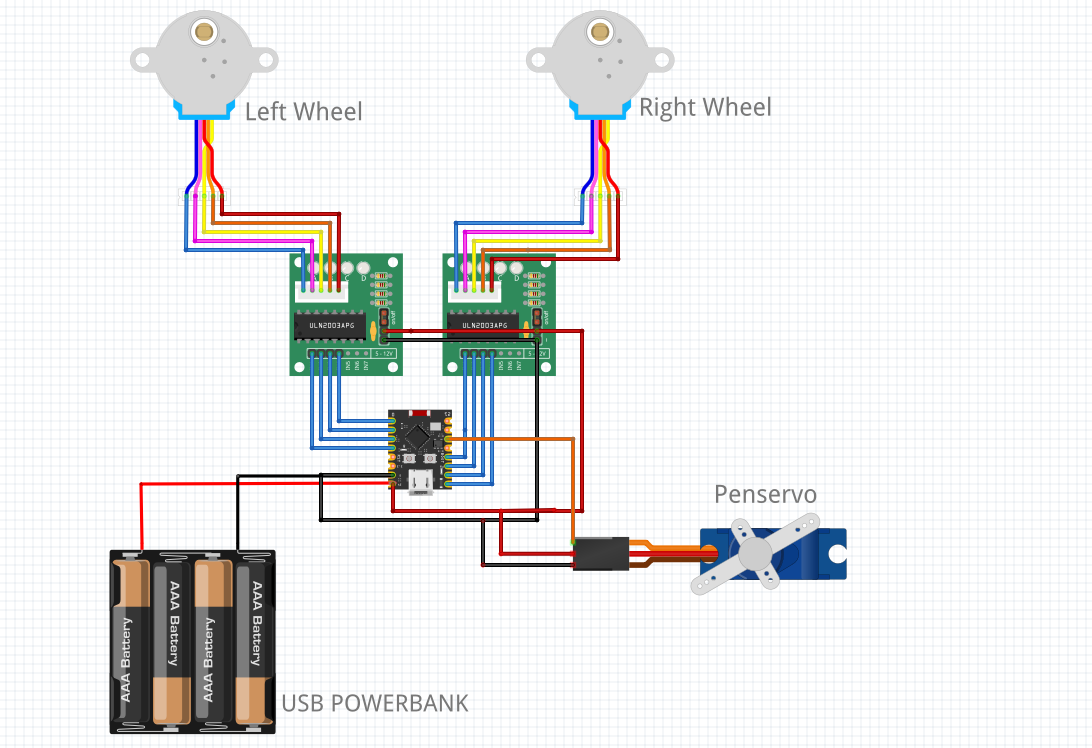
Power Connections:
- 5V: Connect the 5V output from the ESP32 dev board to the VCC pin on both ULN2003 driver boards
- Connect the servo’s red (power) wire to 5V.
- GND: Connect the ESP32 GND to both ULN2003 driver boards and the servo’s black (ground) wire.
*** Note: All grounds must be connected (common ground).
Assembly:
- Mount the motors and their drivers on the left and right side.
- Mount the servo in its holder.
- Attach the ESP32-C3 Mini to its mounting bracket.
Wiring Diagram:
Left Wheel Motor → ULN2003 → ESP32-C3 GPIO:
IN1 → GPIO 1
IN2 → GPIO 2
IN3 → GPIO 3
IN4 → GPIO 4
Right Wheel Motor → ULN2003 → ESP32-C3 GPIO:
IN1 → GPIO 8
IN2 → GPIO 7
IN3 → GPIO 6
IN4 → GPIO 5
Servo:
Signal (yellow/orange) → GPIO 10
Power (red) → 5V
Ground (black) → GND
*** Always check polarity ***
Part 2: Flashing the Firmware
To flash the firmware.bin file to your ESP32-C3 Mini:
1. Download the flashing tool and compile it using the latest Arduino IDE.
2. Download the firmware.bin file from:
[https://github.com/mikaelmoran/TurtlebotEsp32/](https://github.com/mikaelmoran/TurtlebotEsp32/)
3. After flashing the flasher tool, connect to the WiFi:
SSID: ESP32-C3-TURTLE-AP-FLASHER
Password: 12345678
4. Open a browser and go to: [http://192.168.4.2](http://192.168.4.2)
- Upload the firmware.bin file
- The device will reboot with the Turtle firmware.
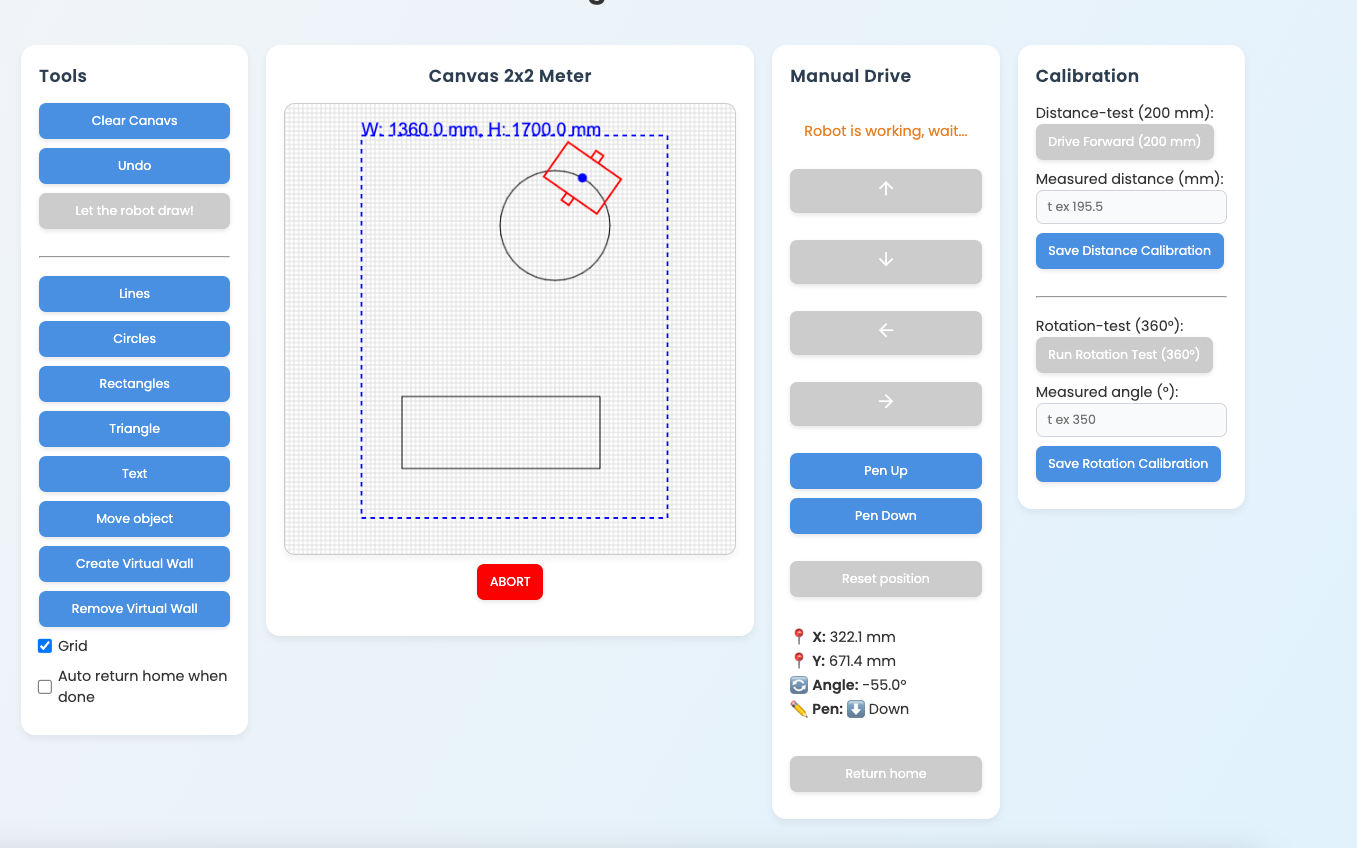
Part 3: Calibration via Web Interface
After flashing the firmware, calibration is required for accurate movement.
1. Connect to the robot’s WiFi (e.g., TurtleRobot-AP).
2. Open a browser and go to: [http://turtlebot.local](http://turtlebot.local) or use the IP shown in the serial monitor.
3. Two calibration steps are needed:
a) Distance Calibration:
- Click "Drive (200 mm) forward"
- Measure how far it actually moved
- Enter the actual distance and click "Save Distance Calibration"
- Repeat until it matches
b) Rotation Calibration:
- Click "Run Rotation Test (360°)"
- Measure the actual angle rotated
- Enter the value and click "Save Rotation Calibration"
- Repeat until accurate
Proper calibration ensures the robot can reproduce drawings correctly.
If you like it, feel free to support me with a coffee :-)

buymeacoffee.com/mikaelmoran
Pen Drawing TurtleBot with Wifi

Publicado em 30 de mar de 2025