Estás en 3DFinder
Buscamos en Thingiverse, MakerWorld y Printables al mismo tiempo para darte lo mejor de cada una.
Descripción
2025.07.15 update:
Added brim to the Wall parts where they had the tendency to warp with a slightly unclean build plate.
Warning! Connectors are a tight fit so it's extremely hard to take them out later on. Decide whether one part is going to be on the side holding up a wall or in the middle before finalizing the assembly.
Short description:
Perfect way to store and display your benchies. Features include:
- gridfinity compatibility (1x2 per unit)
- stackable
- space for 24x48mm swatch
- no supports
Detailed description:
As my Benchy collection started growing, I decided to look for a storage solution. I wanted something that would fit in gridfinity, can be stacked on top of each other but also gives freedom in how many Benchies I can have in a row. Since I didn't find anything that satisfied me, I decided to make my own.
While working on it, I've also come to realize that keeping track of what filament each Benchy is made out of becomes difficult when you start using filaments from different brands. That's why I decided to include space for a filament swatch with a label. I've used this one [https://makerworld.com/en/models/845616-filament-swatch-48#profileId-792720](https://makerworld.com/en/models/845616-filament-swatch-48#profileId-792720) as it fit the labels that I have and it's an overall nice model.
I went through several prototypes (around 5-6) fixing all the issues and optimizing the model before I reached a state I'm happy with.
Assembly instruction:
Parts used:
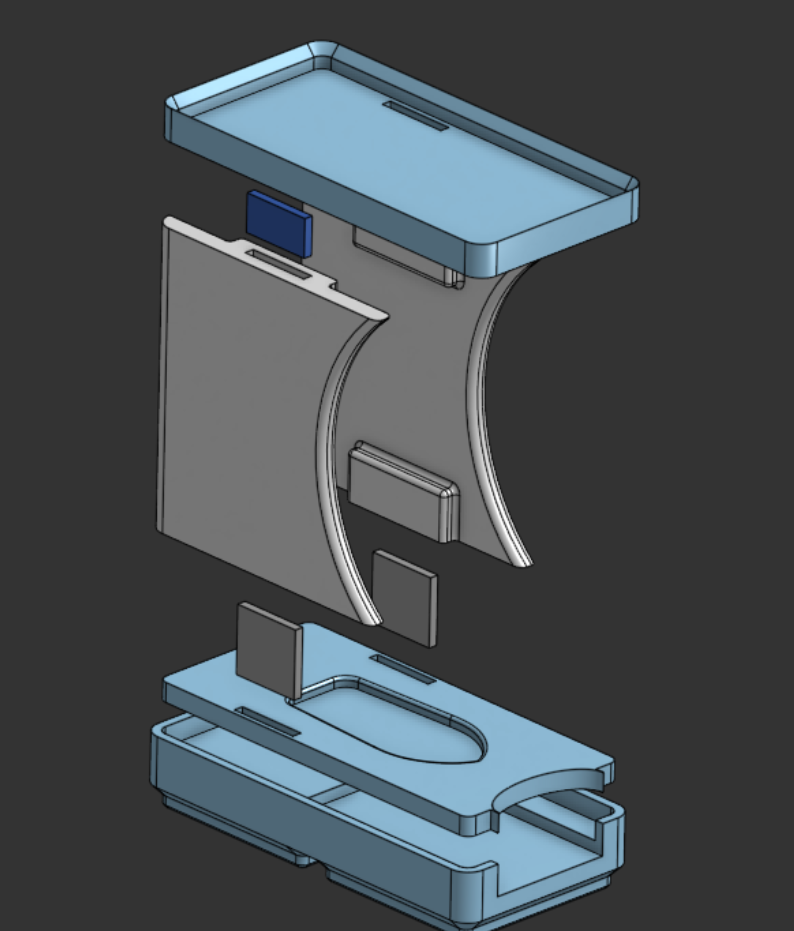
- Bottom (the one that fits gridfinity base) [1 per unit]
- Dock (the one with Benchy shape on it) [1 per unit]
- Wall (the one with big curve) [2 per set]
- Small Connector (the smallest piece) [2 per middle unit; 1 per side unit; 2 per Top]
- Big Connector (like the small one, but bigger) [1 per Wall]
- Top (can cover 1-5 units depending on which one you choose) [1 per set]
Assembly (for units that go in the middle):
- Place Dock onto Bottom.
- Place 2xSmall Connectors in the holes.
- Push them all the way in (I recommend turning the whole thing upside down and pressing it against a desk or some other solid surface).
Assembly (for units that go on the side):
- Place Dock onto Bottom.
- Place 1xBig Connector on the side that will be have wall and 1xSmall Connector on the other side.
- Push them as far as it's possible (Big one should stick out a bit and the Small one shouldn't).
- Place a Wall on top of the Big Connector and push it in.
- Place 1xSmall Connector on top of the Wall and push it in.
- Place whichever Top you chose on top of the Wall so that the Small Connector fits into the hole.
Example image for 1Unit Top assembly:
Benchy Display Unit (Stackable+Gridfinity)
Publicado el 26 de mar. de 2025
¿Te gusta este modelo? Crea una cuenta gratis para guardar tus favoritos y volver a ellos más tarde.
Crear cuenta