Você está no 3DFinder
Buscamos em Thingiverse, MakerWorld e Printables ao mesmo tempo para te dar o melhor de cada uma.
Descrição
After having used it for almost a year, I'm happy to share my “we don't need no stinkin' cloud!” smart light controller!
The intention of this project was to make a PWM light controller that could be controlled manually with a button, through an app (WLED), a WebUI from a computer, and even on a schedule if desired. Fortunately WLED enables all those things to happen, and is free!
The print itself is rather simple - mostly just black PLA with a little bit of natural if you want to use an illuminated button. The basic idea is 12V power comes in one DC jack, is fed to the buck converter so you can run the D1 Mini, which feeds control signal back to the AOD, which drives the LEDs and feeds out the other DC jack. The sides of the box are labeled “In” and “Out” so you don't accidentally blow it apart. You then wire up your LEDs with a 5.5x2.1 male connector and you're ready to rock.
PARTS LIST:
- 1x D1 Mini v3 (Ali)
- 2x 5.5x2.1 DC Jack (Amazon)
- 1x 6x6 Microswitch (Ali)
You could also use a non-illuminated 6x6x7 micro tactile switch. - 1x Mini560 (12v) / Mini560 Pro (24v) to 5V Buck Converter (Ali)
- 1x AOD4184 (Ali)
- 1ch PWM LEDs
- Power supply sufficient for your LEDs
- 5.5x2.1 Pigtails recommended
(I just cut a bunch of these in half) - Screws
- 2x M2.3x5 self-tapping screws (D1 Mini)
- 2x M1.7x5 self-tapping screws (AOD)
- 2x Wood Screws (#6 or #8 work fine)
- Consumables (wire, heatshrink, VHB tape, etc)
I actually found my switch at a local electronics shop, EPO. If you're in the Houston area, go make your patronage!
As for LEDs, I went cheap and got a spool of these 12V warm SMD LEDs which I embedded in some aluminum channel. You can use whatever you'd like though, so long as they're single channel PWM LEDs. Please make sure you match either the Mini560 (for 12V LEDs) or the Mini560 Pro (for 24V LEDs), get a power supply capable of handling them. While I don't completely trust the math that an AOD4184 can handle 2000W of power (40V 50A), I've been running my LEDs (15W, 12V @ 1.25A) without issue. You assume responsibility to take caution while evaluating your power loads!
PRINTING TIPS
I've included four different designs for buttons, using natural ("clear") PLA and plain black. One is completely clear, one has an embedded black power logo, then two are inverse of each other with a completely through logo. It takes a minute to print all four, and you can disable the ones you don't think you'd like. “Button (inverted)” is the one that generates the most material swaps.
ASSEMBLY
You can assemble all the electronics before installing it in the box. I strongly encourage testing your setup with test probes before soldering! Take extra caution throughout this project to verify the polarity of all connections!
I would suggest programming your D1 Mini first, then wiring as follows. Try to keep wiring fairly short and ensure everything is well insulated with heat shrink. I suggest laying your components out on your bench to estimate how much wire you will need - too much could clog up the insides. I took the ground feeds for every connection except the LED output and soldered them together as one big lug.
On the D1 Mini:
- Pin D1 (GPIO 5) is used to drive the AOD's “PWM” pin
- Pin D7 (GPIO 13) is used to sense the switch
- The 3.3V pin is used to provide power to the micro switch (as mine has no resistor installed and showed acceptable power draw on my power supply at 3.3v)
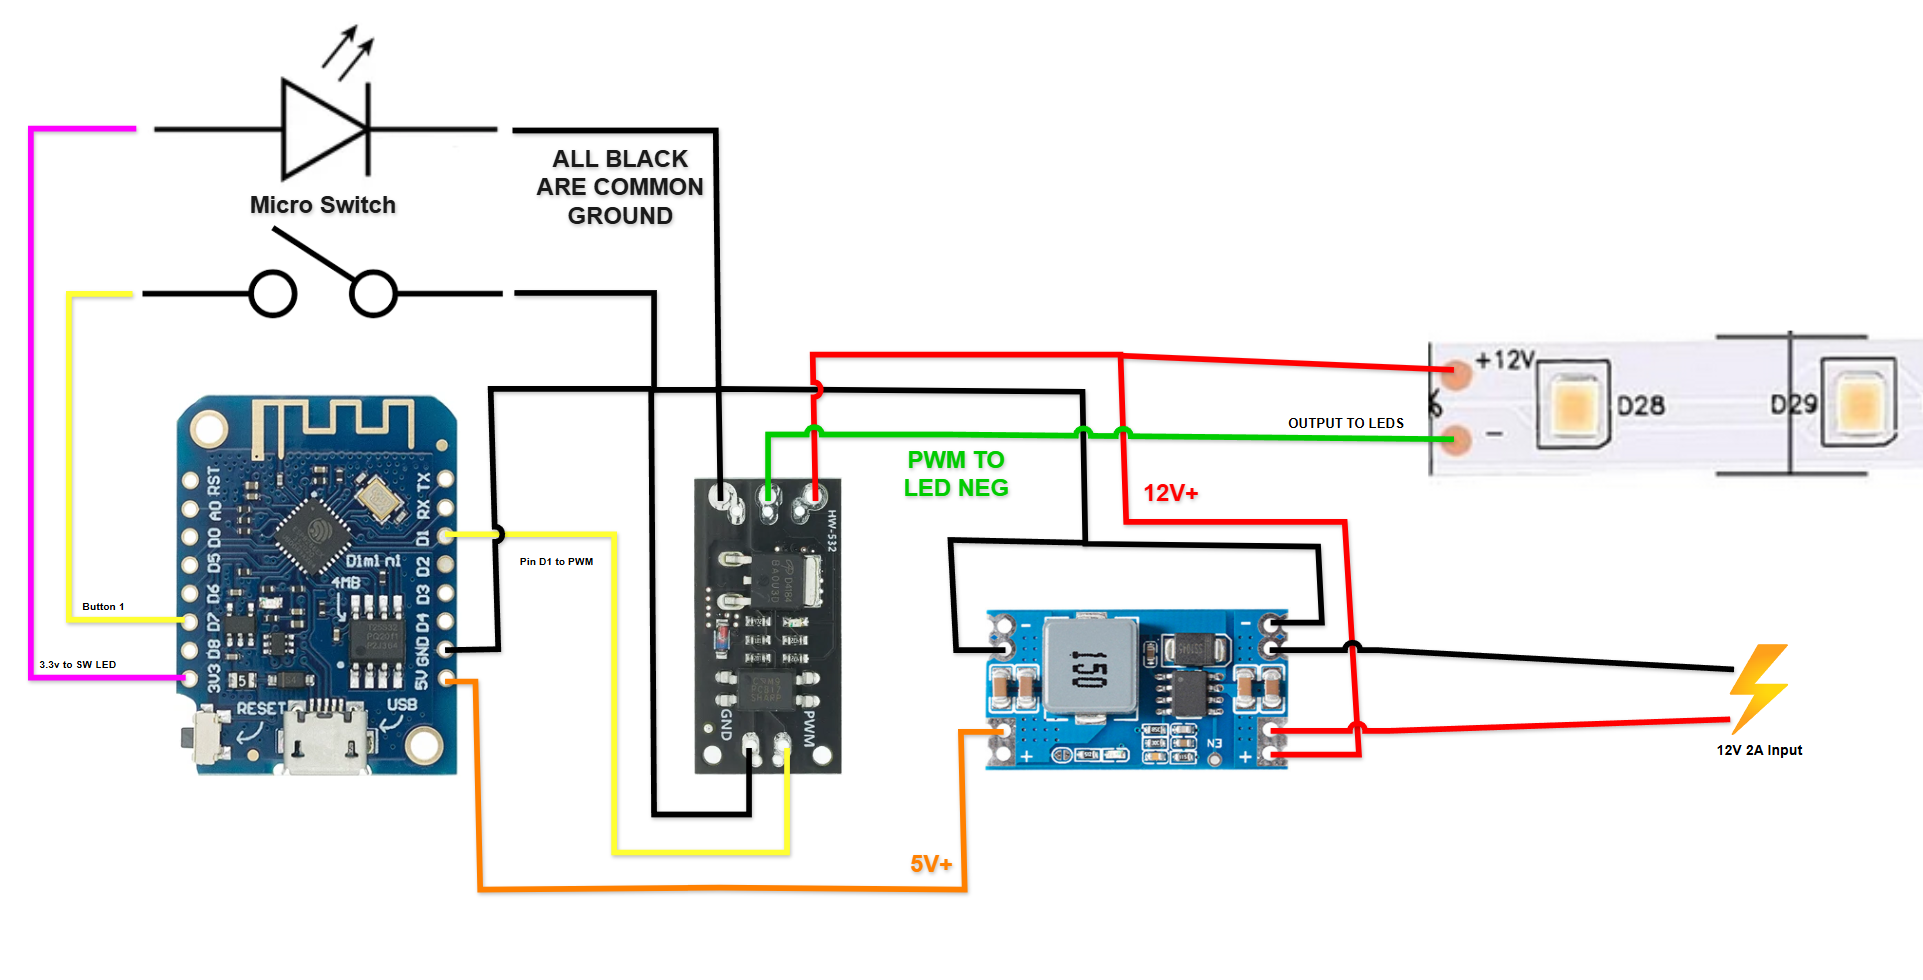
Look on the bottom of the Mini560 to verify you are using the correct side for input and output!
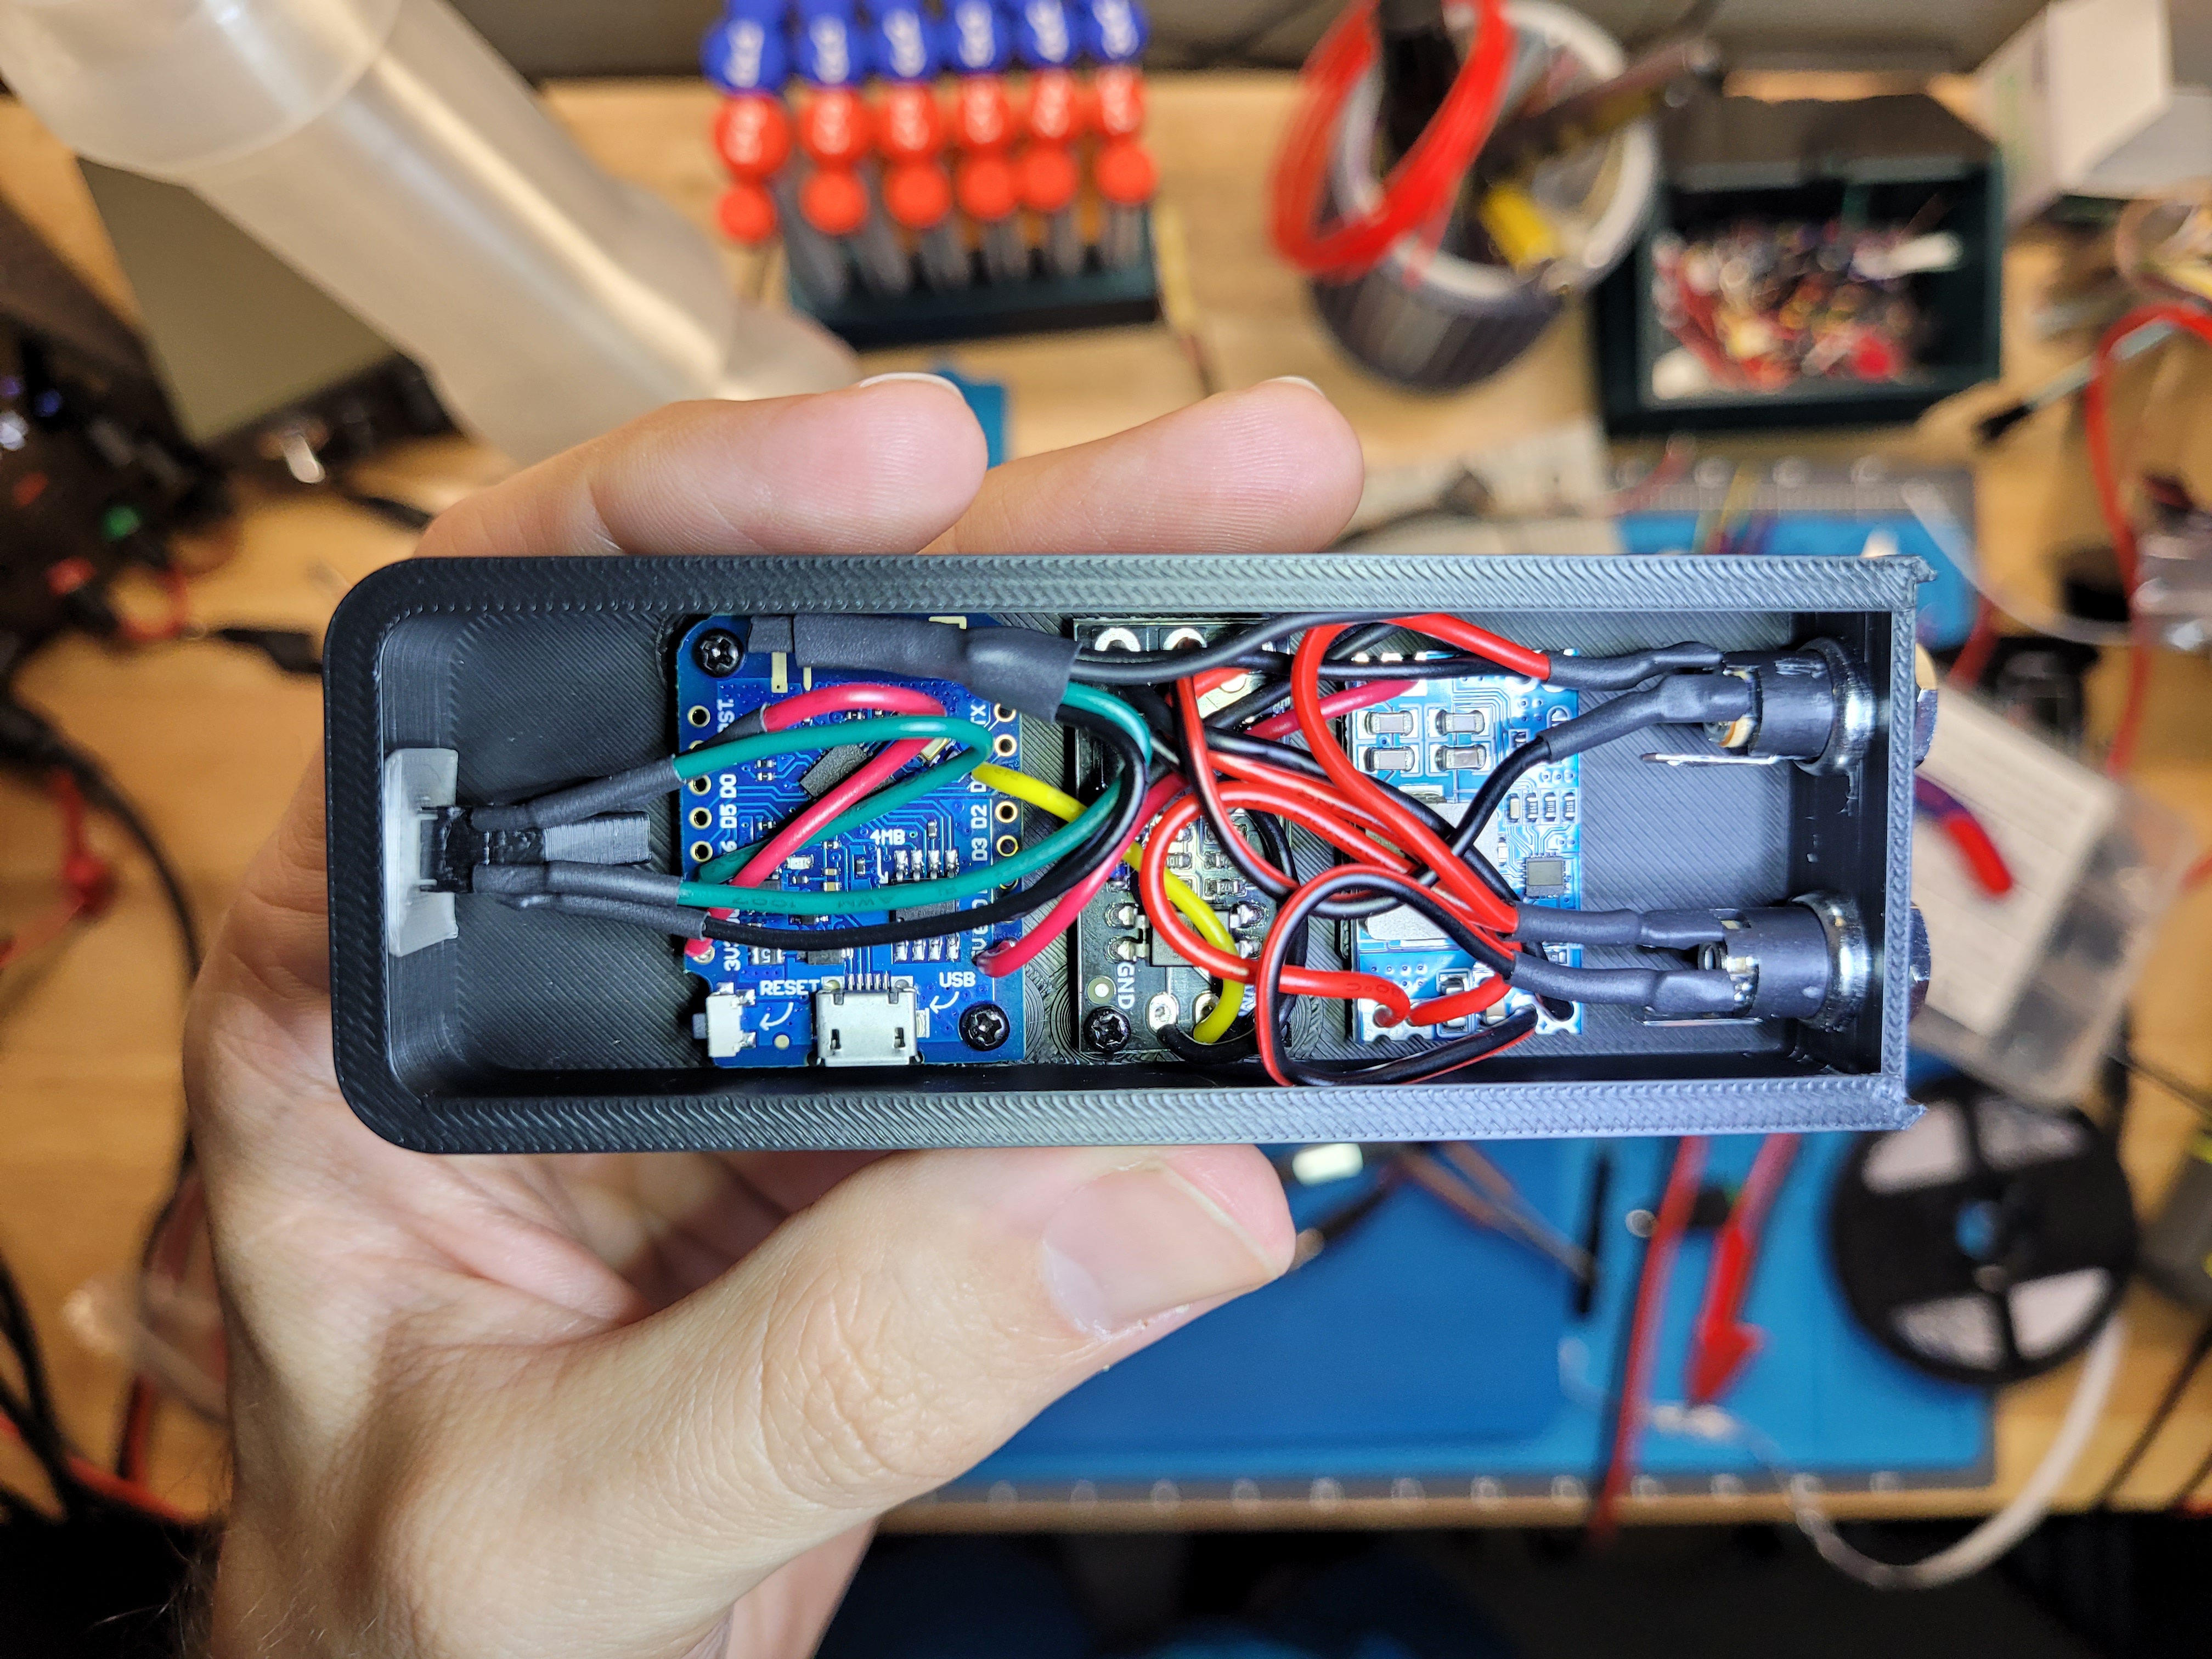
These wire colors do not match my diagram, sorry!
With everything wired up, use a pad of VHB tape to hold down the Mini560, screw down the AOD and D1 Mini, use the nuts to secure the DC jacks. The button cap should be put over the button before installing. Use a spot of glue (your choice, I used hotmelt) to secure the micro switch in the little cradle. It will be a tight fit, but you should be able to click the button. Dry fitting this first might be a good idea!
INSTALLATION
This is designed to hang from a shelf or other overhang and slide back on the dovetails. I would suggest putting the two pieces together and finding exactly where you'd like it to be, then carefully slide the bottom off while holding the top in place to mark where you want to screw it in. Make sure the heads of your screws sit very flush, else they might impact the body of the switch when you try to install it.
Once it's in place, simply plug your power supply in to the “IN” side and your LEDs in to the “OUT” side. I soldered my LEDs together in a chain using those cut up extension cords to connect them together segment by segment, then hid the wires behind the shelves of my filament rack.
USAGE
If you use the configs I have provided, the button serves the following functions:
- Single tap - on/off
- Double tap - rotate between 10% and 100% duty cycle
- Press and hold - continuous dimming (brightness ramping)
Otherwise, it's regular ‘ol WLED so you can configure it through the WebUI or phone app to your heart’s content. For a while I had it set that double-tap would set to 50% brightness and activate a 10 minute timer (slowly dim to off over 10 minutes), but I decided I liked it better as a toggle.
Under-Shelf Smart Light Controller

Publicado em 24 de fev de 2025